Showing posts with label mushrooms. Show all posts

Monday, January 27, 2025

Chicken with mushrooms and peppers


How about a quick, easy and healthy dish for dinner? It starts with chicken "tenders." I thought I was buying larger pieces of boneless, skinless chicken but when I unwrapped the package, there they were -- "smallish" pieces of chicken. I knew they'd cook quickly, and I'd need to give them a flavor boost to avoid a bland dish. So I rubbed on a little olive oil, seasoned them generously, and gave them a quick saute on high heat.
I removed them from the pan before they were cooked through, then cooked the vegetables and added the chicken back, with some stock and a little cornstarch to thicken.
Sit down to a delicious dinner in a half hour start to finish.


Click here to connect with me on Instagram and find out what’s cooking in Ciao Chow Linda’s kitchen each day (and more)

Chicken With Mushrooms And Peppers

1 lb. chicken "tenders"

2 tablespoons olive oil to coat the chicken

1/2 teaspoon seasoned salt (I make my own in the summer with dried homegrown herbs and sea salt)

dash of black pepper

1/8 teaspoon garlic powder

2 more tablespoons olive oil to saute the chicken and vegetables

1 red pepper, sliced thinly

8 ounces mushrooms, sliced

1/4 cup sliced onions

1 large garlic clove

1/4 cup chicken stock

1 teaspoon cornstarch

parsley, minced (to garnish)

Smear the olive oil over the chicken pieces, then sprinkle with the seasonings. Saute the pieces on high heat in olive oil until lightly browned. Remove chicken pieces and add vegetables and garlic to the pan, cooking on medium heat until softened. Mix the chicken stock with the cornstarch. Add the chicken back to the pan and pour in the chicken stock/cornstarch mixture. If too thick, add a little more stock or water. Mix everything together until coated. Sprinkle with minced parsley. Serve over rice or noodles, if desired.

Friday, April 29, 2022

Artichoke Mushroom Lasagna

I love all kinds of lasagna – from Italian-American style red-sauce, ricotta-filled lasagna, to the traditional Italian lasagna from Emilia-Romagna that uses no ricotta but béchamel sauce instead. This recipe is the latter, and with spring upon us here in the Northeast U.S., artichokes are in season so why not make them the star of the dish? I added mushrooms too, but you can eliminate them and just feature artichokes. Feel free to trim and cook fresh artichokes, but they’re also available frozen, which is what I used, and they are a huge time-saver.

However, I did make my own pasta from scratch and it’s a game changer. If you don’t want to make your own pasta, a good substitute is a brand like Rana that’s as close to homemade as I’ve ever found (but there’s nothing like freshly homemade pasta for its toothiness and supple texture.)

Make the pasta and let it sit while you prepare the rest. You’ll use only half this amount of pasta for this recipe. Use the rest to make fettuccine or fazzoletti or whatever other shape you like.

After making the pasta, sauté the mushrooms. Make sure to cook them on high heat and leave them alone rather than continually tossing them, so they develop a nice brown outer coating.

Set the mushrooms aside in a bowl and saute the shallots and artichoke hearts in the same pan, then combine them all in a bowl. Cut some of the artichokes in half if they’re too thick.

Time to make the béchamel sauce. Place the butter in a pan with the flour and cook those together for a couple of minutes to eliminate a “flour-y” taste. Then slowly add the milk, the broth (if using), the bay leaf and other seasonings, whisking all the time. I don’t like the béchamel to become too thick, because the pasta absorbs a lot of it and the lasagna can easily become too dry if the sauce is too thick. So don’t let it get as thick as pudding, for example. If it does, thin it out with more milk or broth. It should closer in thickness to pourable brown gravy.

Now that the béchamel is made, boil the pasta sheets. They will need only a minute in the boiling water, since they’ll cook more in the casserole once it’s in the oven. Drain well, and/or pat dry.

Butter the casserole first, then pour in a little béchamel. Place the first layer of pasta in the casserole, cutting to fit.

Add half the mushroom and artichoke mixture, more béchamel, some parmesan and dabs of taleggio cheese.

Add another layer of pasta, cutting to fit.

Then layer on more béchamel, the rest of the mushrooms and artichokes, and more parmesan and taleggio.

Cover with another layer of pasta and the rest of the béchamel, more parmesan and more taleggio cheese. (A diet dish this is not!)

Bake in the oven at 350 degrees for 1/2 hour-40 minutes until browned on top and piping hot. I know it will be hard to resist cutting into it right away, but let it rest for at least 15 minutes before trying to slice it, or it will spill out and not hold its shape.


Click here to connect with me on Instagram and find out what’s cooking in Ciao Chow Linda’s kitchen each day (and more)

Artichoke Mushroom Lasagna
Author: Ciao Chow Linda
Ingredients
  • FOR THE PASTA:
  • 3 eggs
  • 2 cups 00 flour
  • (or buy already made lasagna sheets)
  • FOR THE FILLING:
  • 4 cups baby portobello mushrooms, sliced
  • 2 tablespoons buttter
  • 2 10-ounce packages frozen artichokes
  • 1 large shallot, finely minced
  • 1/4 cup olive oil
  • a couple of sprigs of fresh thyme
  • salt, pepper
  • 7 ounces Taleggio cheese
  • 1 cup grated parmesan cheese
  • FOR THE BECHAMEL SAUCE:
  • 1/2 cup butter
  • 1/3 cup flour
  • 4 cups milk or 2 cups milk and 2 cups vegetable broth
  • 1 bay leaf
  • salt, pepper
  • a few grindings of grated nutmeg
Instructions
  1. Make the pasta by placing the flour in the food processor add adding the eggs.
  2. Hold back about 1/2 cup flour and add it after you’ve mixed the initial flour and eggs to see if you need to add more.
  3. If it’s too wet, add more flour, even more than the 1/2 cup you reserved,if needed.
  4. The dough should not be sticky, but should not be dry either.
  5. You want it to be pliable enough to roll out.
  6. I like to remove it from the food processor and knead it a minute or two on the board.
  7. Wrap the dough in plastic wrap and let it rest at least 1/2 hour to let the glutens relax.
  8. Roll on a pasta machine to the next to the last thin setting.
  9. When ready to assemble the lasagna, boil the pasta for just a minute, then drain and pat dry.
  10. It will continue to cook the rest of the way in the oven.
  11. FOR THE FILLING:
  12. Boil the artichokes in water for five minutes.
  13. Drain the artichokes, and remove from the water, but retain the water and let it reduce so you can use the flavored water in the bechamel sauce later.
  14. If the artichokes are too thick, slice them thinner.
  15. Place the butter in a skillet on high heat and add the mushrooms.
  16. Let them sear on high heat to get some color and caramelization.
  17. Remove from the heat and place the mushrooms in a bowl.
  18. Lower temperature of pan.
  19. Add the olive oil and the minced shallots and sauté until the shallots are wilted.
  20. Add the cooked artichokes and seasonings.
  21. Saute with the olive oil and shallots for a few minutes.
  22. Add the artichokes to the bowl with the mushrooms.
  23. TO MAKE THE BECHAMEL:
  24. Melt the butter in a saucepan.
  25. Add the flour and stir with a spoon or whisk and let the flour cook for a minute or two.
  26. Slowly add the milk and the vegetable broth (or just milk alone if not using vegetable broth.)
  27. Add the bay leaf and other seasonings and let them meld together.
  28. Keep stirring with a whisk to make sure there are no lumps.
  29. Remove the bay leaf.
  30. Set sauce aside and assemble lasagna.
  31. TO ASSEMBLE:
  32. Spread some of the béchamel sauce on the bottom of a lasagna pan or casserole.
  33. My lasagna dish measured 9″ x 11 1/2 “
  34. Add one layer of the pasta.
  35. Cover with half of the artichoke and mushroom mixture.
  36. Dabble with some of the Taleggio cheese.
  37. Spread with more of the bechamel sauce and some of the parmesan cheese.
  38. Add a second layer of pasta, the rest of the artichoke and mushroom mixture.
  39. Dabble with more taleggio cheese, bechamel and parmesan.
  40. Cover with another layer of pasta, then spread the rest of the bechamel, parmesan and taleggio cheese on top.
  41. This can all be done one day ahead of time and refrigerated.
  42. On the day of serving, remove from refrigerator and let sit for one hour on the counter to bring to room temperature.
  43. Place covered with aluminum foil, in a 350 degree oven for 20 minutes.
  44. Remove the foil and bake for another 15-20 minutes or until the top is browned.
  45. Remove from the oven and let the lasagna rest at least 15 minutes before serving.


Thursday, January 7, 2021

Pork Chops in a white wine-mushroom sauce

There are days when you have no idea what to eat until an hour before dinner when you open the refrigerator to see what’s languishing in its depths. This recipe springs from such a day, when I had defrosted the pork chops and found some mushrooms in the fridge, on the brink of spoiling. Hunting around for the other ingredients was easy since there’s always wine and chicken broth in the house. If you haven’t got any chicken broth go ahead and substitute a little water instead. If you haven’t got white wine, dry sherry or marsala could easily be substituted, although the taste would be dramatically different with the sweetness of marsala. Get the rice going before you start this dish though, because it will take you only a half hour start to finish.

Click here to connect with me on Instagram and find out what’s cooking in Ciao Chow Linda’s kitchen each day (and more)

Pork Chops in a white wine-mushroom sauce
Author: Ciao Chow Linda
Ingredients
  • 2 pork chops, trimmed of most of the fat around the edges
  • 1 tablespoon olive oil
  • salt, pepper
  • 1/2 lb. sliced mushrooms, crimini or baby portobello (or whatever you like really)
  • 2 tablespoons butter
  • 1 large shallot, minced
  • 2 cloves garlic, minced
  • 1/2 cup dry white wine
  • 1/4 cup chicken stock
  • 1 small squirt of Kitchen Bouquet, optional
  • 1 tablespoon cornstarch, mixed with a little water or chicken broth
  • salt, pepper, minced parsley
Instructions
  1. Pat the pork chops dry with a paper towel and season with salt and pepper.
  2. Add the olive oil to a skillet and when it is hot, add the pork chops and let them brown for a couple of minutes on each side.
  3. Remove after they start to turn brown.
  4. Do not cook them all the way through.
  5. Add the butter to the skillet, then the sliced mushrooms.
  6. When the mushrooms start to become a little limp, add the shallots and garlic, season with salt and pepper, and cook until transparent.
  7. Put the pork chops back into the skillet with the mushrooms then pour in the wine and chicken stock.
  8. Add the Kitchen Bouquet, if you have it.
  9. Lower the heat to a slow simmer and cook just until the pork chops are cooked through. It should take no more than five minutes.
  10. Mix the cornstarch with a little water or chicken broth and add to the pan a little at a time, until the sauce starts to thicken.
  11. Sprinkle with parsley and serve with rice or noodles or mashed potatoes.


Wednesday, October 28, 2020

Saffron Fazzoletti with Sausage and Mushrooms


Fazzoletti (the Italian word for handkerchiefs) is a pasta I’ve been wanting to make for a long time, after eating it years ago at Le Virtù, a favorite Philadelphia restaurant. I finally got in the fazzoletti-making mode a couple of weeks ago and decided to channel fall flavors, with sausage and mushrooms in the sauce. But to kick it up a further notch, I added saffron to the dough. Saffron is expensive here in the states, but a little goes a long way. It’s a lot less expensive in Italy, and it’s much fresher if you buy it near the source (Abruzzo is famous for its saffron from Navelli). So whenever I’m in Italy, I buy saffron, whether in a pretty little ceramic container, as I bought in Santo Stefano di Sessanio, or in paper packages, that you can find in any supermarket in the country. One of my very favorite ways to use it is in the classic risotto alla Milanese, a recipe I wrote about here.

The dough is made with OO flour, the gold standard when making pasta, with its fine, soft grain and high gluten content. I added two of the small glassine envelopes of saffron to the dough, after dissolving it in a tablespoon of warm water. And yes, you can taste the saffron in the pasta, although it is subtle. Dump everything into a food processor, leaving some of the flour aside because when you’re making an egg/flour pasta,  it’s much easier to add more flour to a wet mixture than add more eggs to a dry pasta mixture. Feel free to mix it on the countertop, but you’ll need a lot more muscle. Even with the food processor, take it out and knead it on the counter, adding more flour if it’s too sticky, and kneading it until it’s as soft as a baby’s bottom. Cover it and set aside for at least a half hour, which gives the gluten time to relax and do its thing. It’ll be much easier to work with as a result.

This is the amount of pasta I made using the recipe below. 

As you can see, I made about a dozen fazzoletti, that each measured 4″ x 4″, plus a lot of pappardelle that I plan to use in a separate recipe. Of course, you can always buy packaged pasta, or even fresh pasta in the refrigerated section, but you’ll have a hard time finding fazzoletti pasta, and there’s nothing quite so delicious as home made. I had a few scraps left over and cut them into thin spaghetti that I’ll most likely use in chicken soup.

The sauce comes together quite quickly, with some olive oil, herbs, sausage, shallots and mushrooms, all cooked in one pot.

Lift the cooked fazzoletti from the boiling water directly into the sauce, letting some of the water come along with it. Stir and mix everything together gently so you don’t rip the pasta. Add more of the pasta water, if needed.

Serve on a large platter, sprinkled with a drizzle of olive oil, some parmesan cheese and minced parsley.

Wait till you bite into this toothsome, yet silky pasta with these complementary flavors. If you’re like me, you’ll have a hard time stopping at one bowl.

Click here to connect with me on Instagram and find out what’s cooking in Ciao Chow Linda’s kitchen each day (and more)

Saffron Fazzoletti with Sausage and Mushrooms
Author: Ciao Chow Linda
Ingredients
  • FOR THE PASTA:
  • 2 cups flour
  • 4 eggs
  • 2 packages (glassine envelopes) of saffron
  • 1 tablespoon hot water
  • FOR THE SAUCE
  • 1 1/2 links of sweet Italian sausage (about 1/2 pound)
  • 8-10 small portobello (or cremimi) mushrooms
  • 1 shallot, minced
  • 1 garlic cloves, minced
  • 1/4 olive oil
  • fresh sage leaves
  • fresh thyme leaves
  • salt, pepper
  • minced parsley
  • a little pasta water
  • parmesan cheese
Instructions
  1. Dissolve the saffron in the hot water.
  2. Place the flour (keep 1/2 cup of the flour aside) and eggs and the watered down saffron into a food processor (or mix by hand if you have the strength).
  3. If the dough is too sticky, add the rest of the flour, a little at a time.
  4. When the mixture has turned into a ball, remove to a wooden board.
  5. Knead a bit more (keeping flour on the board) until the dough is smooth.
  6. Shape it into a ball (or two balls) and wrap in plastic wrap, or keep covered under a bowl.
  7. Let the dough rest for a half hour.
  8. When ready to shape the dough, roll it by hand to a thin consistency, or using a pasta machine, roll it to the smallest number on the setting.
  9. For the fazzoletti, cut into 4 inch squares.
  10. This recipe makes a lot of fazzoletti, but you can shape some of it into fettuccine, or pappardelle or other shapes and reserve for other meals.
  11. I used 12 fazzoletti for two people and it was plenty for a meal.
  12. If you’re making it as a first course, you will want fewer fazzoletti for two people.
  13. Boil the fazzoletti in ample salted water and add to the sauce.
  14. FOR THE SAUCE;
  15. Add half the olive oil to a large saucepan.
  16. Heat to a medium heat, and add the sausage, crumbling it into pieces, and removing the casing.
  17. Wash the mushrooms and cut into quarters.
  18. Add the mushrooms to the sausage and when almost cooked, add the minced shallot and garlic.
  19. Add the fresh sage leaves and thyme leaves and let everything cook for about 10 minutes.
  20. Start cooking the fazzoletti in the boiling water.
  21. They should take only a few minutes to cook.
  22. Meanwhile, if the sauce looks too dry, add some of the pasta water.
  23. Drain the fazzoletti and add to the sauce.
  24. Don’t worry if some of the water comes along with it.
  25. Gently stir the pasta into the sauce, letting it absorb the flavors, and reducing the water.
  26. Season with salt and pepper.
  27. When the water is nearly all gone, add the rest of the olive oil.
  28. Toss gently into a serving bowl, and sprinkle with grated parmesan cheese and minced parsley,


Monday, October 12, 2020

Gnocchi with Butternut Squash, Mushrooms and Crispy Sage Leaves

I love carefree summer days at the beach, but when autumn rolls around, and some of my favorite foods are at their peak — like butternut squash — I enjoy spending more time in the kitchen. Pumpkins and squash are so redolent of crisp fall days, of Halloween, heartier cooking and family time. Unfortunately, Covid has severely limited family time, although we were all tested recently so we could gather for my granddaughter’s second birthday – YEA!!! I decided to make gnocchi for the occasion, one of my husband’s all-time favorite meals, and I knew it would be equally welcomed by my son, daughter-in-law, and granddaughter. The recipe is included below, but if you want a photographic step-by-step tutorial on making potato gnocchi, click here.  If you haven’t got a gnocchi paddle, a little wooden implement that makes these ridged impressions, you can easily use a fork to roll them, as my mom always did when I was growing up — or even the rough edges of a cheese grater.

Getting the right consistency is the key to successful gnocchi, and it helps to have a “feel” that comes after you’ve made them a number of times. Too much flour and they’re leaden. Too little flour and they disintegrate in the water. So after you’ve mixed the dough, make a few gnocchi and test them out by boiling them in water. You’ll know right away if you need to add more flour. It’s so much easier to add more flour, but if you’ve already added too much, then you’ve got a problem. You can make these ahead of time, but refrigerate them on floured dishcloths if you’re making them the day before you serve them. You can freeze them too, but in my experience, they sometimes attract too much water from the freezer and fall apart when later boiled in water. Instead, I boil them to start with, drain them on paper towels or dishcloths, then lay them on cookie sheets and put the cookie sheets in the freezer. After the gnocchi have individually frozen, you can pull them off the paper towels or dishcloths, and pop them in plastic bags, ready to be reboiled again whenever you want to serve them. They seem to retain their consistency better, at least for me.I wanted to showcase some fall flavors with the gnocchi, so I cut up some butternut squash (I’ve used honeynut squash too, which I love) and some mushrooms. Roast at high temperature after you’ve drizzled with olive oil, salt and pepper. You can do this ahead of time too, even the day before, and just set it all aside in the refrigerator until you need it.

Fry up some sage leaves in olive oil, drain on a paper towel, and sprinkle with salt. They’re hard to resist as a crunchy snack, so make a bunch if you have enough sage to spare.

Melt the butter in a large pan, add some fresh sage leaves and let the butter absorb the sage flavor for a couple of minutes. Then add the roasted squash and mushrooms, and scoop the cooked gnocchi directly from the boiling water into the pan with the butter and vegetables. Don’t worry if some water comes along with it. In fact, reserve a bit of water to add in order to get a little more “sauce.” Toss everything gently, and remove the sage leaves, which have become soggy. Serve with grated parmesan cheese sprinkled on top, and some crispy sage leaves on the side.

It’s a family favorite, as you can see from my little granddaughter. They was worth making just to see her sweet little smile.


Click here to connect with me on Instagram and find out what’s cooking in Ciao Chow Linda’s kitchen each day (and more)

Gnocchi with Butternut squash, Mushrooms and crispy sage
Author: Ciao Chow Linda
Ingredients
  • FOR THE GNOCCHI:
  • 5 large brown-skinned baking potatoes
  • 2 large eggs
  • 1 t. salt
  • 1/4 t. white pepper
  • pinch of grated nutmeg
  • 1/2 c. parmesan cheese
  • 2 cups flour (or more if needed)
  • FOR THE ROASTED SQUASH AND MUSHROOMS:
  • 1 1/2 cups honeynut or butternut squash
  • a handful of mushrooms (cremini, baby portobello or button mushrooms)
  • 2 tablespoons olive oil
  • seasoned salt, pepper to taste
  • FOR THE SAUCE:
  • 8-12 tablespoons unsalted butter
  • a dozen sage leaves
  • some water from boiling the gnocchi
  • grated parmesan cheese
  • FOR THE CRISPY SAGE LEAVES:
  • olive oil
  • sage leaves
Instructions
  1. FOR THE SQUASH AND MUSHROOMS:
  2. Cut the squash into small pieces, cut the mushrooms into halves, or quarters if large, and toss with the olive oil and seasonings.
  3. Roast in a 475 degree oven for 10 minutes, or until the pieces are tender.
  4. FOR THE CRISPY SAGE LEAVES:
  5. Place a little olive oil in a shallow saucepan and when it’s hot, add the sage leaves.
  6. Fry for a minute or two and flip, removing to a paper lined plate.
  7. Sprinkle salt on them immediately and set aside.
  8. FOR THE GNOCCHI:
  9. Bake the potatoes uncovered in a 375 degree oven for about an hour or until done.
  10. Remove from oven and when you can handle them, peel them.
  11. Put chunks of the potato through a ricer and spread on a cookie sheet.
  12. Let it cool completely, then mix with the eggs, salt, pepper and nutmeg and cheese.
  13. Add flour, 1/4 cup at a time.
  14. You may not need all 2 cups flour, or you may need more.
  15. Just add enough until the dough comes together and you can easily roll it into a big “log.”
  16. Cut the log into four or five pieces, then take each piece and roll it out like a snake, about 1/2 inch to 3/4 inch thick.
  17. Using a knife, cut off some pieces of the roll, maybe about 1/2″ each.
  18. Take each 1/2″ gnocco and make an imprint on it, using either a fork or a gnocchi paddle.
  19. At this point, you can refrigerate if not using immediately — even overnight.
  20. Bring water to a rolling boil, add salt and the gnocchi and let simmer gently until they rise to the top.
  21. The recipe makes about 225 gnocchi so freeze half if you like.
  22. If I’m planning to freeze some, I actually cook them all in the water, then drain them on paper towels, place half on a cookie sheet and put those in the freezer. When they have frozen hard, I move them to a plastic bag and keep them in the freezer until I need them.)
  23. FOR THE SAUCE AND TO ASSEMBLE:
  24. Melt the butter in a saucepan, then add the sage leaves, letting them simmer a few minutes to impart their flavor.
  25. Then using a slotted spoon, remove the gnocchi from the water and place them directly into the pan with the melted butter and sage leaves.
  26. Don’t worry if a little water comes along when you ladle out the gnocchi, in fact, it’s good to add a little of the water to the sauce.
  27. Add the roasted squash and mushroom pieces, and gently stir everything together.
  28. Place everything into a serving bowl, sprinkle with parmesan cheese and scatter the crispy sage leaves on top.


Monday, October 30, 2017

Wild Mushroom Bruschetta

What a wonderful surprise I got last week when a friend dropped off some wild mushrooms at my door! It brought back memories of childhood when my dad and brother would come back from foraging in the woods for morels or chanterelles. No one in my family does that any longer, and while I eat plenty of supermarket mushrooms, they’re quite bland compared to the woodsy flavor of a wild mushroom mix. My friend Polly bought these for me at a farmer’s market in Chestnut Hill, Pa., and they include half of a lobster mushroom (the red one), shitake mushrooms (the brown caps), oyster mushrooms (the kind of frilly ones) and enoki mushrooms (the white ones with teensy caps).
The big question was what to make with these beauties? Risotto, mushroom stew, pasta with mushrooms? So many ideas swirling in my head, but in the end I decided to chop them up and make wild mushroom bruschetta. They would be a perfect accompaniment for the rest of the meal planned for dinner, but they would certainly make a fine appetizer on their own to have for company too. After sautéeing the mushrooms in butter with some shallots, garlic and herbs, I combined the mixture with some grated fontina cheese and spread it over some toasted bread. Then I popped it under the broiler for a few minutes.The result was a bruschetta with intensely flavored mushrooms smothered with melt-in-your mouth fontina cheese. Make them on smaller toasts for individual canapés to have with drinks. But make sure you use a good quality sturdy bread for these. How can you resist digging into this?

Wild Mushroom Bruschetta

Ingredients
  • mixed wild mushrooms – I used about two cups chopped
  • 1 shallot, finely minced
  • 1 large clove garlic
  • 2 Tablespoons butter
  • 1/4 cup dry white wine (or dry sherry)
  • salt, pepper
  • a small amount of minced herbs – I used rosemary, thyme and sage
  • 1/2 – 3/4 cup grated fontina cheese
  • Slices of good sturdy bread, toasted
Instructions
  1. Sweat the onions in 1 tablespoon butter until softened, and add garlic.
  2. Cook for a couple of minutes over low heat.
  3. Add the chopped mushrooms and another tablespoon of butter.
  4. Sauté the mushrooms over medium heat and when they start to shrink, add the white wine and turn up the heat to high.
  5. Stir over high heat for a couple of minutes, then lower heat and add the salt, pepper and herbs. Remove from heat and mix in the grated fontina cheese.
  6. Pile onto toasted slices of bread and put in the broiler until cheese melts.


Monday, December 8, 2014

Puff Pastry Bites, Uncommon Goods and a Giveaway


With the holidays approaching, you might want to have a few recipes for appetizers at the ready. These puff pastry bites couldn't be easier. They freeze well too. You use packaged puff pastry dough, and in my case, leftover vegetables. I already had some roasted butternut squash, swiss chard, mushrooms and caramelized onions for the gnocchi dish I posted here. But I had more than I needed, so I transformed the leftovers into these appetizers. Use any vegetables you like - artichoke hearts, broccoli bits or spinach also come to mind. Add some cheese too, for a richer taste. For the ones below, I just cut the pastry into little squares and popped them into a mini muffin tin, then filled them with the squash and caramelized onions before baking.


For these spirals, I rolled out a sheet of the puff pastry and spread it with a mixture of the chopped Swiss chard and mushrooms. Then I added a layer of asiago cheese and rolled it up like a jelly roll, sliced it and baked it.


I served them on these handsome slate boards that were sent to me by Uncommon Goods. The company sells a variety of high quality gifts, for men, women and children. You'll find a plethora of holiday shopping ideas on their website, including these beautiful slate boards.


They're made by Brooklynites whose family has owned a quarry in upstate New York for three generations. They're available in both a grey slate and a terra cotta color too and they look great when serving all sorts of food.


They're perfect for serving cheeses too, and arrive with pieces of chalk, especially useful if you're offering different kinds of cheeses.


  The company has a variety of other gifts available too, for both home entertaining or appropriate for gifting to men, women and children. Check out their site here.

Wouldn't you like to have one of these slateboards to use for your holiday entertaining? Just leave a message in the comments on the blog (NOT on email) saying whether you'd like the grey or terra cotta colored slate, and be sure to leave a way for me to contact you - email is best. I'll have the computer generate one lucky winner and the company will mail you the slate board a short time later. You'll love it!


Puff Pastry Bites

printable recipe here

1 package puff pastry, completely thawed

(I used leftover vegetable for the filling, but if you want to start from scratch use the following:)

2 T. olive oil

1/2 large onion, sliced thinly

1 cup butternut squash, diced into small pieces

2 T. olive oil

salt, pepper

fresh herbs, finely chopped (rosemary, thyme)


Sauté the onions in the olive oil until golden. Remove from the pan, set aside, but cut into small bits. Add 2 T. more olive oil and sauté the squash, adding a bit of water if the squash starts to stick to the pan. Season with salt, pepper and herbs, and when the squash is cooked through, add the onions back to the pan.

Spray a small muffin pan with non-stick spray. Cut the puff pastry in small squares and push them down into the spaces in the muffin pan. Fill with a mixture of the vegetables and bake in a 400 degree oven about 20 minutes or longer, or until the pastry is golden.


For the spirals, spread the puff pastry out flat then spread with the following:

chopped spinach that's been sautéed with minced onion, salt and pepper, mixed with sautéed, minced mushrooms (mine were leftovers). Spread some grated asiago cheese over the vegetables, then roll like a jelly roll. Cut into slices about 1/4 inch thick, then place on a cookie sheet and bake in a 400 degree oven about 20 minutes or longer, until pastry is golden.


Bookmark and Share


Friday, October 26, 2012

Butternut Squash Bread Pudding


 The headline is a misnomer. I should have called it Butternut Squash, Mushroom, Sausage and Kale Bread Pudding. But that was a mouthful - granted, it's a good mouthful, but too long for a title of this recipe. Anyway, it's that time of year when butternut squash is abundant -- a vegetable that just screams "fall." I love it in soups, simply baked with olive oil and salt, or gussied up in lasagna or casseroles like this one. I served this as a main course, with a salad alongside, but you could leave out the sausage and serve it as a side dish. Thanksgiving will be here before you know it and it would be perfect on the table alongside Tom turkey.


There are a number of steps, but it's easy to make ahead of time if you want. Keep the bread and the squash cubes in sizable chunks when you cut them - not too teensy so they don't disintegrate into unrecognizable pieces after baking. 


After all the ingredients are sautéed, sliced, etc. place them in a bowl.


Add the eggs and cheeses and mix everything together with a spoon.


This is what you end up with - a large casserole that feeds lots of people - at least a dozen if it's a side dish or six if it's a main course.


Or bake it in a lot of smaller dishes if you want individual portions.


Either way, it's delicious, so get busy. And dig in.


Butternut Squash Bread Pudding

printable recipe here


In the photos, I used 1 cup kale, but I'd use more next time I make it. You can add or subtract any of the vegetables, and even leave out the sausage to make it completely vegetarian.


3 cups butternut squash, cut into cubes

2 T. olive oil

salt, pepper

ground sage or seasoned sage salt* or herbs de provence

4 cups sturdy Italian or French bread (preferably a day old)

2 T. butter

2 T. olive oil

3/4 cup minced shallots

3 garlic cloves

1/2 pound Italian sausage

1/2 pound mushrooms, sliced

1 1/2 cup kale, chopped


1 cup half and half

2 cups milk

4 eggs

1/2 cup grated parmesan cheese

1 cup mozzarella or fontina cheese, shredded


*I make seasoned salt at the end of the summer, by harvesting a lot of herbs and blending them with kosher salt. Use any combination you have - rosemary, thyme, sage, lemon balm, etc. I went heavy on the sage last year and it makes a great seasoning for the Thanksgiving turkey as well as recipes like this.

Spread the mixture on a cookie sheet and let it air dry for a day or two. When the herbs are completely dried, place the mixture into the blender or food processor and blend finely before placing into jars.


For the bread pudding:


Cut the squash into cubes - not wimpy ones, but about 1 inch cubes. Oil a cookie sheet and toss the squash cubes in the oil. Season with salt, pepper and the dried sage or sage salt or herbs de provence. Go easy on the salt if using the sage salt. Bake at 375 degrees for about 40 - 45 minutes.


Cut the bread into large cubes and put it in the oven for about five minutes while the squash is cooking. Remove to a large bowl.


Meanwhile, saute the minced shallot in the olive oil and butter until wilted. Add the minced garlic and saute briefly until soft, then add the mushrooms and cook them through. When the mushrooms are browned and nearly done cooking, add the chopped kale and saute for a few minutes. If necessary, add a little more oil. Season all with salt and pepper, then remove from the pan and place all the cooked vegetables in the bowl with the bread.


Use the same pan to cook the sausage. Remove the casing from the sausage and break up the meat in the pan, cooking it through. Add a little more olive oil if there's not enough in the pan to keep the meat from sticking. Add the cooked sausage to the bowl with the vegetables, along with the squash when it is cooked through.


Whisk the eggs, then add the half and half and milk and stir in the cheeses. Pour the mixture into the bowl with the bread, the sausage and the vegetables and mix it all together with a wooden spoon. Let it sit for at least 10 minutes for the bread to absorb some of the liquid. You can even make everything to this stage and let it sit in the refrigerator overnight. Pour it into a greased casserole dish - mine was oval but it measures roughly 9 x 13 inches. Bake it at 375 for about 35 to 40 minutes. I also turned on the broiler near the end to achieve a little more browning. This also reheats very well as leftovers.


Bookmark and Share

Sunday, January 25, 2009

Fusilli with portobello mushrooms and ham

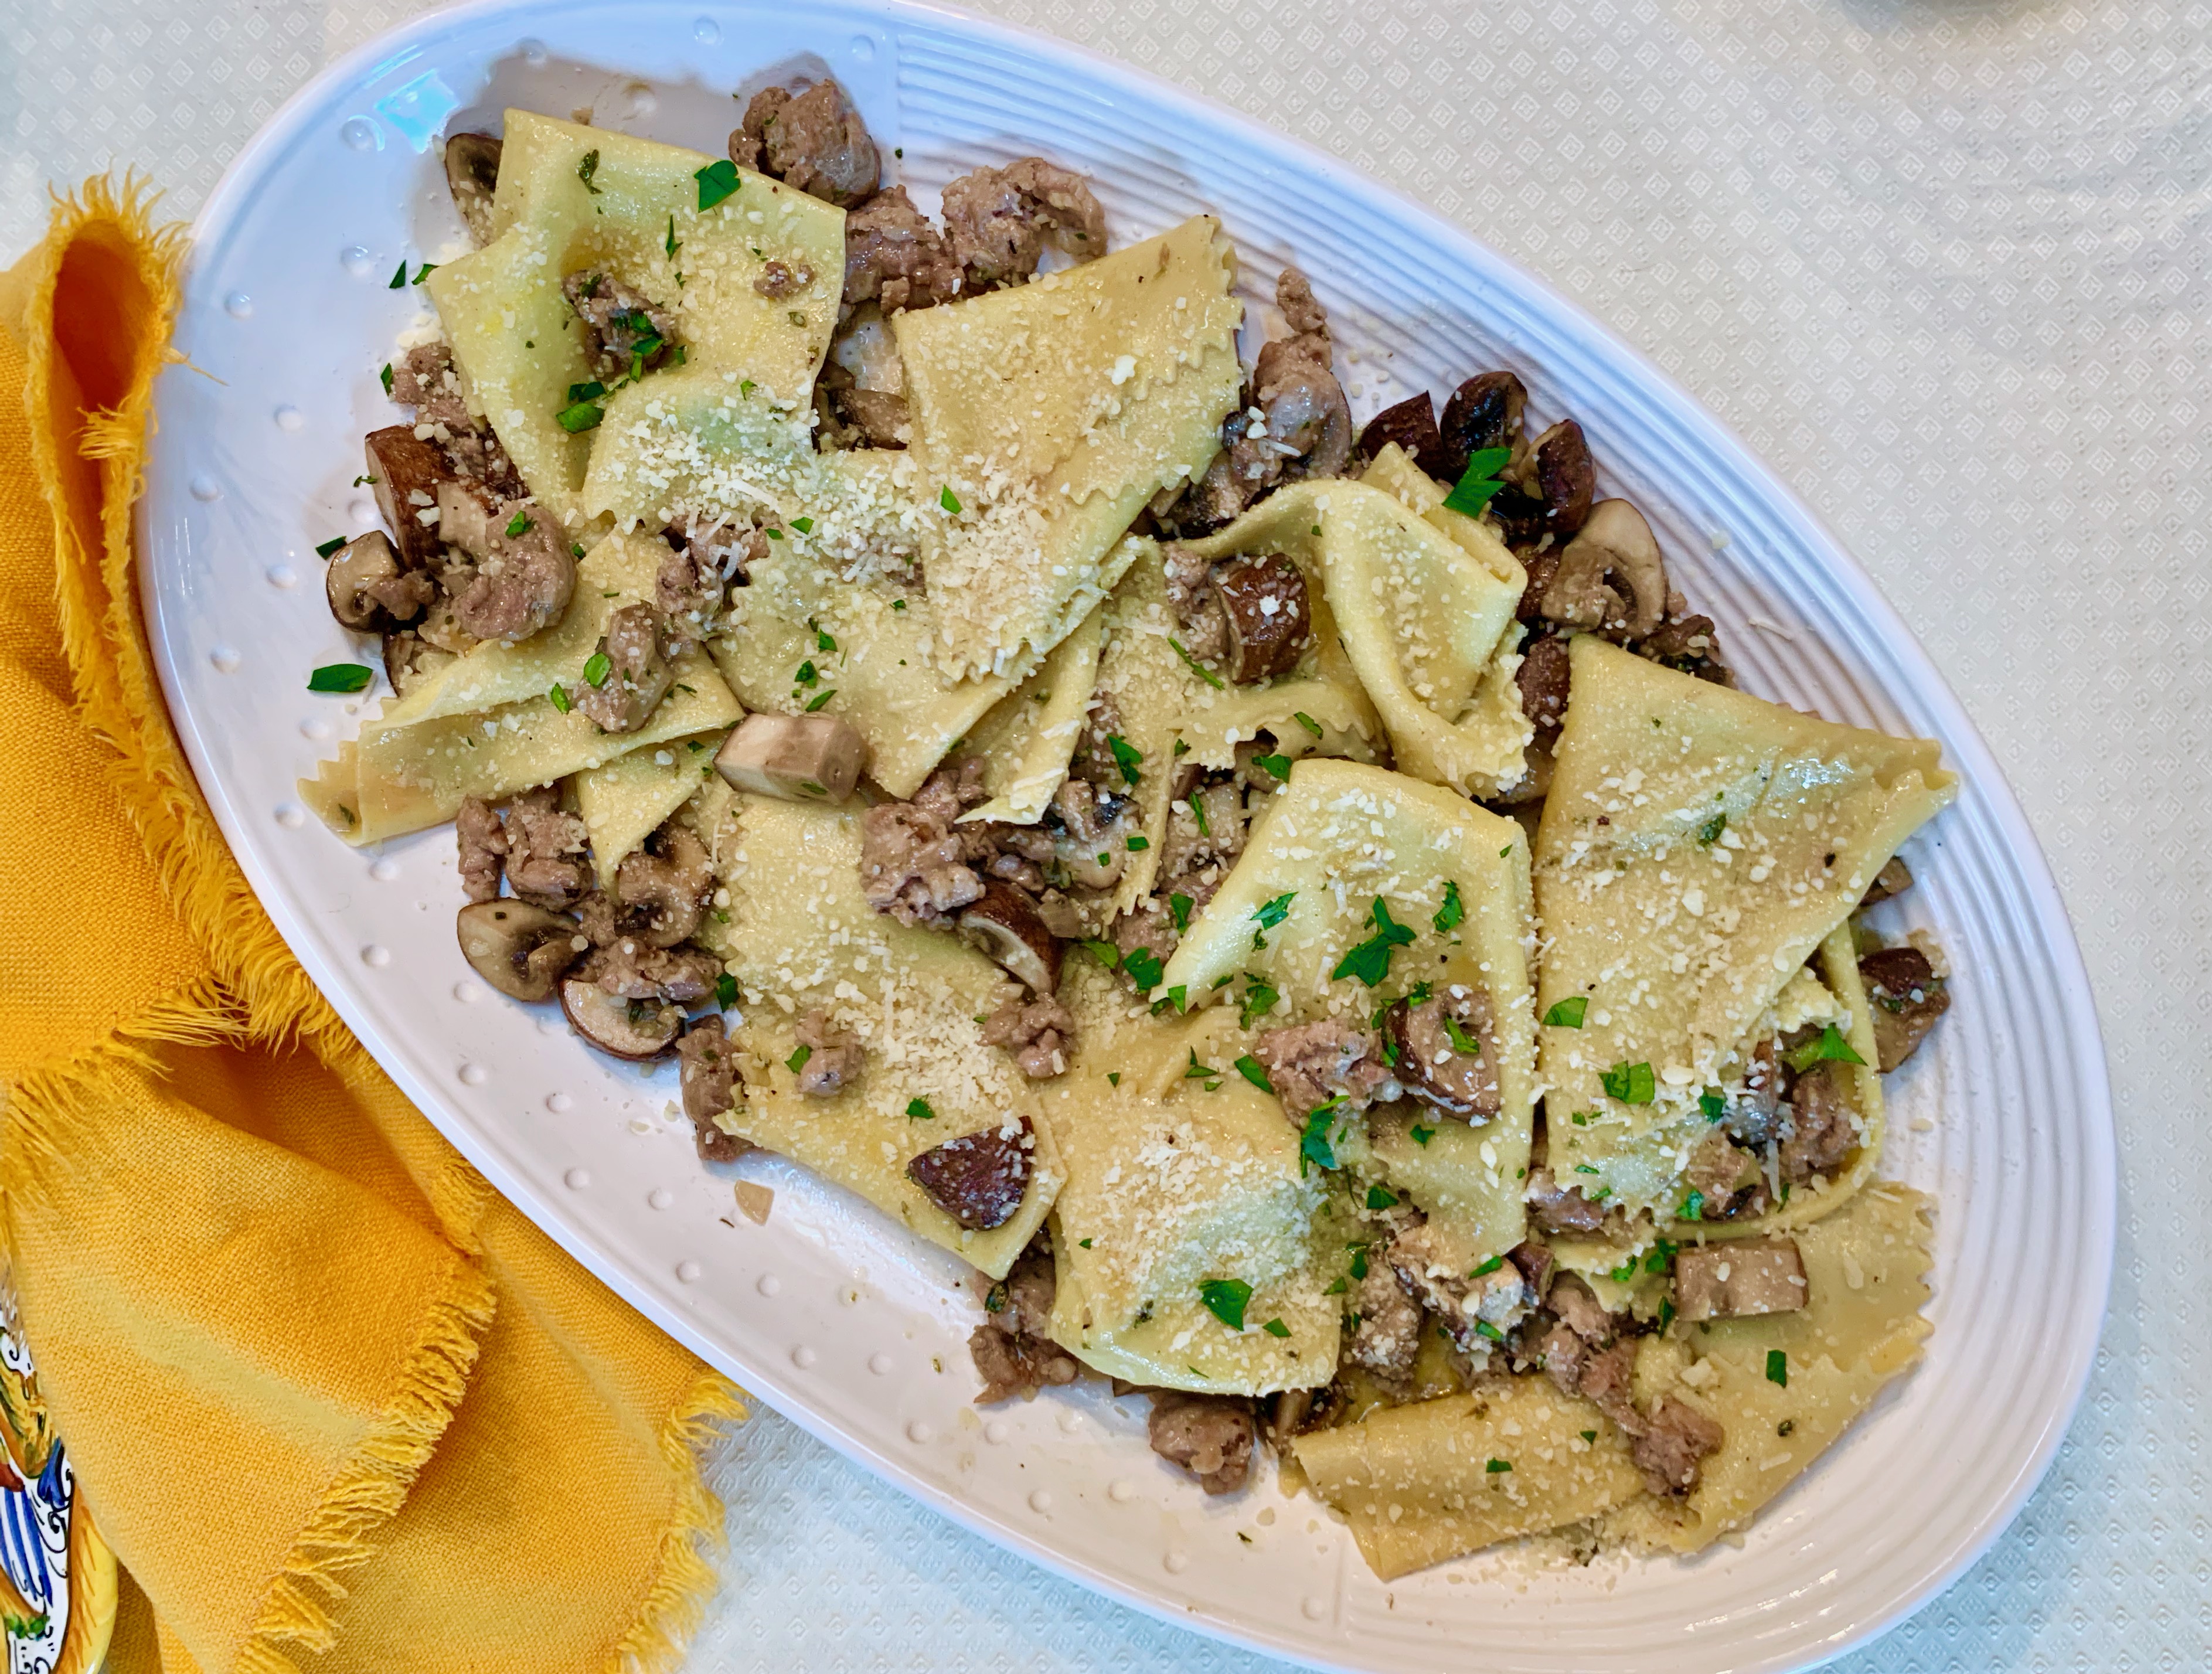
This dish was quickly thrown together with our first portobello mushroom harvest. I sliced the mushrooms, sauteed them in some olive oil and butter with a shallot and minced garlic, added a little white wine and some pasta water, salt and pepper and that was it. But it still needed some umph, which is why I thought to add the ham. If I were making this vegetarian, I'd kick up the heat with more cracked black pepper.

I had only a couple of slices of prosciutto cotto in the fridge, which was plenty for just two people. Prosciutto cotto is a very delicate cooked ham and could be kind of hard to find depending on where you live. But you could substitute regular baked ham, or even prosciutto crudo if you like. Another option that would be delicious is to fry up a slice of pancetta or bacon and add that. There are lots of variations, but to me, turning out a tasty dish with what you've got on hand is important - not only because you don't want to always be running to the store, but so that you learn to become resourceful and not waste anything either. It can lead to interesting combinations that you'd never have thought of otherwise.

I finished the dish off with a scattering of parsley and a dusting of freshly grated parmigiano cheese. Not bad for a quick meal, as my mother-in-law used to say.

For two people:

1/3 pound fusilli, or other pasta (or however much you eat)
about 3 cups sliced mushrooms
1 shallot, minced
1 garlic clove, minced
2 T. oil
2 T. butter
1/4 cup white wine
salt, pepper
2 slices prosciutto cotto, cut into bits
freshly grated parmesan cheese, to sprinkle on top
minced parsley

Get the water boiling and throw in the pasta.
Saute the shallot and garlic for a couple of minutes in the olive oil and butter, then add the mushrooms and saute until cooked through. Season with salt and pepper. Add the white wine and cook for a few minutes on high heat to reduce a bit. Add a little pasta water too at this time, but only a few tablespoons or so. As you can see from the picture, this is not a dish that is swimming in sauce, but you should have enough for a light coating of liquid. Lower the heat to a slight simmer until the pasta is finished cooking.

Drain the pasta and add it to the pot with the mushrooms, stirring around in the sauce to coat the pasta. Remove from the heat and put into a serving dish. Add the ham, top with parsley and parmesan cheese and serve.

Saturday, January 24, 2009

Habemus Fungus

We grew these!
At home.
In a cardboard box.

Yes, that's right, these delightful portobellos popped up as little brown buttons a few days ago and quickly er...... mushroomed to these large beauties in a couple of days.

I ordered the mushroom kit as a Christmas gift to my husband and another one for my father. There were quite a few companies selling the kits via the internet, but I ordered mine from a company in California. Email me if you want specifics.

I got the mushroom gift idea when we were traveling through the Italian Abruzzo countryside last fall. There we were on a country road, tootling along (is that a word?) when I see a sign with an arrow that says "Fungaia" (mushroom growing place).

"Stop the car," I shout. "Let's go find the mushrooms." Always up for a new eating or gardening discovery, my husband quickly turns the car around. We end up a few minutes later at the fungaia - a quanset hut with a sign out front instructing visitors to ring the bell for assistance. Which we did. A few minutes later, a very handsome young Italian man appears to show us inside - a vast space filled with what look like bales of hay and two different types of mushrooms sprouting all over them. After a tour of the fungaia and a brief stop at the shop next door, we leave with a basketful of fresh oyster mushrooms (pleurotis), and a jar of mushrooms preserved in olive oil to take back to the U.S. Worth the detour, wouldn't you say?

So back to the kit... A few days after Christmas my husband followed the easy directions that came with the box. Only a few simple instructions and we were off and waiting. We would have had our first crop earlier, if only we hadn't initially stored the box in a place that was a little too cool.

Fast forward a few days to the dining room - a warmer climate than the guest room - when the little buttons appeared. A few days later and we were ready to harvest our first crop. Which is just what I did earlier this week. The mushrooms are supposed to keep producing with two very large crops and then a tapering off to smaller harvests. When all the nutrients are exhausted, the fungi stop doing their thing and go to mushroom heaven, or a compost pit in our case.

In the meantime, I'm going to have fun turning these into some delightful eats. Look for a recipe to follow. That is, if you can peel your eyes off this good-looking Italian dude who works at the fungaia.