Monday, October 30, 2017

Wild Mushroom Bruschetta

What a wonderful surprise I got last week when a friend dropped off some wild mushrooms at my door! It brought back memories of childhood when my dad and brother would come back from foraging in the woods for morels or chanterelles. No one in my family does that any longer, and while I eat plenty of supermarket mushrooms, they’re quite bland compared to the woodsy flavor of a wild mushroom mix. My friend Polly bought these for me at a farmer’s market in Chestnut Hill, Pa., and they include half of a lobster mushroom (the red one), shitake mushrooms (the brown caps), oyster mushrooms (the kind of frilly ones) and enoki mushrooms (the white ones with teensy caps).
The big question was what to make with these beauties? Risotto, mushroom stew, pasta with mushrooms? So many ideas swirling in my head, but in the end I decided to chop them up and make wild mushroom bruschetta. They would be a perfect accompaniment for the rest of the meal planned for dinner, but they would certainly make a fine appetizer on their own to have for company too. After sautéeing the mushrooms in butter with some shallots, garlic and herbs, I combined the mixture with some grated fontina cheese and spread it over some toasted bread. Then I popped it under the broiler for a few minutes.The result was a bruschetta with intensely flavored mushrooms smothered with melt-in-your mouth fontina cheese. Make them on smaller toasts for individual canapés to have with drinks. But make sure you use a good quality sturdy bread for these. How can you resist digging into this?

Wild Mushroom Bruschetta

Ingredients
  • mixed wild mushrooms – I used about two cups chopped
  • 1 shallot, finely minced
  • 1 large clove garlic
  • 2 Tablespoons butter
  • 1/4 cup dry white wine (or dry sherry)
  • salt, pepper
  • a small amount of minced herbs – I used rosemary, thyme and sage
  • 1/2 – 3/4 cup grated fontina cheese
  • Slices of good sturdy bread, toasted
Instructions
  1. Sweat the onions in 1 tablespoon butter until softened, and add garlic.
  2. Cook for a couple of minutes over low heat.
  3. Add the chopped mushrooms and another tablespoon of butter.
  4. Sauté the mushrooms over medium heat and when they start to shrink, add the white wine and turn up the heat to high.
  5. Stir over high heat for a couple of minutes, then lower heat and add the salt, pepper and herbs. Remove from heat and mix in the grated fontina cheese.
  6. Pile onto toasted slices of bread and put in the broiler until cheese melts.


Monday, October 23, 2017

Cheese Making

I’ve rolled pasta, baked bread, canned fruits, jarred jams and fermented vegetables. I’ve fried cannoli, stretched strudel and brined turkeys. I’ve cleaned squid, octopus and even fed snails for a day to cleanse them before cooking. I’ve pounded lemon grass and ground spices for curry in Thailand, made macarons in Paris and caught cephalopods off the coast of Sardinia. But one of the things I’ve wanted to try, but hadn’t until last week was cheesemaking.

All that changed at the Farm Cooking School in Titusville, New Jersey, where I learned how to make four different kinds of cheese – mozzarella, ricotta, crème fraîche, and goat’s milk cheese. The class of about eight people gathered to learn from Ian Knauer, founder of the school, which I’ve written about in the past here.

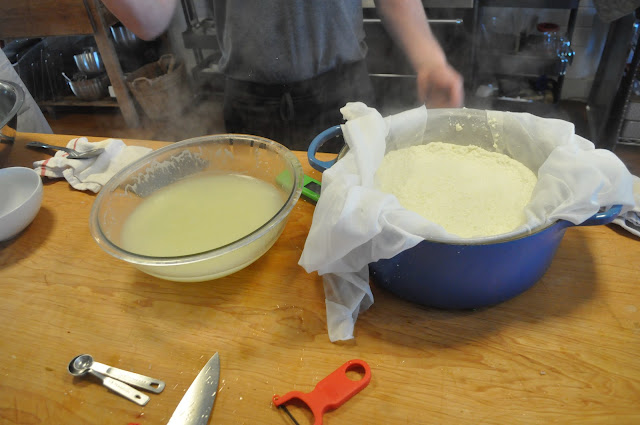
I’m not going to describe the process in detail, although there is a recipe at the end, using one of the cheeses we made. But for those of you who live within the tri-state area of New York-Pennsylvania-New Jersey, I hope you will seek out this cooking school and take the class — or any one of the myriad they offer — from butchering to bouillabaisse. Ian and business partner Shelly Wiseman, both veterans of Gourmet magazine, hold classes mornings and night, and even offer week-long culinary vacations in the beautiful countryside around the Delaware River Valley. The cheesemaking process is similar for most cheeses – bring the milk up to a certain temperature, add rennet, let it stand until curds form, and strain through cheesecloth. For mozzarella, the curds are stretched and pulled in hot water until they meld together into a ball shape.


Crème fraîche is made with heavy cream to which a mesophilic starter culture is added. Alternately,  simply add a tablespoon of purchased crème fraîche to a cup of heavy milk inside a sterilized glass jar, and heat it inside a pot filled with warm water. For goat’s cheese, you start with goat’s, not cow’s milk (naturally) raw or pasteurized — not always so easy to find.

But even if you don’t make your own cheese, you’ll want to try the recipe at the end of this post using good quality purchased cheese. Of course, nothing compares to freshly made, but still, the recipe can be adapted using store bought cheese.

None of the dishes we ate contained meat. (For strict vegetarians, you might think twice about eating cheese, since rennet, used in most cheeses, is an enzyme made using cow’s stomach.)

The lunch lineup included this delicious salad of kale, cooked beets and the goat cheese we made and crumbled on top.

We also roasted shishito peppers and served them with the mozzarella balls we pulled.

The lentils were cooked and mixed with the crème fraîche, then topped with sweet roasted carrots, dill and mint.

Dessert was simple but wonderful – apples poached in white wine, sugar and cinnamon and served with  fresh ricotta.

If getting to The Farm Cooking School is impossible, here’s the next best thing — a cookbook Ian and Shelley have written that is due to be released in a few weeks. You’ll find many of the recipes and techniques here that you’d learn at the school, and you can pre-order it on Amazon.com.

Lentils with Spice-Roasted Carrots and Crème Fraîche

Author: The Farm Cooking School
Serves: 8 to 16
Ingredients
  • 3 pounds carrots, peeled
  • 3 T. extra virgin olive oil
  • 1 t. ground coriander
  • 1 t. smoked paprika
  • 1 t. ground cumin
  • 1 pound lentils, black or green
  • 1/4 cup extra virgin olive oil
  • 1 large onion, quartered
  • 2 garlic cloves, smashed
  • 3 T. fresh lemon juice
  • 1 cup dill (or cilantro) and mint leaves
  • 1 cup crème fraîche
Instructions
  1. Toss the carrots with the oil, coriander, paprika, cumin, 1 t. salt and 1/2 t. pepper.
  2. Spread the carrots on a baking sheet and roast until tender, about 25 minutes.
  3. Reserve the carrots.
  4. While the carrots roast, cover the lentils in a saucepan by 2 inches of water.
  5. Stir in the onion, garlic and a generous pinch of salt and pepper.
  6. Boil the lentils until tender, about 20 minutes, then drain the lentils and toss with the oil, lemon juice and salt and pepper to taste.
  7. Place the lentils on a serving platter and top with the carrots, herbs and crème fraîche.
  8. Serve.


Monday, October 16, 2017

Egg Filled Acorn Squash

If you’re like me, you’ve served your fair share of frittatas, bagels, muffins and similar foods when organizing a breakfast or brunch at your home. I was expecting a group of relatives yesterday morning, but decided I wanted something a little different. As soon as I saw Marie’s Instagram post last week, I knew I had found it. My friend Marie, of Proud Italian Cook, has one of the best food blogs going, and you can always count on her to provide delicious, easy recipes and mouth-watering photos too.

You can do some of the prep work ahead of time for this one — including roasting the acorn squash the night before. Just slice the squash, smear it with some olive oil, freshly ground black pepper and seasoned salts (that I make each year by drying my fresh herbs and mixing them with coarse salt). Roast in the oven, flipping once. When your guests arrive, just spread a little butter or oil in a skillet (one that has a lid — I used my electric skillet that holds six of these squash rings). I placed a few spinach leaves inside the squash rings, then dropped an egg into it. I also scattered a few sage leaves in the pan, as added flavor.

Sprinkle with salt and pepper and place the lid on the top. Cook them at low heat until the whites set and the yolks are still runny.

I can’t really tell you how long it takes since it depends on how large your eggs are and how hot your skillet is. I know I had the heat on for about five minutes and it cooked the yolks a little more than I had wanted. I prefer them more runny than the photo shows. But that didn’t stop everyone from finishing every last morsel. Thanks Marie.

Egg Filled Acorn Squash

Serves: 6 servings
Ingredients
  • three acorn squash
  • olive oil
  • seasoned salt
  • black pepper
  • spinach leaves
  • 6 eggs
  • minced rosemary
  • sage leaves
  • butter
  • parmesan cheese
Instructions
  1. Slice the acorn squash in slices about 1/2 inch thick.
  2. Place the nicest rings on a baking sheet and smear with olive oil. (save the other pieces for another meal.)
  3. Sprinkle seasoned salt and crushed black pepper on both sides
  4. Bake in a preheated 425 degree oven for 15 minutes on each side, flipping once.
  5. Add about 1 T. butter to a nonstick skillet
  6. Put the squash slices in the butter, then place some spinach leaves inside the hole.
  7. Carefully drop a whole egg into the center of the squash, and sprinkle with salt and pepper.
  8. Scatter some sage leaves and minced rosemary around the squash slices.
  9. Place a lid on top and let them cook at low temperature until the whites are cooked, but the yolks are still runny. This could take anywhere from 5 to 10 minutes. Keep checking.
  10. Sprinkle with freshly grated parmesan cheese and more minced rosemary.


Monday, October 9, 2017

Stuffed Peppers

When your garden gives you a bounty of peppers, it’s time to get stuffing.
We left most of this year’s peppers on the plant until they turned from green to red, imparting more sweetness as they ripened.
With these four peppers, you can feed eight people, provided you have another side vegetable, like corn, as I did, or a salad.
Of course, that’s assuming you have a normal appetite.
But if eating a whole pizza by yourself is normal for you, then you’ll want two halves per person.
The stuffing is mostly ground beef, but with a bit of brown rice and some tomato sauce mixed in to give it a little more flavor. The peppers release a lot of water after they’ve been cooking a while, but I give it a head start by pouring in a small bit of water on the bottom before covering the whole thing with aluminum foil. It also means you don’t need to grease the pan.
Bake covered for a half hour, then remove the cover and bake for another half hour. If there’s too much water on the bottom, remove the peppers and drain most of the water.
Near the last ten minutes of cooking, top with more sauce and slices of fontina cheese and place back in the oven to melt.
Serve with another vegetable, like corn on the cob, green beans, or a salad, for a complete meal.
Want more Ciao Chow Linda? Check out my Instagram page here to see more of what I’m cooking up each day.
You can also connect with Ciao Chow Linda here on Facebook, here for Pinterest or  here for Twitter.
Stuffed Peppers
Cuisine: Italian
Author: Ciao Chow Linda
Ingredients
  • Stuffed Peppers
  • 4 large red (or green) peppers
  • 1/2 cup raw brown rice, cooked in 1 1/2 cups water (I use short grain brown rice)
  • 1 egg
  • 1 large shallot
  • 1 large clove garlic
  • 2 T. olive oil
  • 1 1/2 pounds ground beef
  • 1/4 tsp. salt
  • pinch black pepper
  • 2 T. minced parsley
  • 3/4 cup grated parmesan cheese
  • 1 1/2 cups shredded fontina cheese, plus a little more to place on top
  • 1 cup tomato sauce, plus another cup for pouring on top
Instructions
  1. Cut the peppers in half.
  2. Remove the ribs, drizzle a little olive oil on the inside and season with salt and pepper.
  3. Make the stuffing mixing all the ingredients, including 1 cup tomato sauce.
  4. Stuff the mixture into the peppers, and place in a casserole.
  5. Put a shallow amount of water on the bottom of the casserole and cover tightly with aluminum foil. Bake at 400 degrees for 1/2 hour.
  6. Remove the foil, and most of the water that will have accumulated on the bottom since the peppers will release a good amount in the cooking.
  7. Be careful not to burn yourself.
  8. Cover the peppers with tomato sauce and place back in the oven for another 1/2 hour.
  9. Remove from the oven and place a slice of fontina cheese on top.
  10. Place in the oven again for another five minutes or so until the cheese has melted.