Tuesday, September 25, 2018

Pork Tenderloin with Figs and Olives

Looking for a delicious main course that’ll impress your guests, but is easy enough for an every day meal? Look no further than this pork tenderloin roast, cooked with figs and olives, a recipe inspired by my friend, Marie, whose blog, Proud Italian Cook, always leaves me hungry.

It’s near the end of fig season here in the Northeastern U.S., and if you don’t have your own fig tree, I hope you have FWF (friends with figs). My own fig tree, a new transplant that produced only one edible fig so far this year, was not up to the task, but fortunately I have a few FWFs, including my friend Dorothy, who invited me to help myself.

The recipe calls for some fig preserves, and fortunately, I still had some I made earlier in the year. But you can easily purchase fig preserves from the store.

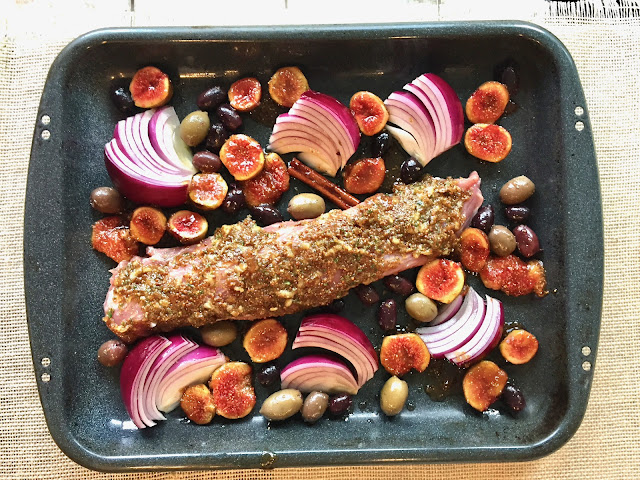
I stewed them for a few minutes in port wine to soften them a bit. Careful not to cook them too long, or they’ll lose their shape since they cook further in the oven. Port wine and figs are a match made in heaven, but if you haven’t got port, you can use red wine, or even just water if you don’t imbibe at all. Add a cinnamon stick to the liquid for even more flavor.Make a paste of fig preserves, garlic and some herbs and spread it over the roast. Surround it with the drained figs, scatter around some olives and sections of red onion. The first time I made this, I browned the meat, but much of the paste burned, causing me to scrape it all off. So I eliminated that browning procedure entirely the second time and it was delicious even without taking that step.


Roast it for about 20-30 minutes at 425 degrees, or until a thermometer reaches 145 degrees. Let it rest for at least 5 – 10 minutes before slicing, then serve some of that luscious fig and port wine liquid on top. It’s so tender and flavorful you’ll go back for seconds…. and thirds.

Pop over to my Instagram page here to see more of my food and travel adventures.
Pork Tenderloin with Figs and Olives
Author: inspired by Marie of Proud Italian Cook
Ingredients
  • 1 pork tenderloin, 1 to 1 1/2 pounds
  • 1 dozen ripe figs, cut in half lengthwise
  • 1 large red onion, sectioned in pieces
  • about 1/2 cup green and black olives
  • MARINADE FOR THE PORK
  • 2 tablespoons fig preserves
  • 2 tablespoons grainy mustard
  • 1 large garlic clove
  • 1 tablespoon each minced rosemary and thyme
  • salt, pepper
  • POACHING LIQUID FOR FIGS
  • 1/2 cup port wine and 1/2 cup water
  • 1/4 cup honey
  • 1/4 cup fig preserves
  • 1 cinnamon stick
Instructions
  1. Place the port wine, water, honey, fig preserves and cinnamon stick in a saucepan and bring to a boil.
  2. Reduce the heat, add the figs and poach gently for about five minutes to soften and imbue the figs with more flavor.
  3. Mix the marinade ingredients together and smear over the pork in the roasting pan.
  4. Let the pork sit at room temperature with the marinade for about 1/2 hour.
  5. Fan out the onion sections around the pork, and also scatter the olives and drained figs in the pan.
  6. Spoon a little of the poaching liquid on the roast and place in a 425 degree oven for about 20-30 minutes or until a thermometer reads 145 degrees.
  7. Remove from the oven and cover with aluminum foil and let it rest 5-10 minutes.
  8. If the poaching liquid is not thick enough to your liking, reduce over high heat for a bit.
  9. Slice the roast and ladle some of the poaching liquid on top before serving.


Wednesday, September 19, 2018

How to Steam and Pick Blue Crabs, Maryland Style

If you’ve ever been to Maryland, you know that steamed blue crabs are as common there as lobsters in Maine, or crawfish in New Orleans. Crab houses abound, where you sit down to a table covered with brown paper, waiting for the spicy, steaming crabs to be dumped in the center. A few pitchers of beer or iced tea and plenty of napkins are also required for the full experience.

You can also make steamed crabs Maryland-style at home with minimal effort, provided you live along the Western Atlantic seacoast, the only place where you can find blue crabs.

And when you do find them, they’re not inexpensive, especially the larger size, that can cost about $60 a dozen. Still, if you have the opportunity to buy them, give this a try. They’re delicious, and “picking” crabs while quaffing some beers is a fun way to pass a couple of hours with friends.

Only a couple of ingredients (other than the crabs) are necessary – coarse salt and Old Bay seasoning. Mix them together in a bowl. The proportions are up to you – the more seasoning, the spicier the crabs will be.

Using a pair of tongs, (be careful, those claws can really nip you!), place the raw crabs in a steamer basket or colander, sprinkling a generous layer of the coarse salt and Old Bay over the crabs. Continue layering until the steamer basket is full.


Pour a bottle or two of beer at the bottom of a large pot. Some people use water instead of beer, and some add a bit of vinegar to the liquid. My colander rested just right on the lip of the pot, but with the crabs mounted high in the colander, there was no lid deep enough to fit above the crabs. So I improvised and turned another pot upside down over the colander. The crabs should never be immersed in the liquid, or you’ll have soggy crabmeat.

Steam the crabs on high heat for about 20 minutes.

Cover the table with brown paper (I used cut-up brown paper bags) and dump the crabs in the center of the table.Now comes the tricky part, the “picking.” But when you’ve done it once or twice, it becomes easy. The first time I ate these, decades ago with friends Kathy and Cliff who live in Maryland, my lips got hotter and hotter from all the Old Bay seasoning, until Cliff demonstrated the right way to “pick” crabs, doing some of the work for me, and handing me the choice backfin pieces. But I have long since learned to pick crabs and you can too.

 Take a butterknife and stick it under the back of the crab as in the photo below. Then holding the crab in one hand and the knife in the other, lift the body of the crab away from the “apron.”

The apron will come off in one piece, but you still have some cleaning to do. You need to pull off the gills, those feathery things on either side of the body. I also remove the “mustard,” the yellowish-greenish viscera that’s  part of the digestive system. Some people love it, but I find it gross, so I get rid of it too. Using both hands, snap the body in two. 

The best part of the crab is the backfin meat, and if you practice you can take it out in one large piece. Put your finger on the wide part of the crab body and press gently while pushing upward.
The backfin meat should come out in one piece, but it may take a few tries till you get the hang of it.
Keep picking away at the main body, discarding any shells and cartilage, eating along the way. (Some people serve melted butter with these, but that seems unnecessary to me.) When you get to the claws, you’ll need a mallet and a small knife to help pry the meat loose. (Sorry, I forgot to take pictures of cracking the claws.) Just be careful not to bang too hard on the shell or you’ll end up splintering it into the flesh of the crab. When you’re all done, gather up all the brown paper and throw everything into the garbage can. Hopefully pick up will come in the next day or two or you’ll have all the local cats hovering over your trash can.


SaveSave

SaveSave

SaveSave

SaveSave

SaveSave

SaveSave

SaveSave

Tuesday, September 11, 2018

Fig and Almond Crostata

It’s fig season here in the Northeastern U.S., and if you don’t have your own fig tree, there are plenty of markets selling different varieties of these luscious fruits. I had about a dozen that were ready to eat and decided to make a free-form crostata for dessert, poaching the figs first in port wine, honey and cinnamon. They’re delicious poached in red wine too, but if you have port wine, it’s a perfect match accompaniment to figs.

The figs become a little moister after poaching, which could make the pastry soggy, so I scattered a layer of sliced almonds as a bed for the figs, to act as a barrier and also give more texture and flavor.

Drain the figs from the poaching liquid and place them carefully over the almonds.

Gather the pastry around the edges, pinching to form a border. Brush with beaten egg, or some milk.

After it comes out of the oven, spread some of the reduced glaze over the top.
It’s delicious just as is, but a bit of ice cream always makes things better.
Fig and Almond Crostata
Ingredients
  • Serves two to four people (easily doubled to serve eight)
  • 10 to 12 figs, cut in half
  • 1/2 cup Port wine
  • 1/4 cup honey
  • 3 Tablespoons sugar
  • 1 cinnamon stick
  • 1/4 cup sliced almonds
  • For the Pastry:
  • 1/2 cup flour
  • 4 Tablespoons butter
  • 1 Tablespoon sugar
  • a pinch of salt
  • 3 or 4 tablespoons ice water, as needed
Instructions
  1. Bring the Port wine, honey, sugar and cinnamon stick to a boil in a saucepan.
  2. Lower the heat and add the figs. Let the figs simmer for about 5-10 minutes, depending on how ripe the figs are.
  3. Don’t let them poach so long that they lose shape.
  4. Drain the figs and set aside.
  5. Meanwhile, turn the heat to high and let the Port wine mixture reduce to about half or until about the consistency of honey.
  6. Don’t forget the solution will be runnier when it’s hot, but thickens when cooled.
  7. Mix the flour, sugar, salt and butter in a food processor, until it resembles coarse sand. Add the ice water until it starts to hold together. Bring it out onto a board and roll into a ball. Flatten the ball, wrap in plastic and put it in the refrigerator for about a half hour to an hour.
  8. Remove from refrigerator and roll over a floured surface to a circle with a circumference of about 10-12 inches.
  9. Scatter the almonds over the center of the dough, leaving a border of about two inches.
  10. Place the poached figs over the almonds, then fold the pastry over the figs, pinching toward the edges to form a border.
  11. Brush the border with either beaten egg, or milk.
  12. Bake at 400 degrees for about 25-30 minutes or until browned.
  13. Remove from oven, and brush the reduced port wine glaze over the figs.
  14. If the glaze is too thick, put it back on the heat for a few minutes, adding a bit of water if necessary.


SaveSave

SaveSave

SaveSave

SaveSave

Monday, September 3, 2018

Seared Scallops and Corn and giveaway winner


I was at a restaurant recently with an out-of-town friend who ordered scallops for dinner. They arrived looking pale, small, and sitting in a pool of insipid liquid, which was almost unforgivable, given how easy it is to get a good sear and add flavor to scallops with some butter and seasonings.

I’d like to invite her back and cook this recipe for her, especially while corn is at its peak and the scallops at our fish market are particularly fresh right now. We’ve had great corn this summer in New Jersey, but we purchased this delicious sweet corn at a farm stand in upstate New York last week, on our way home from the Glimmerglass Music Festival (where we also got a flat tire in the middle of nowhere, but that’s another story).

We could have eaten like normal humans and limited ourselves to one ear of corn each, but what the heck – why not cook all four ears of corn. We could always reheat the leftovers, right? (Wrong, we scarfed them all down in one sitting!)

It’s easy enough to slice the kernels from the cob with a sharp knife.

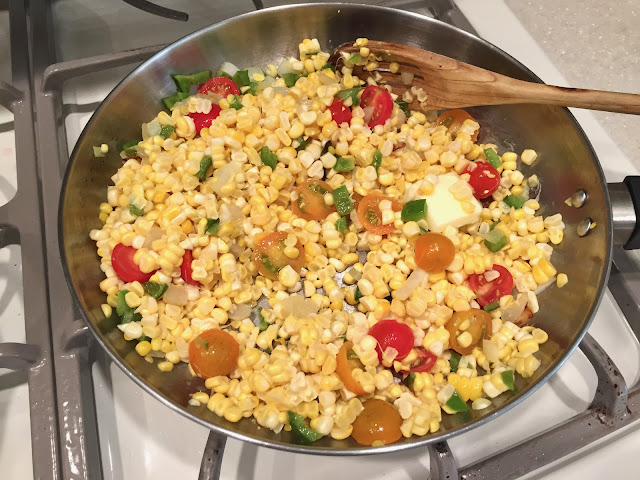
Sauté the peppers, corn and tomatoes in a skillet with some butter and olive oil, along with the seasonings.

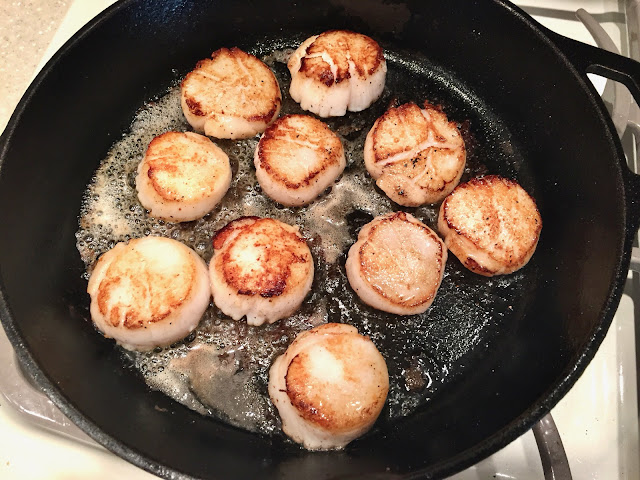
Meanwhile, use a large cast iron skillet to sear the scallops. Heat it until it’s screaming hot, then add the oil and butter. By the way, try to find the largest scallops you can. That way, you’ll be able to get a nice sear on the outside without overcooking the inside. Make sure you dry the scallops thoroughly with paper towels to avoid any moisture from oozing out. If your scallops have too much moisture, or if you crowd too many in a pan, you could end up “steaming” them instead of searing them.

Sometimes, the scallops you buy are so filled with moisture, you wonder if the fish sellers injected them with water to make them weigh more. But these scallops, from our local fish market at the Jersey shore, were large, exceedingly fresh, and not at all weighted down with water. They sautéed beautifully in a minimal amount of fat (about 1 tablespoon of butter and one tablespoon of olive oil). But feel free to add a little more butter if you’re feeling indulgent. There are few things as delicious as browned butter over sautéed scallops.

The whole dish takes less than 30 minutes to put together, from scraping the corn off the cob to presenting it at table. We ate this as a regular weeknight dinner, but it’s certainly company worthy too.

Don’t you agree?

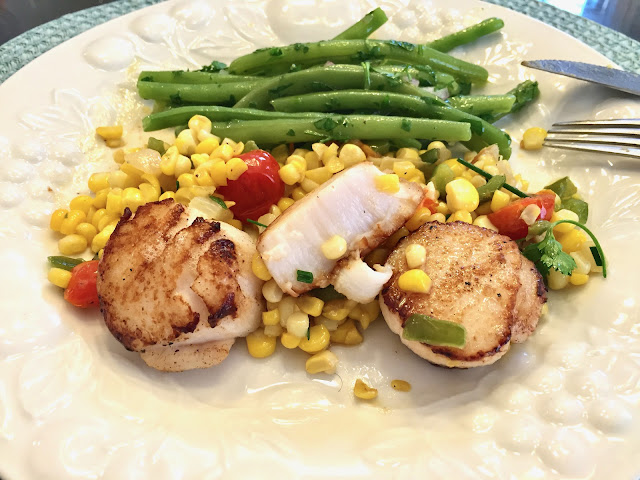
The inside of the scallop is still moist, while the outside is well seared to a buttery goodness.

And now, for the winner of the giveaway in my last post about lobster fra diavolo  and as my way of saying thank you to one of my readers as I celebrate 10 years of blogging, ta da … drum roll please!!!  Sarah Zimmerman, you’re the winner of the $100 Lobstergram gift certificate, selected by a computer driven, random number generator. Look for the gift certificate in your email.

Thanks to all of you who left comments and have been reading Ciao Chow Linda through the years. To see what’s cooking in my kitchen, or what other adventures I’m up to, connect with me on my Instagram page here.

Seared Scallops and Corn
Ingredients
  • 10 large scallops (or about 3/4 pound)
  • 2 T. olive oil
  • 2 T. butter (or more if you like)
  • salt, pepper
  • 4 ears corn (or two unless you are a glutton like us)
  • 1/2 green bell pepper, mined
  • about a dozen red and yellow cherry tomatoes, cut in half.
  • fresh chives
  • fresh parsley
Instructions
  1. Strip the corn off the cob using a knife.
  2. Add one tablespoon butter and one tablespoon oil to a skillet and add the minced green pepper.
  3. Saute for a couple of minutes, then add the tomatoes and corn kernels.
  4. Season with salt, pepper and snippets of fresh chives and add another tablespoon of butter if desired.
  5. Cook the corn mixture over low to medium heat for two or three minutes while you sear the scallops.
  6. Make sure you buy the largest scallops you can find to ensure you get a good sear without overcooking the interior.
  7. Dry the scallops on all sides with a paper towel.
  8. Heat a large cast iron skillet until it’s really, really hot.
  9. Add one tablespoon of oil and one tablespoon butter to the pan, then add the thoroughly dried scallops.
  10. Do not overcrowd or you risk “steaming” the scallops.
  11. Let them sear on one side for a couple of minutes only.
  12. Then flip and sear on the other side.
  13. When the scallops are almost finished cooking, transfer the corn mixture to a platter.
  14. Remove scallops from skillet and place over the corn.
  15. Pour any butter/oil left in the pan over the scallops.
  16. Decorate with a couple of strands of fresh chives.


SaveSave

SaveSave

SaveSave

SaveSave

SaveSave

SaveSave

SaveSave