Showing posts with label pasta. Show all posts

Thursday, July 16, 2026

Protein Packed Pesto

If you grow your own basil, no doubt you've made pesto, that well-known uncooked sauce from Liguria that contains basil, olive oil, garlic, pine nuts and parmesan cheese. Each year, I make enough pesto to tuck away in my freezer and tide me over through the winter. But my pesto this year will be different, thanks to this terrific recipe from The New York Times. We've been trying to include more protein in our diets, especially since my husband's operation earlier this year. As we age (and my husband and I are definitely in the "golden years") our bodies require more protein. Cottage cheese is packed with protein and makes this pesto so creamy and nutritious. There's also spinach in the recipe, that adds more nutrients and helps the pesto retain its bright green color. It also uses less olive oil (fewer calories) and no nuts whatsoever. Did we miss them? NO! We just loved this pesto so much, it's become a staple now that basil is so prolific. 

After a few minute in the food processor, it comes out looking like this -- and it retains its color after tossing with the hot pasta.

Don't scrimp on the parmesan cheese. It adds so much flavor and is one of the most protein-rich cheeses you can eat. And because it's aged for a minimum of 12 months, it's also easy to digest and virtually lactose-free. It's also filled with calories unfortunately, so sprinkle at the peril of your waistline. 


Protein Packed Pesto

(recipe from The New York Times)

Ingredients:

  • Salt

  • 1 lemon

  • 8 ounces whole-milk cottage cheese (1 cup), at room temperature (I use fat-free cottage cheese)

  • 3½ ounces grated Parmesan (1 cup), plus more for serving 

  • 2 tablespoons extra-virgin olive oil, plus more for serving

  • 1 garlic clove, smashed and peeled

  • 3 ounces baby spinach (3 big handfuls)

  • 2½ ounces torn basil leaves (2 packed cups)

  • 1 pound spaghetti or other long pasta (I used fusilli)

Directions:

  1. Step 1

    Bring a large pot of salted water to a boil. Meanwhile, zest and juice the lemon into a high-powered blender or food processor. Add the cottage cheese, Parmesan, oil, garlic, spinach and basil. Blend until very smooth. (in a food processor, this can take up to five minutes.)

    1. Step 2

      Add the pasta to the boiling water and cook until al dente according to package directions. Scoop out 1 ½ cups of the pasta water, then drain the pasta and return to the pot. With the blender running, pour ¾ cup of the pasta water into the cottage cheese mixture and blend until smooth.

    1. Step 3

      Off the heat, add the cottage cheese mixture to the pasta. Toss vigorously until the pasta is coated in sauce, adding more pasta water as needed until glossy. Season to taste with salt. Serve topped with a drizzle of olive oil and more Parmesan.


Monday, October 27, 2025

Fazzoletti (Pasta Handkerchiefs) stuffed with ricotta and Swiss chard


OK, now don't turn away because you don't want to make your own pasta. You can buy fresh lasagna sheets at many supermarkets (although they won't be spinach pasta, most likely) and present your family and friends with this delicious pasta dish. You can even make it ahead of time and keep it in the fridge ready to bake at the last minute. Think of this as free-formed ravioli that are much easier to make and just as delicious. I stuffed them with ricotta and Swiss chard, but you could just as easily use spinach, or even forgo the greens and make a strictly ricotta filling. But if you go the Swiss chard route, you'll roughly chop the greens, then saute them in a little olive oil until cooked through - just a few minutes should do it.

Make the spinach pasta (or buy fresh lasagna sheets) and cut into  four inch squares. It's ok if they aren't perfectly square, or if they're a bit smaller or a bit larger.

Then briefly cook them in boiling water, and drain on paper towels.

Mix the filling ingredients - the cooked Swiss chard, ricotta, parmesan cheese, egg, nutmeg, salt and pepper.
Dab a bit in the center of each pasta square.
Fold over into a "sort of" triangular shape.
Place into a buttered shallow baking pan. It's ok if they touch a bit but try not to overlap them. Use a second pan to accommodate the rest of the fazzoletti.
Place a slice of mozzarella on top, sprinkle with parmesan, chopped walnuts and finish with a sage leaf.
Bake for about 20 minutes, and serve. (I had to remove and replace the sage leaves because they got too dark in the oven.)
Slice into this goodness and enjoy. Drooling allowed.
Click here to connect with me on Instagram and find out what’s cooking in Ciao Chow Linda’s kitchen each day (and more)

Fazzoletti (Pasta Handkerchiefs) stuffed with ricotta and Swiss chard
(Makes about 12 stuffed fazzoletti)

For the Pasta:
(You may get more pasta than you need for this recipe, so just cut the rest into fettuccine and use another day.)

1 10-ounce box frozen spinach
2 cups 00 flour
2 eggs
pinch of salt 

For the Filling:

1 cup ricotta, preferably drained overnight
1 small bunch of Swiss chard, chopped roughly and sautéed in 2 tablespoons olive oil until soft
1 egg
1/2 cup grated parmesan cheese
a few gratings of nutmeg
salt, pepper

To Finish:
1 8 oz. ball of fresh mozzarella
1/4 cup grated parmesan cheese
1/2 cup chopped walnuts
fresh sage leaves

Instructions:
  1. FOR THE PASTA:
  2. Drain the spinach thoroughly, squeezing out all the water you can with your hands.
  3. Then press it with paper towels to get out any remaining water.
  4. Place the spinach and the two eggs into the food processor to break down the spinach.
  5. Start adding the flour.
  6. You may need as little as a cup and a quarter of flour.
  7. It’s easy to add more flour later, but much harder to work the dough if you place too much flour into the food processor.
  8. Add just enough flour and process until the dough comes together into a ball.
  9. It will be sticky.
  10. Place the dough onto a wooden work surface, add more flour until the stickiness disappears and the dough seems more “homogenized” and softer.
  11. Cover the dough with plastic wrap or a bowl and let it sit for at least 1/2 hour.
  12. Roll the pasta into sheets, then cut into approximately 4" squares.
  13. Boil the squares until al dente, then place on paper towels to drain before stuffing.
FOR THE FILLING:
Mix the ricotta with the cooked Swiss chard and the rest of the filling ingredients.

ASSEMBLY:
Dab a hefty tablespoonful of the filling into the center of each pasta square. Fold one edge toward the opposite edge, forming a sort of triangle.
Place each triangle into a buttered baking dish, trying not to overlap them. There should be just one layer. Use more baking dishes if needed.
Cover each triangle with a small slice of fresh mozzarella, some walnuts and a sage leaf.
Bake at 350 degrees F. for about 20 minutes or until the cheese is melted.
If necessary, remove the sage leaf and replace it with a fresh one before serving.


Tuesday, August 6, 2024

Sausage Ragù and Pasta

Once in a while, I get a craving for pasta in tomato sauce but don't have time or desire to make a long-simmering two or three hour ragù with meatballs, braciole and more. If you've got some Italian sausage and a can of tomatoes (I love those small cherry tomatoes in sauce), you're on your way to a delicious meal in a half hour. If you can find these small gnocchetti, or Sardinian maloreddus, it makes a perfect pairing. Otherwise, look for a small pasta like tiny shells or even rotini. It was a big hit with my husband, who even asked for the recipe so he could make it for his "Jersey Boys" -- childhood friends who visit from around the globe once a year and spend a week with him at the shore house.

Check out Ciao Chow Linda on Instagram here to find out what’s cooking in my kitchen each day (and more).

Sausage Ragù and Pasta 

(serves 2)

2 links of Italian sausage (casings removed and broken into bits)

4 tablespoons olive oil

1/4 cup finely minced onion

1 garlic clove, finely minced

1 16-ounce can cherry tomatoes in puree, or 1 can of tomato puree

1/4 cup dry red or white wine 

1/2 teaspoon salt

1/2 teaspoon dry basil flakes

a shake of red pepper flakes

1/2 pound small shaped pasta (photo shows Sardinian gnochetti)

freshly grated parmesan or pecorino cheese to sprinkle on top

Remove the casings from the sausage, break it into chunks and place it in a saucepan with 2 tablespoons of the olive oil. Cook through and remove from pan. Add 2 more tablespoons of olive oil, and the onion. Sauté until soft, then add the garlic and cook until softened. Add the cherry tomatoes (I like to puree them first, right in the can with a stick blender, but if you like a chunky sauce, leave as is), the wine and the seasonings. Return the cooked sausage bits to the sauce. Simmer everything together for a half hour, then boil the pasta and serve with the sauce.

Sprinkle parmesan or pecorino on the pasta.

Friday, May 10, 2024

Pasta E Fagioli Soup Redux

The calendar may say it's spring, but here in central New Jersey, it's a cool, drizzly day -- perfect for a bowl of this pasta e fagioli soup. There are as many variations of this dish as there are regions of Italy and I've posted another recipe or two in the past that you can find here and here. They're all delicious, but I really enjoyed this latest version that included a special pasta called rombetti my son found for me. They were just perfect for this soup, but may be difficult to find if you don't have a specialty Italian store near you. Feel free to substitute any small pasta shape -- even broken up spaghetti -- just make sure it's a good product, made with quality ingredients and slow drying techniques.

A good sprinkle of freshly grated parmesan or pecorino cheese will take this dish over the top.


Check out Ciao Chow Linda on Instagram here to find out what’s cooking in my kitchen each day (and more).

Pasta & Fagioli Soup

1/2 cup minced onion
1/4 cup minced celery
1/4 cup minced carrot
3 tablespoons olive oil
4 cups chicken broth (or water)
1 or more cups water
2 cups diced potatoes 
2 cans chick peas
2 cans cannellini beans or small white beans
1 tablespoon salt
1/2 teaspoon black pepper
a sprig of fresh rosemary and a couple of sprigs of fresh thyme, finely minced
1 pound small pastas, boiled separately (I used a pasta called rombetti)
parmesan or pecorino cheese to sprinkle on top

Sautè the vegetables in the olive oil till softened. Add the chicken broth, the potatoes, one can of chick peas and one can of beans. Add the seasonings. Cook everything together for about 45 minutes, then using a stick blender, blend most of the soup to a puree. If it's too thick, add more water. Add the other can of chick peas and the other can of beans, and cook till heated through. Add the drained and boiled pasta and serve with grated parmesan or pecorino cheese.


Monday, January 29, 2024

Rosette Modenese (Pasta Roses)


This luscious dish, also called "nidi di rondine" (swallow nests) originates in Modena, Italy, and has to be one of the most delicious things I've ever tasted. It may look like a lasagna rollup, but it's in a whole different category and is filled with prosciutto cotto, fontina, parmesan and béchamel. One of my Italian cousins (who doesn't live that far from Modena), prepared it for me decades ago and I made it only once following that visit. With company coming for dinner last weekend, I wanted a killer primo piatto and decided to make it again. To say it did not disappoint is an understatement. It was even better than I remembered -- so ethereal,  light and delicate, it practically melted in the mouth. My guests were also in rapture over the dish.

The authentic way to make this is without the tomato sauce, but I wanted a little color and a slight acidic touch to balance all the cheese and béchamel, so I added dollops of tomato sauce on the bottom of the casserole and on top too. You can alter it to your taste, even changing the cheese from fontina, to taleggio or any other good Italian cheese that melts well. 
The recipe may seem long, but it almost took longer to write this blog post than it did to make the rosettes. To save a little time, I started by making the pasta dough the night before, then wrapped it in plastic and stored in the refrigerator overnight. 
The next day, I cooked the béchamel, stirring until it was the density of pudding. Then I set it aside to cool.
I made a light tomato sauce (again, eliminate this if you want the authentic version) and set it aside to cool.

Next, you grate the fontina cheese. 

Then roll out the pasta. Yes, you can use store-bought pasta sheets, but nothing compares to the velvety texture and toothiness of home made pasta.
I boiled each pasta sheet for just one minute, then dunked it right away in a cold water bath. I rolled it out to its thinnest setting, and wondered to myself whether it even needed the boiling, or whether I could have eliminated the step, since it was so thin and baked in the oven for nearly 40 minutes. Maybe next time, I'll try baking it without boiling the pasta first. 

I placed the boiled pasta on some dry dish towels and patted away any remaining water. They look like they need ironing, don't they? 
Spread a thin layer of the béchamel on top, then a sprinkling of grated parmesan cheese.
Next goes the layer of prosciutto cotto (cooked ham). Don't be tempted to use any old boiled ham here, or prosciutto crudo. Search out prosciutto cotto at an Italian specialty food store. It's even available online, if you can't find it near you. It's so much more delicate than regular boiled ham, and has no smokiness whatsoever. Prosciutto crudo would be all wrong too, not just from the flavor standpoint, but it would also be difficult to slice evenly once it's all rolled up since it can be a little stringier. 

Last, layer on the shredded fontina. Use more if you like -- no rules here.
Then start rolling from the short end. Roll tightly. The roll on the right (below photo) was the result from rolling one of the pasta layers. I thought it was too puny, so I placed it adjacent to another pasta layer and continued rolling, making for a fatter roll like the one on the left.
Here's a photo of adding another filled pasta sheet.
Slice the rolls (I got six slices from each of the two rolls, but the slices on the ends weren't as full as the ones from the middle.)
In all, I got twelve rosettes. Depending on appetites, it would be enough for four to six people. I served it as a first course and each person ate one or two pieces. So we had some leftover the next day, and they heated up great in the microwave. If you want it as the main course (with a side salad), it might only serve four people.


I placed a layer of béchamel on the bottom of a large casserole, and then a few dollops of tomato sauce.

Spread the tomato sauce.
Add the rosettes.
Then add a dollop of béchamel and a dollop of tomato sauce over each rosette.
Sprinkle with more parmesan and fontina.
Bake covered with foil for 20 minutes, then remove the foil, and bake another 20 minutes or so until piping hot. If you like crispy pasta edges (I don't) then bake without a cover from the beginning. From start to finish (not including mixing the pasta the day before or baking the pasta), it was a project of about 1 1/2 hours. But the beauty is you can make it all ahead of time, then pop it in the oven when your guests arrive, and sit down to have a drink with them rather than be in the kitchen fussing over a first course. It's well worth trying this for a showstopper dish. Try it for your special Valentine this year. Or as a first course for Easter. It's sure to be a favorite with everyone.


Check out Ciao Chow Linda on Instagram here to find out what’s cooking in my kitchen each day (and more).

Pasta Roses (Rosette Modenese)

printable recipe here

Ingredients:

Fresh Homemade Pasta

2 cups 00 flour (you may need more)

4 eggs (start with 3 eggs)

pinch of salt

For the Stuffing:

1/2 pound prosciutto cotto, thinly sliced

1/2 cup grated parmesan cheese plus another 1/4 cup to sprinkle on top.

1 1/2 cups shredded Italian fontina cheese plus another 1/4 cup to sprinkle on top.

Béchamel sauce:

1/2 cup butter

1/2 cup flour

3 cups milk

1/4 teaspoon salt

1/8 teaspoon white pepper

a generous grating of nutmeg

----

1/2 cup of homemade tomato sauce (meatless) 

Directions

Make the béchamel sauce

Make the béchamel by melting the butter, then add the flour and stir with a whisk over low heat until flour absorbs the butter. Let it cook for a minute or two, then slowly add the milk, whisking all the while. Add the salt, pepper and nutmeg and stir over low to medium heat until it becomes the consistency of pudding. Set aside to cool.

Make the tomato sauce

I used 1/2 stick diced celery, 1/2 diced carrot, 1/4 cup diced onion and sautéed them in 2 tablespoons of olive oil, then added 2 cups chopped tomatoes, salt, pepper and 1/8 teaspoon dried basil. Simmer for 1/2 hour, then use a stick blender to make it smooth. Set aside to cool.

Make the pasta

Meanwhile make the pasta. I use a food processor and start with two cups of 00 flour and three eggs. Whir everything together until it forms a ball. If it's too dry, add a fourth egg, then whir again. It may come together now but it may also be too sticky, so add more flour, a little at a time, to get to the right consistency - smooth but not too dry and not sticky. Knead for a few minutes until very smooth, then let it rest for at least 20-30 minutes. I made mine the day before, wrapped it in plastic and kept it in the refrigerator overnight. This makes more dough than the recipe calls for, so I froze the rest of the dough.

Roll the dough to the thinnest setting on your pasta machine. Try to make it as wide as the machine will allow. Boil the pasta strips for just a minute, then plunge into cold water to stop the cooking and make it easier to handle. Place on a dish towel and pat dry.

Assembly

When you're finished boiling the pasta, it's time to assemble. Start by spreading a thin layer of béchamel over the pasta, then sprinkle some parmesan next, followed by a layer of the prosciutto cotto, and finally the fontina. Starting at one end, roll tightly until you reach the end. If your pasta sheets are too short, just continue rolling a completed roll onto a second sheet of filled pasta. I had long pieces of pasta but inadvertently cut them in half originally, thinking they were too long. Cutting them in half also makes them less likely to be unwieldy when boiling. After the first roll of the filled pasta, I realized I wanted a thicker roll, so I just continued by adjoining the already rolled piece to a second piece that was filled by flattened. I hope this isn't too confusing, but refer to the photo in the post to clarify.

When you're finished rolling, cut each roll into six pieces -- each piece will be about an inch and a half wide. The pieces next to the end won't be as full as the center pieces, but that's ok.

Next, spread a layer of the béchamel sauce into the bottom of a large casserole, then place a few dollops of tomato sauce over that and spread it thinly over the béchamel. Place the rosettes over the sauce, then spread a little béchamel on top, a dab of tomato sauce and more fontina and parmesan. 

Bake, covered, at 350 degrees for 20 minutes. Remove foil and bake another 15-20 minutes, or until everything is melted. 


Wednesday, December 13, 2023

Calamarata Pasta with Calamari (squid) in Tomato Sauce.


When I was growing up, Christmas eve dinners were always a big deal. We sat at the table for hours, eating fish course after fish course. Later on in the evening, some of the neighbors would stop by, enjoying my mother's cooking and joining the boisterous conversation. Most of the fish were fried - including smelts, eels, baccala and other staples of the Italian-American "Feast of the Seven Fishes." Once my brother Frank brought home conch when he was stationed in Boston as a tour guide on the U.S. Constitution (both he and my brother Joe were in the Navy). I don't have any recollections of liking it, although I've since grown to enjoy conch when we're in the Caribbean, in either conch fritters or ceviche. There was always spaghetti too on Christmas eve. To me, the pasta was the highlight of the meal, and I don't know which I loved more - the spaghetti with crabs we'd have some years, or the spaghetti with squid other years. Either way, they were always served in a red sauce, and you needed plenty of napkins to keep your hands cleaned while eating the messy crabs.
After decades of taking over the reigns for the Christmas eve fish feast, I still make sure to have at least seven fishes, but have pared down quite a bit, and no longer make the fried fish as I once did. We gather around the coffee table first, eating octopus salad, shrimp cocktail and several other offerings, all washed down with ample prosecco being poured. 

I get a lot of help from other family members like my son, who makes baccala mantecato, that I used to serve with grilled polenta. But since gaining a Jewish daughter-in-law, who makes latkes in keeping with her Hanukkah tradition, we now spread the baccala over a latke -- a perfect combo and one we jokingly call "baccalatkes."

After an hour or so, we move to the dining room, but instead of presenting numerous main courses as I did for years, now I narrow it to one, in addition to a salad. Most years, it's been pasta with shellfish, (spaghetti ai frutti di mare) but even that requires multiple pots to be going at once -- two pots just to boil the pasta, plus a pot to saute the shrimp and scallops and separate pots to steam the mussels and clams. 

It can be done but it's a lot to juggle, especially if you're serving 16 people, as I am this year. And I hate missing out on all the fun happening in the living room while I'm in the kitchen.
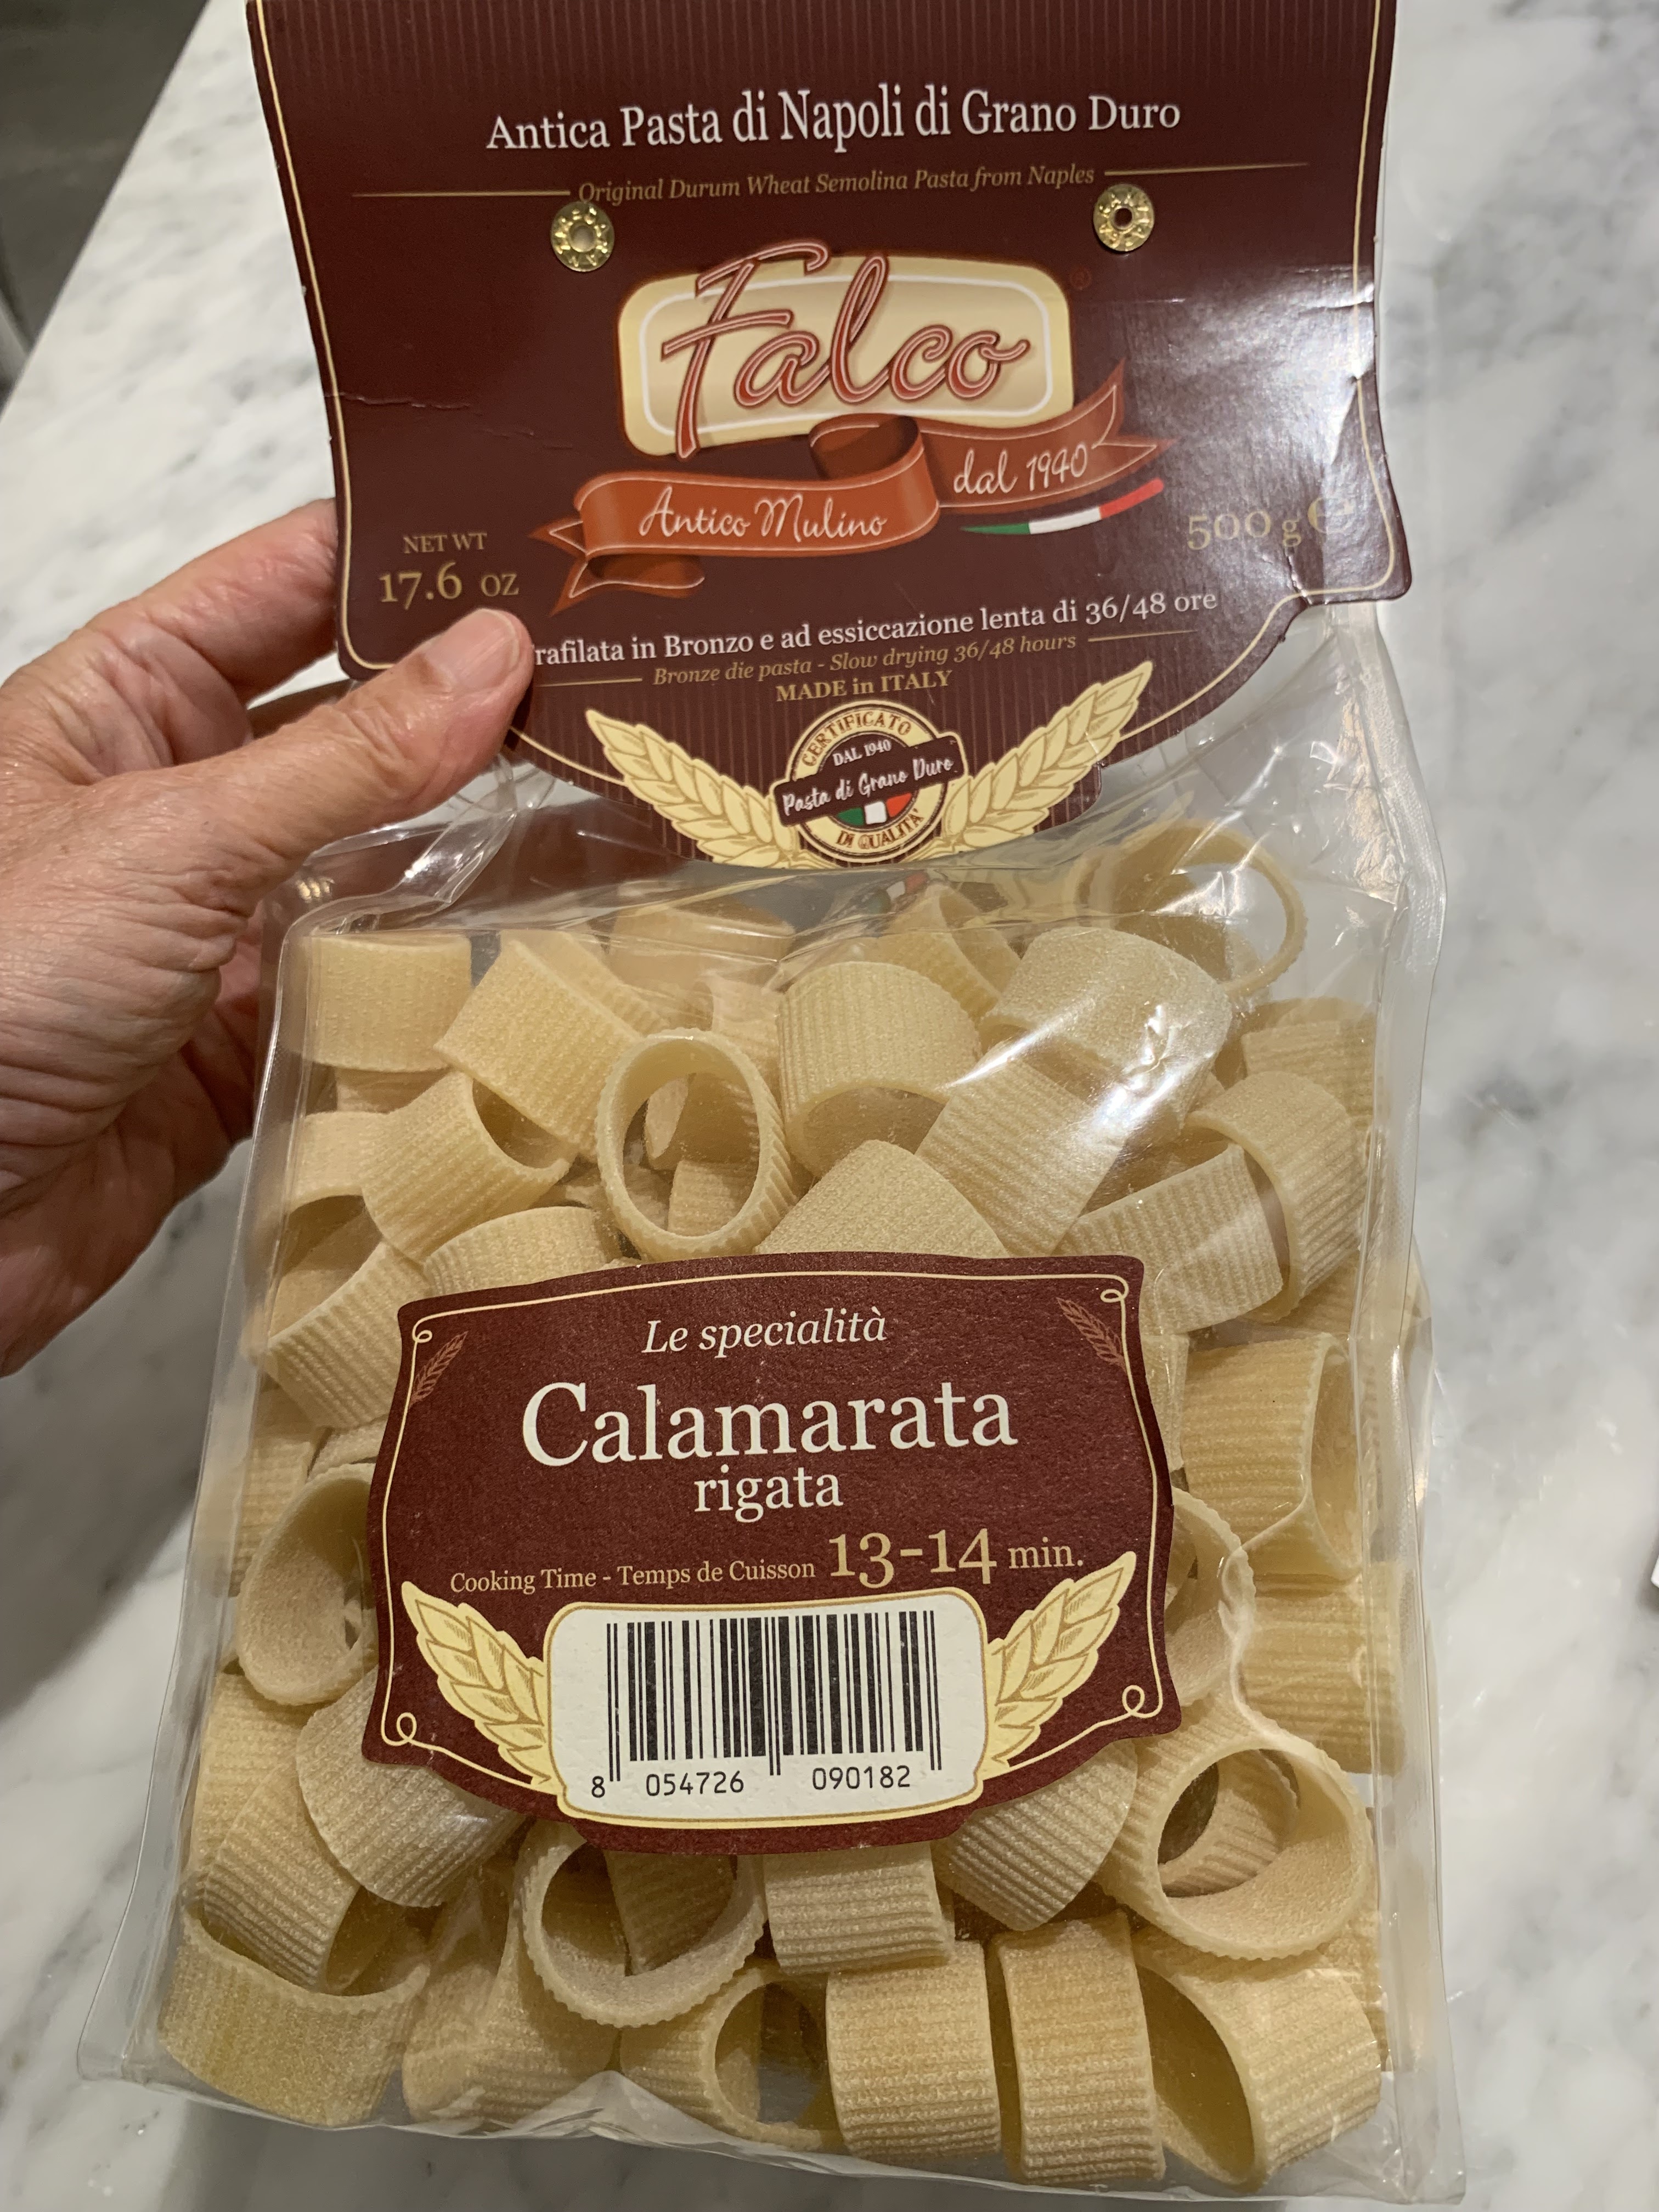
So this year, I'm planning to serve pasta with squid in tomato sauce, requiring only three pots (two to boil the pasta and one to cook the squid) It's a dish reminiscent of what my mother made, but not with spaghetti. I'll be serving it with calamarata pasta, named after the calamari it so closely resembles. You can buy it at Italian grocery stores or online, but I also found it at Home Goods, a store that sells everything from carpets to candy. The food section at Home Goods always has a great selection of pasta -- and the brand I found there -- made by Falco -- was really good quality - extruded with bronze dies, and with a slow drying process, it held its shape well after cooking. It was also designed with ridges and that helps the sauce cling. 

The squid is normally pretty clean when I bring it home from the store, so I just rinse it and cut it into rings. Be sure to get some of the tentacles too. If your squid needs to be cleaned first, click here for a useful YouTube video to guide you through the process. This amount below was only slightly more than 1/2 lb., enough for two people, but I would figure on 3/4 lb. of cleaned squid for two. 

Saute the garlic and shallots in olive oil until soft, along with the red pepper flakes, then toss in the squid rings and cook until they become opaque.
Add the tomato passata, wine, salt, pepper and basil, then simmer for about 30 minutes. You can do this an hour before serving if you're having company, then turn off the heat and gently simmer again for 10 or 15 minutes while you boil the pasta.
After the pasta is cooked to the al dente stage, add it to the sauce and stir to get everything well coated. Sprinkle with more fresh basil and serve with a good dry wine. We're planning to open up several bottles of nero d'avola. It's a red wine from Sicily and I know some people would say white wine only with fish. But squid in tomato sauce can hold its own with a medium to full-bodied red wine and nero d'avola is one of our favorites. But if you prefer white wine, do your own thing. But please, don't sprinkle parmesan cheese on this dish!

I think this is the perfect dish for Christmas eve, and one that's sure to please everyone around our table this year -- from my two-year old granddaughter to my 102 year-old father. I hope you make it too, whether for Christmas eve or another time.
Wishing you all a Buon Natale e felice anno nuovo.

If you'd prefer this dish with a garlic and olive oil sauce, click here for that recipe. For more Christmas eve fish ideas, click here.


Check out Ciao Chow Linda on Instagram here to find out what’s cooking in my kitchen each day (and more).


Calamarata pasta with calamari in tomato sauce
(serves four people)


1/2 cup olive oil
2 small shallots
4 large cloves of garlic
red pepper flakes, to taste
1 1/2 lbs. squid, cleaned and cut into rings
2 - 2 1/2 cups passata (or tomato puree)
3/4 cup dry wine (red or white)
1/2 teaspoon salt, pinch of black pepper
fresh basil
1 lb. calamarata pasta

Saute the shallots and garlic in the olive oil until limp. Add the red pepper flakes and the squid and cook the squid a few minutes until they are opaque. Add the wine, the passata and seasonings. Cook for 1/2 hour to 45 minutes.
Boil the pasta until al dente, then add to the sauce and stir everything together until the pasta is well coated. Sprinkle more basil on top and serve.


Sunday, November 5, 2023

Cappellacci stuffed with pumpkin

As the calendar moves toward Thanksgiving, many of you are starting to plan your meal for the big feast. In many Italian-American households, it wouldn't be Thanksgiving without a pasta first course. With so many squash and pumpkins in markets right now, it makes sense to use this delicious seasonal vegetable as part of your meal. I used a "cheese" pumpkin for this since it's much more flavorful than the Halloween jack o'lanterns. But another combination I love to use is mashed sweet potato mixed with butternut squash. To me, the taste is closest to the squash you find in Italy. You choose, depending on your preference and what's available where you live.

Making your own pasta may seem daunting, but the use of a food processor really speeds things along. Instructions below will guide you to make about six or seven dozen cappellacci. You can prepare everything ahead of time, then freeze the filled pasta in a single layer on a cookie sheet. When they're frozen, remove and place in a bag for the freezer, and you can pull them out right before you cook them.

Here's the technique: Take a teaspoon or so of the filling and drop it into a round of dough (I use a biscuit cutter to make the circles, but the rim of a glass works well too.)

Moisten one half of the edge of the circle and fold it over from the middle.

Then pick up the semi circle and pinch the ends together.

Squeeze to secure the ends. It helps if you use a dab of water.

Then flip up the edges to form a cappellaccio (from the Italian word for hat "cappello.")

Click on the video below for a demonstration of how to shape the cappellacci.


Once you get the hang of it, it won't take long to make enough for your meal.

Boil them in abundant water right from the freezer if you've made them ahead of time.


Serve with a simple sauce of butter, sage and parmesan cheese.

Check out Ciao Chow Linda on Instagram here to find out what’s cooking in my kitchen each day (and more).

Cappellacci Stuffed With Pumpkin

Ingredients

FOR THE PASTA: (makes about 75-80 cappellacci)

2 cups 00 flour

3-4 eggs, depending on humidity

FOR THE STUFFING:

1 cup cooked and mashed pumpkin (or squash or a combo of sweet potato and squash), drained overnight

3/4 cup grated parmesan cheese

4 amaretti cookies, crushed

a few gratings of nutmeg

salt, pepper to taste

FOR THE SAUCE:

1 1/4 sticks tablespoons butter

fresh sage leaves

parmesan cheese to sprinkle on top

Directions
Mix all the stuffing ingredients together and set aside while you make the pasta.
Using a food processor, add three of the eggs to the flour and whir together.
The mixture should start to form a ball, but if it looks too dry, add another egg.
Keep whirring until you have a mixture that will hold together when you press it with your fingers, but is not so wet that it is real sticky.
If it's too sticky, add more flour.
Dump it onto a floured board and knead it a bit till it easily forms a ball.
Let it rest at least a half hour to loosen the glutens and make it easier to work.
Roll it out by hand or with a pasta rolling machine, to one or two points thicker than the thinnest setting.
Cut circles using a glass or biscuit cutter, about three inches in diameter.
Place a small amount of filling in the center of the dough, moisten the bottom edge and fold in half, encasing the filling.
Using your fingers, moisten one edge of the cappellacci, then wrap it around your index finger, and let the two edges overlap a little.
Press them together securely and flip up the edges.
Boil and serve with butter melted and flavored with sage leaves.
Sprinkle parmesan cheese on top.
Cook within a few hours of making the cappellacci or store covered in refrigerator overnight.