Thursday, August 27, 2020

Foglie D'Ulivo with Browned Butter Pine Nut Sauce

Aren’t they cute? I was enchanted by this shape of pasta and learned to make it following a video by Rosetta Costantino on her excellent Instagram page. They’re called foglie d’ulivo (olive leaves). This pasta shape is widely known across Italy, but originally is from the Apulia region. It’s made similarly to orecchiette, another specialty of Apulia, but instead of forming round little “ears,” the leaf-like shape requires a different technique.

You can make this with plain white or whole wheat flour, but I added spinach to the dough to attain the bright green color, mimicking actual leaves. After making the dough, (and letting it rest at least a half hour), roll it out into snake-like shapes, then cut into small pieces, which you then roll into smaller “logs” that are slightly more lumpy in the center.

Here is a step by step demonstration of me shaping the pasta leaves.

It takes a little practice, but after a few minutes of trying, you’ll be an expert and these adorable little leaves will be the beautiful result of your labor.

I served them in two different ways – with a browned butter sauce and pine nuts, plus a sprinkle of parmesan cheese.Another time I tossed them with a summer salsa verde that was featured in Food 52 and includes mint, parsley, basil and capers. We liked it, but thought we might like the salsa better over fish or vegetables.We much preferred the browned butter/pine nut sauce over this pasta, or a traditional basil pesto. You might also like it with a red sauce, but I would keep it light and use fresh tomatoes (maybe even small cherry tomatoes) so the color and shape of the green leaves don’t disappear in the sauce.

If you’ve never made pasta at home before, foglie d’ulivo may seem a bit daunting. Want to increase your knowledge of making pasta, with a really comprehensive guide to everything pasta – from the ingredients to the techniques?  It’s an online cooking school run by two sisters in Rome, Benedetta and Valeria, who started their company, Local Aromas, to teach people about Italian food. Knowledgeable, enthusiastic and passionate about Italy and its food, they conduct food tours in Rome in addition to their online slate of classes. They started with courses on pasta and gnocchi but plan to expand in the future to include other foods and wines too. In their classes, you’ll learn why certain flours are used for certain pastas, how to make the dough and shape it to specific types of pasta, from farfalle to fettuccine and much more. Especially during this pandemic, if you can’t get to Italy and are looking for a great way to learn a new skill, sign up for a class at Local Aromas.

Click here to connect with me on Instagram and find out what’s cooking in Ciao Chow Linda’s kitchen each day (and more)

Spinach Foglie D’Ulivo with Browned Butter Pine Nut Sauce
Author: Ciao Chow Linda
Serves: 4 servings
Ingredients
  • FOR THE PASTA:
  • 1 10-ounce box frozen spinach, thawed
  • 2 cups 00 flour
  • 2 eggs
  • pinch of salt
  • FOR THE SAUCE:
  • 1/2 cup unsalted butter
  • 1/4 cup pine nuts, toasted
  • parmesan cheese, to taste
Instructions
  1. FOR THE PASTA:
  2. Drain the spinach thoroughly, squeezing out all the water you can with your hands.
  3. Then press it with paper towels to get out any remaining water.
  4. Place the spinach and the two eggs into the food processor to break down the spinach.
  5. Start adding the flour.
  6. You may need as little as a cup and a quarter of flour.
  7. It’s easy to add more flour later, but much harder to work the dough if you place too much flour into the food processor.
  8. Add just enough flour and process until the dough comes together into a ball.
  9. It will be sticky.
  10. Place the dough onto a wooden work surface, add more flour until the stickiness disappears and the dough seems more “homogenized” and softer.
  11. Cover the dough with plastic wrap or a bowl and let it sit for at least ½ hour.
  12. To make the foglie, take a piece of the dough and roll it out to a snake-like shape, about 1/2 inch thick and about 6 to 8 inches long.
  13. If you roll it too long, it’s harder to handle.
  14. Cut off small bits of the snake-like roll.
  15. Roll the small bit so it is a bit thinner on the ends than in the middle,
  16. Holding one part of the dough with one hand, use a knife or spatula in the other hand and press down on the dough, sliding the knife or spatula along the dough.
  17. Shape with your fingers to make the ends more like a “point” of a leaf if you like.
  18. Cook the pasta in abundant salted water.
  19. If you let the pasta dry overnight, it will take longer to cook, maybe as long as 15 minutes, depending on the thickness.
  20. Meanwhile, take the butter and place it in a saucepan.
  21. Cook it on medium heat until it starts to turn tan.
  22. It can burn easily, so be careful not to let it get to that point.
  23. Add the toasted pine nuts, then the drained pasta and toss everything together.
  24. Place in a serving bowl, then sprinkle with parmesan cheese.


Thursday, August 20, 2020

Brutti Ma Buoni

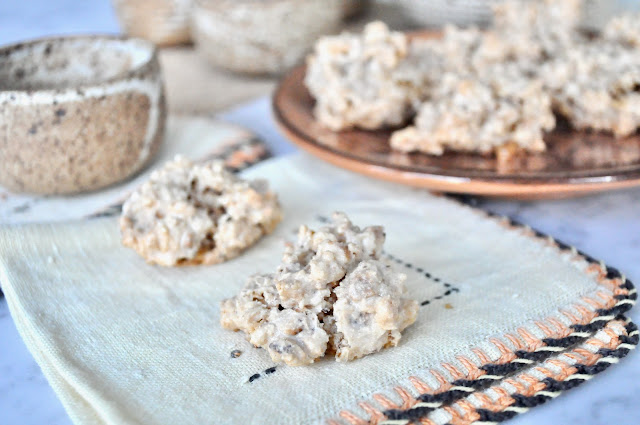
Do you ever make a recipe that calls for egg yolks only, leaving you with leftover egg whites? I sure do, and as a result, there are usually at least three containers in my freezer containing leftover egg whites. After thawing, they’re as good as using fresh egg whites, and they’re perfect for making these delicious cookies from Rosemary Molloy’s “Authentic Italian Desserts.” They’re also perfect for anyone on a gluten free diet, since no flour is involved. They’re called “brutti ma buoni,” or “ugly but good,” but I think that’s a misnomer. I wouldn’t call them ugly at all. Homely, maybe, but not ugly. And boy are they good. It’s hard to stop eating these, so make a double batch and watch them disappear.

Click here to connect with me on Instagram and find out what’s cooking in Ciao Chow Linda’s kitchen each day (and more)

Brutti Ma Buoni
Author: Rosemary Molloy’s “Authentic Italian Desserts” via Ciao Chow Linda
Ingredients
  • 2 large egg whites
  • 1 cup granulated sugar
  • pinch of salt
  • 1 cup finely chopped hazelnuts
Instructions
  1. Preheat oven to 300 degrees and line a 10 x 14 inch baking sheet with parchment paper.
  2. In a medium bowl, beat the egg whites on high speed until stiff, 2 to 3 minutes.
  3. Add the sugar and salt and beat on medium speed to combine.
  4. Fold in the hazelnuts.
  5. Pour the mixture into a medium pot over low heat and cook for 15 to 20 minutes, gently stirring continuously with a wooden spoon.
  6. The mixture is ready when it becomes a light brown color and has thickened.
  7. Remove the mixture from the heat and place heaping tablespoons on the prepared baking sheet.
  8. Bake for 18 to 20 minutes.
  9. Let the cookies cool completely before serving.


Wednesday, August 12, 2020

Everything Cheddar Tomato Bacon Grilled Cheese Sandwich

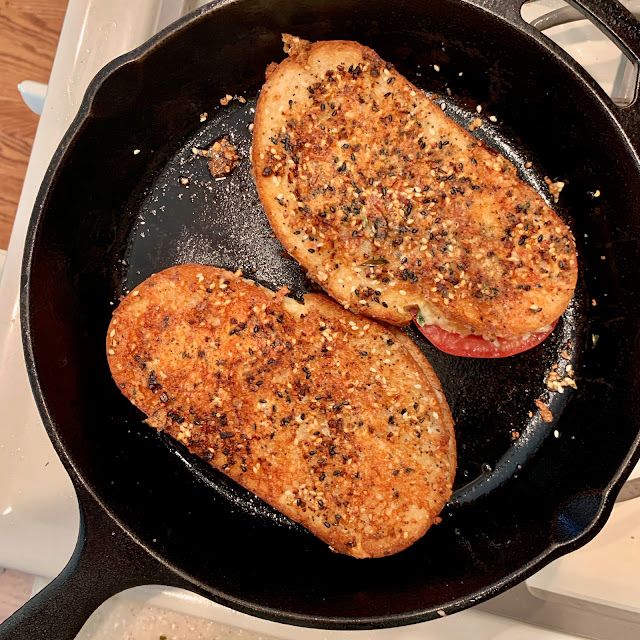
Who doesn’t love a grilled cheese sandwich? And particularly one that elevates the pedestrian sandwich to sublime, oozing with cheeses, herbs, bacon and tomato. If that’s not enough to convince you, just wait till you crunch into the coating of parmesan cheese and “everything-bagel” seeds after crisping the sandwich in butter. After I saw this posted on Half Baked Harvest‘s Instagram page, I knew it was in my future. Bacon is not a staple in my house, but I bought it to make this sandwich, and have to confess, I’ve been enjoying bacon for breakfast, lunch and dinner. It’s an indulgence to be sure, but even if you make it only once a year, this sandwich is worth the calories.

I cooked the bacon a day ahead, to make things go more quickly when I prepared the sandwiches the next day. When you’re ready to get the sandwiches started, slice the tomatoes and salt them first, then let them rest on paper towels to drain off some of the water, so your sandwich doesn’t get soggy. Mix the cheeses with the herbs. I used a combination of sharp white cheddar and Havarti with dill.

Don’t add any salt to the cheese, since the “everything bagel” seasoning (bought at Trader Joe’s but you can make your own with the recipe below) is salty enough. Spread the butter on the outside bread slices, then sprinkle with the parmesan cheese (which also is plenty salty) and the “everything bagel” seeds.

Assemble the interior of the sandwich, placing the cheese, tomatoes and bacon inside,

Top with the second slice of bread and sauté in butter.

Flip the sandwiches over and cook until nicely browned on both sides. Use a little more butter or olive oil if needed. (This is definitely NOT a low calorie meal).

Then get some napkins ready to keep your hands clean, and enjoy one of the best grilled cheese sandwiches you’ll ever eat. To really complete the meal, make yourself some tomato soup, the traditional accompaniment to grilled cheese sandwiches. And don’t forget to take a photo before you eat, as the bowl says.

Click here to connect with me on Instagram and find out what Ciao Chow Linda is up to in the kitchen (and other places too) each day.

Everything Cheddar Tomato Bacon Grilled Cheese Sandwich
Author: Ciao Chow Linda via Half Baked Harvest
Ingredients
  • 1 tomato, thinly sliced
  • kosher salt and black pepper
  • 4 slices sourdough bread
  • 1 cup shredded sharp cheddar cheese
  • 1/2 cup shredded Havarti cheese
  • 1/4 cup fresh basil, chopped
  • 1 tablespoon fresh thyme leaves
  • 1 tablespoon fresh chopped chives
  • 4 tablespoons salted butter, at room temperature
  • 2 tablespoons grated parmesan cheese
  • 2-4 tablespoons everything bagel spice (recipe below)
  • 2-4 slices cooked crispy bacon
  • 1-2 tablespoons butter or olive oil to cook the sandwiches
Instructions
  1. Arrange the tomatoes on a cutting board and sprinkle with salt and pepper.
  2. Let sit 15 minutes to draw out excess moisture.
  3. In a bowl, combine the cheddar, Havarti, basil, thyme, and chives.
  4. Brush the outside of each slice of bread with butter.
  5. Sprinkle the parmesan and everything spice over both buttered sides of the bread, pressing the spice mix gently into the bread to adhere.
  6. On the inside of half of the slices of bread, evenly layer half of the cheese mix, the tomatoes, bacon, and the remaining cheese. Add the top piece of bread.
  7. Heat 1-2 tablespoons butter or olive oil in large skillet over medium heat.
  8. Place the sandwiches in the skillet and cook until golden on each side, about 3-5 minutes per side.
  9. Everything Spice: In a small bowl, combine 3 tablespoons toasted white or black sesame seeds, 2 tablespoons poppy seeds, 2 teaspoons dried onion., 2 teaspoons dried garlic, and 1 teaspoon kosher salt. Keep stored in a cool, dry place.


Tuesday, August 4, 2020

Summer Minestrone

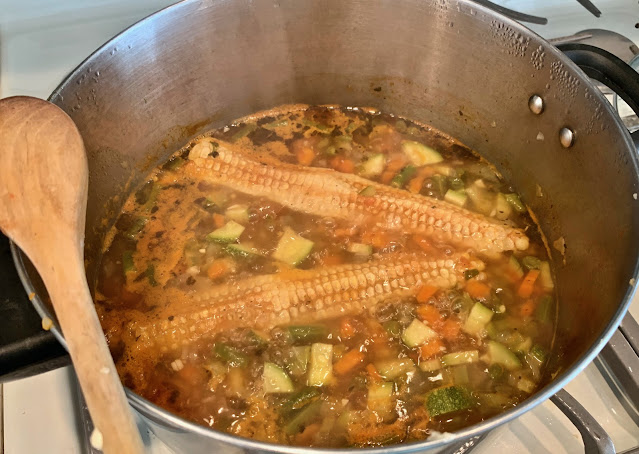
It doesn’t matter whether it’s winter or summer, but for me, soup is always welcome at the table. And when you’ve got summer produce like zucchini, beans and corn at their freshest, why not make a minestrone soup and combine them all, adding some carrots and celery along the way? Don’t forget the pasta too, which in this case was some homemade pasta scraps I cut out and left to dry after a ravioli-making session a while ago. If I hadn’t used homemade pasta bits, I would have tossed in some store-bought ditalini or orzo pasta or maybe even elbow macaroni. I normally cook the pasta in a separate pot of water and add it to the soup when I’m doling it out into the bowl. Otherwise, if you’ve got leftover soup and have added too much pasta to start with, you’re likely to end up with hardly any broth. By the way, this soup is even better the second day, when it’s had more time for all the flavors to blend and the starch from the beans is released to make it a bit thicker.

There is no meat in this soup recipe, but feel free to use some chicken or beef broth if you like. But it’s got plenty of flavor without it, especially if you’ve added the corn cobs to the broth and a parmesan rind or two. Don’t forget to take them out before serving though, or someone could be in for a surprise! Also, the amounts and varieties of the vegetables are up to you. If you want more corn, add it. Or if you don’t like beans, leave them out. Mix and match with whatever suits your fancy.

By the way, I was so thrilled to post this soup using this bowl, which brought back memories of my mother and something she used to say quite often at the table when I was growing up.

For those of you who don’t speak Italian, here’s the translation: “Either eat this soup, or jump out the window.” Fortunately my mom was a great cook, hence we had no window jumpers in my family.

Click here to connect with me on Instagram and find out what Ciao Chow Linda is up to in the kitchen (and other places too) each day.

Summer Minestrone
Author: Ciao Chow Linda
Ingredients
  • 1 Tablespoon olive oil
  • 1 cup minced onion
  • 2 garlic cloves, minced
  • 3 stalks of celery, minced
  • 1 cup diced carrots
  • 1 1/2 cups chopped green beans
  • 2 cups chopped zucchini
  • 8 cups water
  • a parmesan cheese rind
  • 1 cup pureed plum tomatoes
  • 1 can white beans, rinsed and drained
  • 1 can red or black beans, rinsed and drained
  • 2 ears of corn, stripped off the cob, but retain the cob to put in the pot
  • 2 teaspoons salt
  • 1/4 teaspoon black pepper
  • fresh basil, thyme and parsley
  • 1 teaspoon dried parsley
  • ditalini, elbows or orzo pasta
  • parmesan cheese to sprinkle on top
Instructions
  1. Place the olive oil in a large pot, and sauté the onion, garlic and celery until soft but not browned.
  2. Add the carrots, green beans, zucchini, water, parmesan cheese rind and tomatoes.
  3. Add the salt, pepper and fresh and dried herbs.
  4. Cook everything together at a low simmer for 45 minutes, adding the corn cobs.
  5. Remove the corn cobs from the pot and add the beans and the corn kernels.
  6. Cook for another 1/2 hour.
  7. Meanwhile, cook the pasta in water in a separate pot.
  8. When the vegetables are cooked, add some of the pasta to the soup and serve in bowls.
  9. If you’re not serving all the soup at once, wait to add the pasta, otherwise the pasta will become overcooked and mushy when you reheat it.