Tuesday, December 13, 2022

Torrone and Pistachio Semifreddo

With the holidays fast approaching, it’s time to get serious about making things ahead of time to serve with little to no effort when family and friends gather. Nothing could be more welcome at dessert, especially a holiday dessert, than a semifreddo. Those of you familiar with it know it’s very similar to ice cream, but no churning is involved. Semi-freddo means half cold in Italian, and this dessert, with its flavors of pistachio and almond torrone, topped with a chocolate sauce, will have you wishing you had made a double batch (or invited fewer people). I’ve made it a couple of times in the past month for dinner parties and it was a huge hit with everyone, including my husband, who might have eaten the whole thing if other people hadn’t been present.

Semifreddo can be made with lots of different flavorings, but since I brought back some torrone (a nougat candy) and some pistachio cream from my last trip to Italy, I was itching to use them both in a semifreddo. Both can be found here in the U.S., with a minimum of searching online. Make sure to buy the HARD torrone, since you’ll be able to crush it into small pieces. The soft torrone just won’t work here. I used an almond torrone but it’s also available with hazelnuts (my favorite). It comes in a long box with a hard brick of torrone inside, made with nuts, sugar and egg whites, and sometimes citrus flavoring. I used a meat pounder to crush the hard torrone into small bits.

Like many ice cream recipes, my semifreddo calls for egg yolks and sugar to be blended together, and I always cook them over a double boiler to thicken them. Be careful though to whisk nonstop or you risk having sweetened scrambled eggs. It seems like it will take forever to get to this creamy, velvety stage, but it’s really only five or six minutes of steady whisking. Don’t leave the stove to do anything else until it’s done. Remove and let cool. When it’s cooled, I add rum to the egg yolks as a flavoring, but you can use any alcohol you like — bourbon, rye, even anisette or amaretto would be good.

After the cooked egg yolk mixture is cooled, fold in the beaten egg whites and the chopped torrone.
Then gently fold in the whipped cream.

Now divide that mixture in half and add a few tablespoons of that half to half a jar of pistachio cream. The jars are generally 7 or 8 ounces. You want to start out by blending a small portion of the mixture with the pistachio cream because the pistachio cream can have a very dense consistency and you could deflate the semifreddo mixture if you stirred vigorously to blend in the pistachio creamAfter you’ve “lightened” the pistachio cream with a small bit of the egg white and whipped cream mixture, continue to add the rest of  the half that was set aside for the pistachio mix. I sure hope I’m not confusing you, but when you’re done, you should have two bowls of mixtures — one with the pistachio cream mixed it, that’s pale green, and one without the pistachio mix, that’s beige-y or pale yellow.Start spooning the mixtures into the loaf pan, alternating colors. Fill the entire loaf pan. My loaf pan measured 8 1/2″ x 4 1/2″ x 2 1/2″.My loaf pan was beginning to overflow, so I also filled two pyrex cups for individual portions that I could also freeze (more for hubby, whose three-times-a-week tennis habit allows him to indulge with lttle to no guilt.) Cover with plastic wrap and freeze everything overnight.

When ready to serve, flip onto a platter and remove the parchment paper or plastic wrap. Slice and serve with chocolate sauce. This was enough for eight generous servings and there was no leftover — people were practically licking their plates.If you don’t want to serve it as slices, you could make the entire semifreddo in individual serving sizes. I used glass pyrex cups for these. You’d probably easily get 10 to 12 individual portions using small one-cup glass pyrex containersThe chocolate sauce is not to be skipped. It’s a cinch to make and so good I have no doubt you’ll be pouring it generously over this semifreddo or any ice cream in your freezer. Holidays will be merry when you bring this to the table. Buon Natale, Happy Hanukkah and the best of the season to all my readers.Check out Ciao Chow Linda on Instagram here to find out what’s cooking in my kitchen each day (and more).

Torrone and Pistachio Semifreddo
Ingredients
  • 6 eggs
  • 6 T. sugar
  • 1 T. rum
  • 2 cups heavy cream
  • 1 cup chopped up almond or hazelnut torrone (the hard, crunchy kind, typically sold in a long box usually about 5.3 ounces. I used about half the box.)
  • 1/2 jar of pistachio cream (jars are usually 7 or 8 ounces)
Instructions
  1. Break up the torrone into small pieces.
  2. (I used a meat pounder and placed the torrore between clean dish towels so it wouldn’t spew all over the kitchen.)
  3. Separate the eggs, but you will only need four of the egg whites.
  4. Save the other two egg whites for another use.
  5. In a double boiler, place the egg yolks and the sugar.
  6. Whisk over warm water until you get a velvety, thick mass.
  7. (Don’t move away from this or you could end up with scrambled eggs.)
  8. Some recipes call for using raw eggs, but I like to err on the side of caution and cook my egg yolks.
  9. Let it cool slightly, then add the rum, whisking it in.
  10. Place it to the side or in the refrigerator, but if you let it chill too long, it will become hard to work with.
  11. Whip the four egg whites until they form stiff peaks.
  12. Add the chopped torrone and the cooled egg yolk mixture to the whipped egg whites, folding everything together.
  13. Beat the cream until stiff.
  14. Fold the egg yolk, whipped egg whites and torrone mixture thoroughly with the whipped cream.
  15. Remove half of this mixture to a separate bowl and set aside.
  16. The pistachio cream can be quite dense, so if you put it all into the mixture from the jar all at once, you risk deflating it too much.
  17. Instead put tthe pistachio mixture into a bowl and mix into it only a few tablespoons of the egg white, egg yolk and whipped cream mixture to “lighten it up.”
  18. Then add the rest of the other half of tthe mixture to the pistachio cream and fold in thoroughly.
  19. You should now have two bowls, one that’s beige with the torrone in it, and one that’s pale green with the torrone and pistachio cream mixture.
  20. Line a loaf pan (8 1/2″ x 4 1/2″ x 2 1/2″) with parchment paper.
  21. Using a large serving spoon, place alterrnating spoonfuls of the beige torrrone mixture with the pistachio mixture.
  22. Continue layering until you reach the top of the pan.
  23. Place a piece of plastic wrap or aluminum foil on top and freeze overnight.
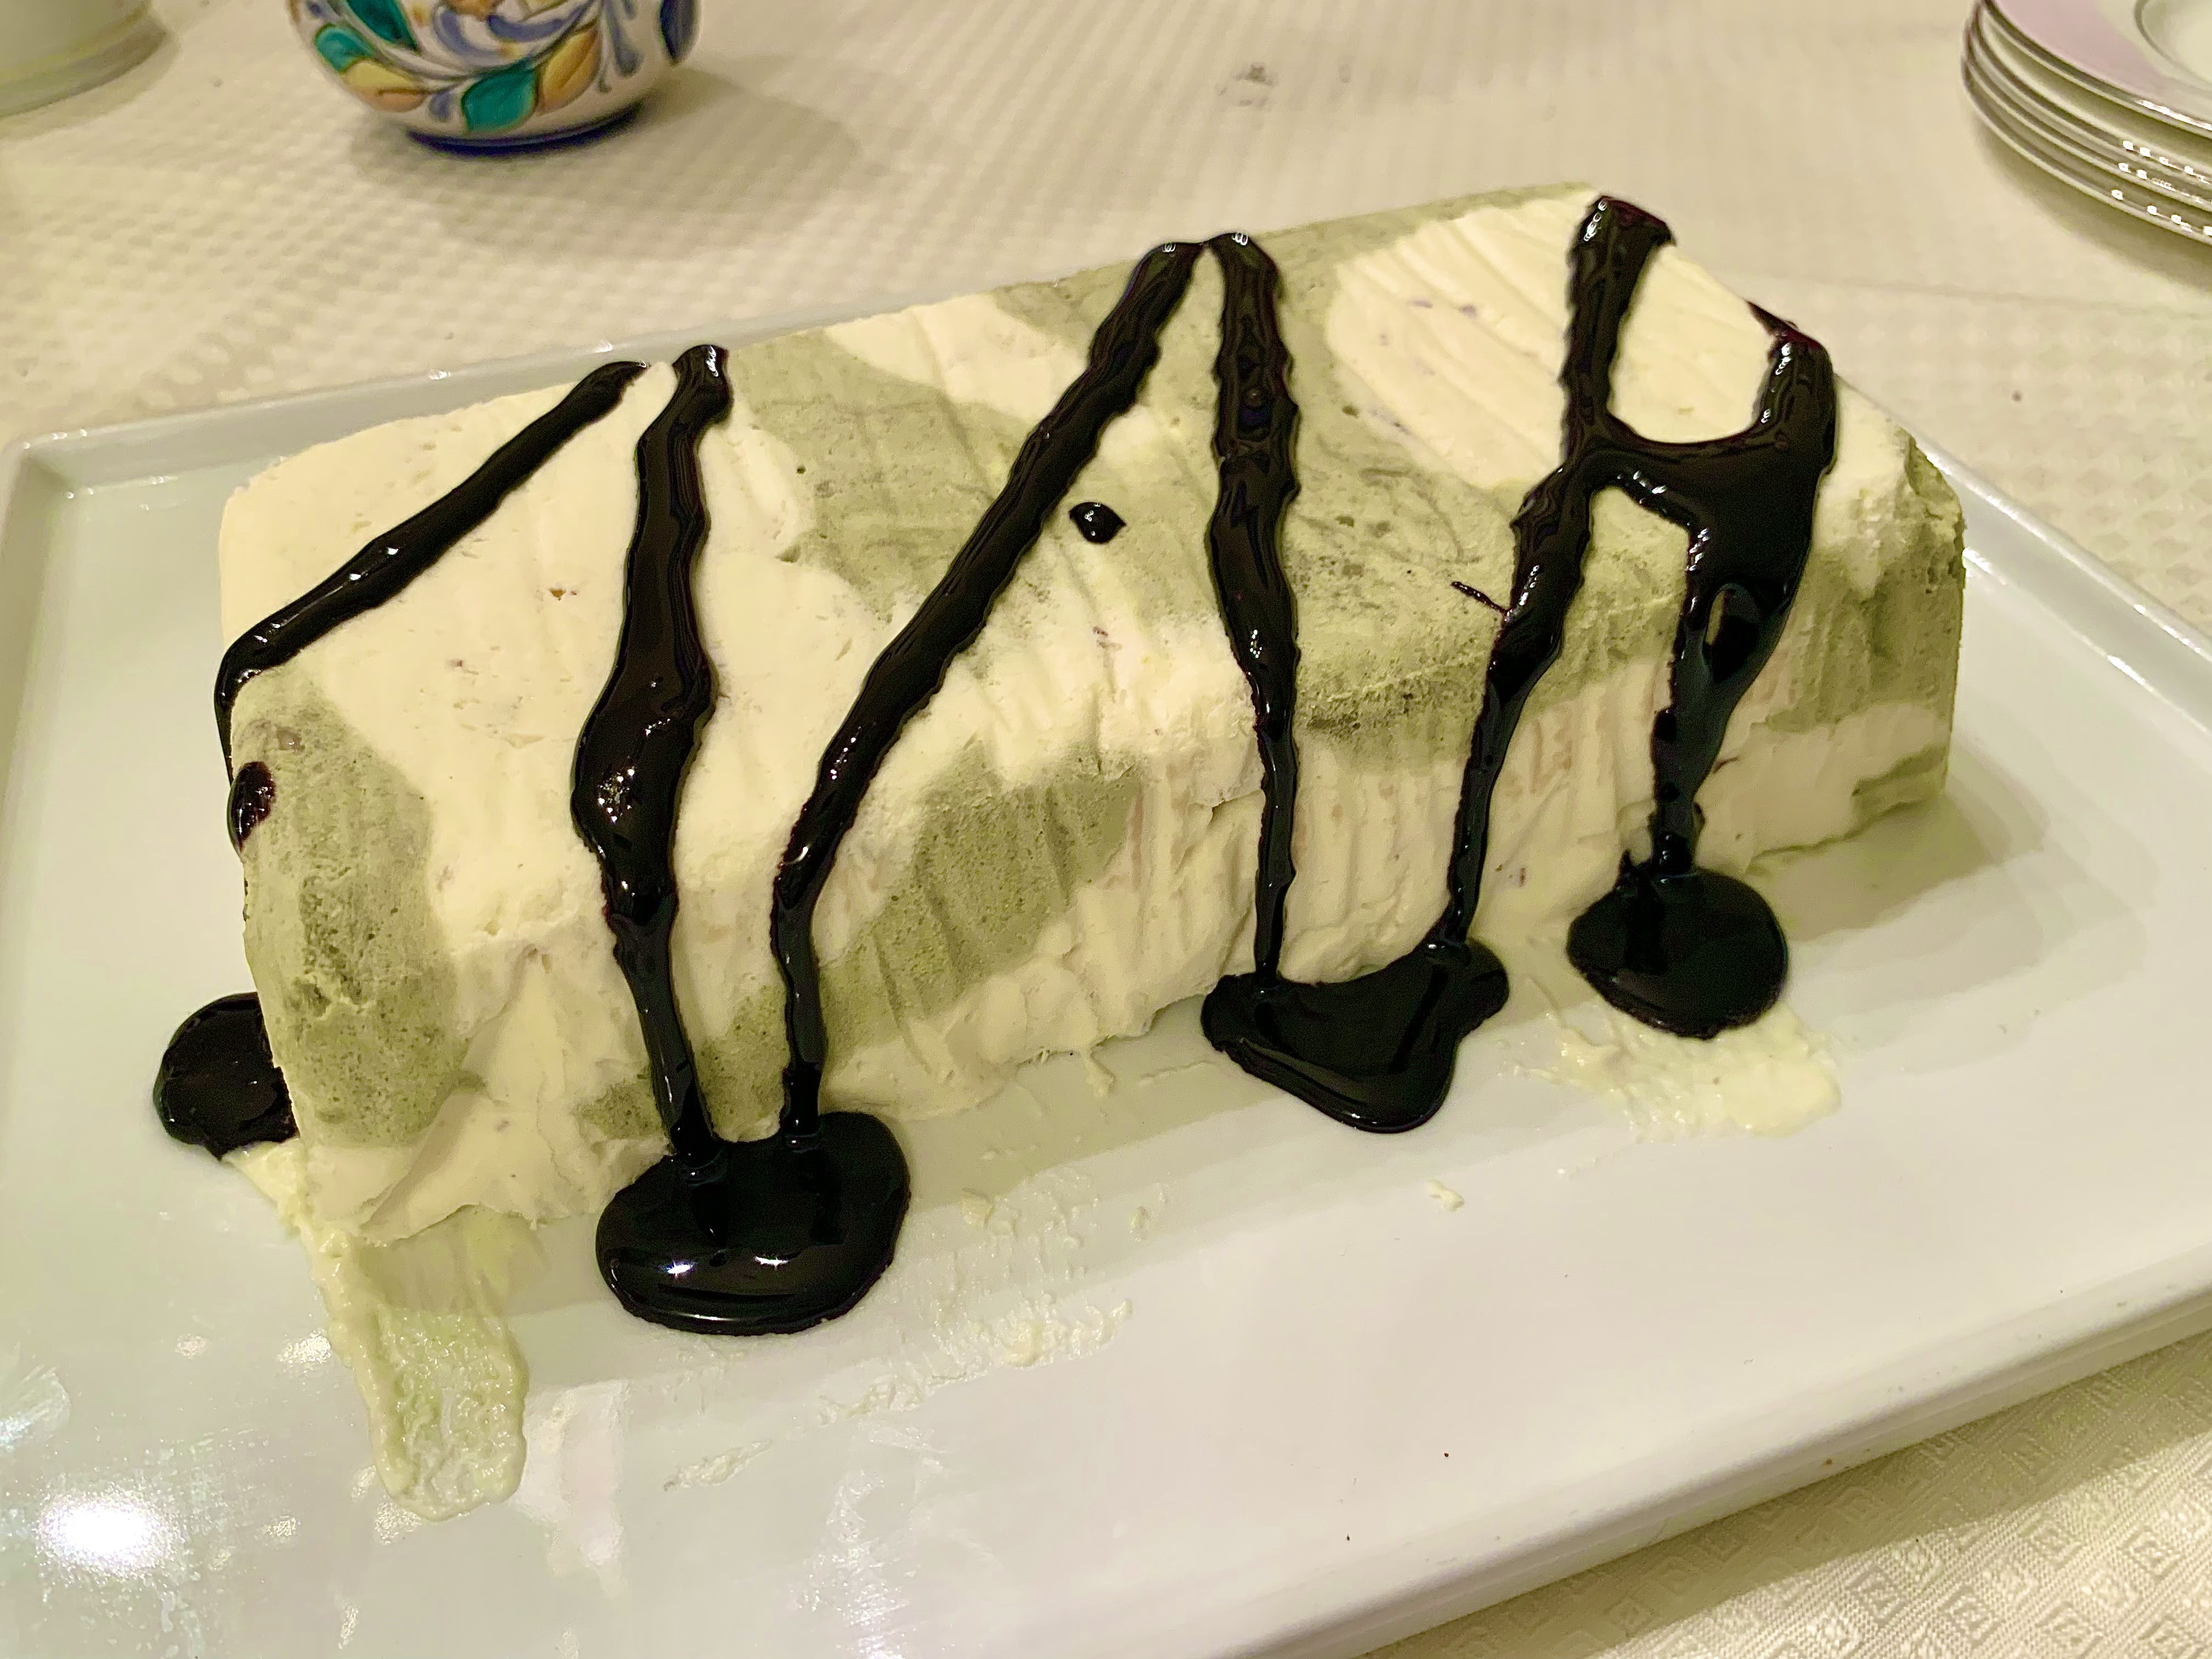
  24. When ready to serve, run a knife around the edge,and flip it over onto a serving platter, removing the parchment paper.
  25. If it doesn’t want to come loose, let the pan soak for a few seconds in hot water, then flip it onto a platter.
  26. Serve with chocolate sauce
  27. CHOCOLATE SAUCE:
  28. 1/2 cup unsweetened cocoa powder
  29. cup granulated sugar
  30. 1/8 teaspoon kosher salt
  31. 1/2 cup cold water
  32. 1/2 teaspoons vanilla
  33. In a saucepan, whisk together the cocoa, sugar and salt.
  34. Add the cold water and bring to a boil.
  35. Let it simmer for a couple of minutes, making sure all the lumps are dissolved.
  36. Remove from heat and add the vanilla.
  37. The sauce will be quite runny when it’s hot so let it sit at room temperature for several hours before using it, or place in the refrigerator to thicken in a shorter time.


Monday, December 5, 2022

Pecan Diamond Cookies

The cookie baking season has begun and if you love pecans, you’ll love these cookies. I do love pecans, and you’d think I’d love pecan pie. But whenever I give pecan pie a try, I’m usually disappointed, because below the tempting pecans on top, it’s frequently filled with a gluey, gloppy layer of corn syrup below. And biting into a forkful of corn syrup is not my idea of good eating. If you’re like me then, these pecan diamond cookies are for you.

These cookies have a buttery, shortbread-type cookie below, and caramel-y, sticky pecans on top — no corn syrup involved! The recipe is one I used to make decades ago and came from an issue of Family Circle Magazine in December, 1979, before a lot of you readers probably were even born. But I’ve got lots of recipes I cut out and saved from the magazine, which stopped publishing in 2019.

If you can resist eating them all, they keep for a long time in a sealed tin, making them perfect for shipping to favorite folks for the holidays. You can freeze them too, and have them ready as your secret stash for when you get the munchies.

But don’t say I didn’t warn you when you can’t stop at one or two.

P.S. To those of you who are on my mailing list, sorry for any glitches recently. I’m updating my email feed, since Feedburner is no longer available and there have been a few “growing pains” resulting in duplicate emails. Hopefully, that’s straightened out now. And if you’re not on my email list, please sign up in the box at right where it says “subscribe to the blog.” Grazie mille.

Check out Ciao Chow Linda on Instagram here to find out what’s cooking in my kitchen each day (and more).

Pecan Diamond Cookies
Ingredients
  • 1/3 cup butter
  • 1/4 cup sugaar
  • 1 egg
  • 1 1/4 cups unsifted all-purpose flour
  • 1/2 cup (1 stick) buttter
  • 1/3 cup firmly packed dark brown sugar
  • 3 tablespoons sugar
  • 1/3 cup honey
  • 2 tablespoons heavy cream
  • 6 ounces pecans, coarsely chopped
Instructions
  1. Beat 1/3 cup butter with 1/4 cup sugar in a small bowl witth electric mixer until light and fluffy.
  2. Beat in egg.
  3. Stir in flour, mixing well, until a soft dough forms.
  4. Spread evenly into a lightly greased 9 x 9 x 2 inch baking pan.
  5. Dough will be thin.
  6. Bake in a 375 degree oven for 12 minutes or until dough begins to firm up but is not fully cooked.
  7. Remove pan to wire rrack.
  8. Lower temperature to 350 degrees.
  9. Meanwhile, melt rrremaining 1/2 cup butter in aa medium size saucepan.
  10. Add brown sugar, the 3 tablespoons sugar and honey.
  11. Bring to boiling; boil raapidly 2 1/2 minutes.
  12. It will be caramel colored and thick.
  13. Carefully add the creaam and bring back to boiling.
  14. Remove from heat.
  15. Stir in the pecaans.
  16. Spread mixture evenly over cookie dough.
  17. Bake at 350 degrees for 25 minutes or until pecan mixture is bubbly and begins to set.
  18. Remove to wire rack
  19. Cool completely
  20. Pecan topping will become firm upon cooking.
  21. Cut into 8 lengthwise strips and 9 diagonal strrips to make diamond-shaped cookies.


Monday, November 28, 2022

Pork Belly Porchetta

If you’ve ever eaten porchetta in Italy, you know it’s savory, it’s succulent and it’s insanely delicious. It’s usually served on a roll and eaten as a sandwich. Frequently, you’ll see an outdoor vendor selling porchetta sandwiches at street fairs and markets, and they’re hard to resist. There’s also a terrific informal trattoria in Rome and in Milan called “La Prosciutteria” where you can buy fabulous porchetta sandwiches which I once snuck back into the U.S. (shh!)

Now you can make your very own porchetta, with flavors and crackling skin similar to the ones you get in Italy. A lot of recipes will show using a pork loin wrapped in a pork belly, but those roasts become so large and unwieldy and serve enough to feed a small neighborhood. The center of the pork loin also has a tendency to dry out, even when it’s wrapped in a pork belly. I’ve also cooked a pork shoulder in a “porchetta-style,” splayed out and spread with herbs and spices then tied up securely and roasted for hours. While it’s delicious, it doesn’t come close to the results you get cooking a pork belly alone. After all, pork belly is the part of the pig where bacon comes from, and we all know everything tastes better with bacon. When cooked at a low temperature for many hours, a pork belly will result in one of the best things you’ve ever eaten, with a crunchy outer skin and plenty of meat in the interior that just melts in your mouth.

I was able to find this pork belly at Costco, and made it for our Thanksgiving meal instead of turkey, a break with tradition that no one regretted. You should prep it at least a day ahead of time to give the herb and spice rub time to do its magic, but it can prepared up to three days ahead and sit in the refrigerator, making it perfect for holidays when you’ve got lots of other dishes to prepare at the last minute.

Score the pork belly and season with the herb, spice and garlic mixture.


Then roll it up like a jelly roll and using butcher’s twine, secure it tightly all the way around.


Here’s a side view, and you can see it’s got plenty of meat, not just fat (although it’s got plenty of that too.) The recipe also calls for you to rub the exterior of the roast with a mixture of kosher salt and baking powder, which I did.  

I then wrapped it tightly in aluminum foil and placed it in the refrigerator for a full day and a half. Place it on a wire rack to roast.


It cooks for a long time, starting at 300 degrees for about two hours or until the temperature reaches 160 degrees. 

The recipe (from J. Kenji Alt-Lopez) says to roast it another two hours at the same temperature, but after two and a half hours, I lowered the oven temperature to 250 degrees and cooked the roast for nearly four more hours since it suited our time schedule better (We wanted to go to a nearby park with our granddaughter while the roast cooked).  Besides, a long, slow roast results in really tender meat. Once you start to see drippings, you should also baste it every half hour, but I skipped this step while we skipped out to the park and it didn’t have any negative effect. 

For the final half hour, the recipe says to crank up the heat to 500 degrees, but after ten minutes at that high temperature, I could see that the upper skin was starting to burn. So I removed the roast from the oven, lowered the temperature to 400 degrees and let it continue to brown. Next time, I think I’ll keep it at 400 degrees for the full last half hour, or even stretch it a little longer until it achieves this nice golden outer crust.  In total, I think my roast was in the oven for six and a half hours. Sinking your teeth into that juicy crunchy crust is almost the best part.

But the inside is pretty darn irresistible too, with those fennel, garlic and rosemary flavors. Try it sometime when you’ve got a large family gathering — maybe even this Christmas or New Year’s Day. Since we were only five for Thanksgiving this year, we had lots of leftovers, but enjoyed a slice of porchetta on a crusty roll the next day. Slathered with some red pepper aioli or even some leftover cranberry sauce, it was the perfect day-after-Thanksgiving treat.

Check out Ciao Chow Linda on Instagram here to find out what’s cooking in my kitchen each day (and more).

The full recipe is from J. Kenji Lopez-Alt/Serious Eats

Pork Belly Porchetta
Ingredients
  • 1 whole boneless, rind-on pork belly, about 12 to 15 pounds (5.4 to 6.8kg)
  • Recipe adapted from J. Kenji Lopez-Alt/Serious Eats
  • 2 tablespoons whole black peppercorns
  • 3 tablespoons whole fennel seeds
  • 1 tablespoon crushed red pepper
  • 3 tablespoons finely chopped rosemary
  • 12 cloves garlic, grated on a microplane grate
  • grated rind of one lemon
  • Kosher salt
  • 2 teaspoons baking powder
Instructions
  1. Place pork belly skin-side down on a large cutting board.
  2. Using a sharp chef’s knife, score flesh at an angle using strokes about 1-inch apart.
  3. Rotate knife 90 degrees and repeat to create a diamond pattern in the flesh.
  4. Toast peppercorns and fennel seeds in a small skillet over medium-high heat until lightly browned and aromatic, about 2 minutes. (I forgot this step and skipped it.)
  5. Transfer to a mortar and pestle or spice grinder and grind until roughly crushed, along with the rosemary, red pepper and lemon peel.
  6. Place the spices, herbs and lemon peel in a small bowl and add the minced garlic.
  7. Season pork liberally with salt then sprinkle with the spice mixtures.
  8. Use your hands to rub the mixture deeply into the cracks and crevices in the meat.
  9. Roll belly into a tight log and push to top of cutting board, seam-side down.
  10. Wrap kitchen twine tightly around the pork.
  11. Combine 2 tablespoons kosher salt with 2 teaspoons baking powder. Rub mixture over entire surface of pork.
  12. If roast is too large and unwieldy, carefully slice in half with a sharp chef’s knife. Wrap tightly in plastic and refrigerate at least overnight and up to 3 days. If desired, porchetta can also be frozen at this point for future use
  13. Adjust an oven rack to the lower-middle position and preheat oven to 300°F (150°C).
  14. Place pork in a V-rack set in a large roasting pan, or if cooking both halves at the same time, on a wire rack set in a rimmed baking sheet.
  15. Place roasting pan in oven and roast until internal temperature of pork reaches 160°F (71°C), about 2 hours, basting with pan drippings every half hour.
  16. Continue roasting until a knife or skewer inserted into the pork shows very little resistance asides from the outer layer of skin, about 2 hours longer.
  17. (I lowered the temperature to 250 and roasted for 3 hours longer)
  18. Increase oven temperature to 500°F (260°C) and continue roasting until completely crisp and blistered, about 20 to 30 minutes longer.
  19. (After about 10 minutes with the oven at 500 degrees, the skin was starting to burn, so I lowered the temperature to 400 degrees and finished roasting for 20 more minutes.
  20. Alternatively, you can remove the roast from the oven and tent with foil for up to 2 hours before finishing it in a preheated 500°F oven.
  21. Tent with foil and allow to rest for 15 minutes (I rested it for 1/2 hour, which gave me time to bake popovers and finish the mashed potatoes and other vegetables.)
  22. Slice with a serrated knife into 1-inch thick disks and serve.


Tuesday, November 15, 2022

Corn Pudding

Are you still deciding on sides for Thanksgiving? To some, they’re the best part of the meal (although desserts are prettty high in the running too). If you want to make a delicious and easy side dish that serves a lot of people, look no further than this corn casserole. The recipe comes from  Southern Living magazine. and can even be made the day before and stored in the fridge, ready to bake on Turkey Day.I served it last Thanksgiving and it even impressed a gluten-free friend, who said she could eat it since it contained only six tablespoons of flour for the whole casserole — not enough for her to be worried about.  We were only four people around the table last year, so I had a ton of the casserole leftover and my guests went home with some of it. But you could easily cut the recipe in half if you’re having only a few people around the table. No matter how many are at the table, or what you serve, it’s a time of gratitude for the blessings in our lives. I hope your Thanksgiving and the year ahead are filled with blessings for you and the ones nearest to you.

Check out Ciao Chow Linda on Instagram here to find out what’s cooking in my kitchen each day (and more).

Corn Pudding
Ingredients
  • 4 large eggs
  • 2 1/2 cups half-and-half
  • 2 (15-oz.) pkg. frozen corn (I didn’t thaw it)
  • 8 ounces fontina or Swiss cheese, (I used a combination of cheddar and Swiss cheese) shredded (about 2 cups)
  • 1/2 cup grated yellow onion (from 1 large onion)
  • 6 tablespoons all-purpose flour
  • 2 teaspoons minced garlic (about 2 garlic cloves)
  • 2 tablespoons chopped fresh chives, plus more for garnish
  • 1 tablespoon chopped fresh thyme, plus more for garnish
  • 2 teaspoons kosher salt
  • 1 teaspoon black pepper
Instructions
  1. Whisk together eggs and half-and-half in a large bowl.
  2. Pulse corn, in 2 batches, in a food processor until coarsely chopped, about 5 times.
  3. Add to egg mixture along with cheese, grated onion, flour, garlic, chives, thyme, salt, and pepper. Stir to combine.
  4. Transfer to a lightly greased 13- x 9-inch baking dish; cover and chill until ready to bake, up to 1 day ahead.
  5. Preheat oven to 350°F.
  6. Remove casserole from refrigerator while oven preheats.
  7. Bake, uncovered, until golden and bubbly around edges and center is just set, about 45 minutes.
  8. Let stand 10 minutes before serving.
  9. Garnish with thyme and chives.


Monday, November 7, 2022

Pumpkin Spice Coffee Cake

I hope you’re not “pumpkined-out” yet this fall, because this is one recipe (from the website “Handle With Heat” ), you need to try. It’s got that seasonal pumpkin and spice flavor, it’s moist, and has an irresistible crunchy crumb topping, finished with a glaze of maple sugar. 
Don’t fight it — just make it
Click here to connect with me on Instagram and find out what’s cooking in Ciao Chow Linda’s kitchen each day (and more)
Pumpkin Spice Coffee Cake
Ingredients
  • From the website “Handle The Heat”
  • FOR THE STREUSEL:
  • 1/2 cup light brown sugaar
  • 1/4 cup all-purpose flour
  • 1/2 cup finely chopped pecans
  • 1 teaspoon ground cinnamon
  • 3 tablespoons unsalted butter, melted
  • FOR THE CAKE:
  • 2 cups all-purpose flour
  • 1 teaspoon baking powder
  • 1/2 teaspoon baking soda
  • 1/2 teaspoon fine salt
  • 1/2 teaaspoon ground cinnamon
  • 1/4 teaspoon ground ginger
  • 1/4 teaspoon ground nutmeg
  • 1/2 cup light brown sugar
  • 1/2 cup granulated sugar
  • 1 cup pumpkin puree
  • 1/2 cup vegetable oil
  • 4 ounces sour cream at room temperature
  • 2 laarge eggs, beaten
  • FOR THE GLAZE:
  • 1/2 cup powdered sugar, sifted
  • 2 tablespoons maple syrup
Instructions
  1. Preheat oven to 350 degrees.
  2. Spray the bottom of an 8-inch square pan with nonstick spray.
  3. MAKE THE STREUSEL:
  4. In a small bowl, combine all the streusel ingredients with a fork until crumbly.
  5. MAKE THE CAKE:
  6. In aa large bowl, stir together the flour, baking powder, baking soda, salt, cinnamon, ginger, nutmeg, brown sugar and granulated sugar.
  7. In a small bowl, stir together the pumpkin puree, oil, sour cream and eggs.
  8. Make a well in the center of the dry ingredients, then pour in the wet ingrients.
  9. Gently stir until just combined.
  10. Spoon half the batter into the prepaared pan, Sprinkle with half the streusel.
  11. Spread the remaining batter over the streusel.
  12. Sprinkle with the remaining streusel.
  13. Bake for 35 minutes or until aa toothpick inserted in center comes out clean.
  14. Glass and ceramic pans take longer to bake than metal.
  15. Cool for 15 minutes
  16. MAKE THE TOPPING:
  17. In a small bowl, combine the sugar and maple syrup until a thick, pourable icing forms.
  18. Drizzle over the warm cakae.
  19. Cut into squares and serve.


Tuesday, October 18, 2022

Marie's Salmon Cakes

Like many of you, I’m a big fan of salmon, but I usually make salmon filets, not salmon cakes. However, I wanted to post something from my friend, Marie, of Proud Italian Cook,  not just because she has great recipes, but for another important reason. Please read to the end to find out why. She has posted so many good recipes over the years, it was hard to choose which to make. But in the end, I decided it was time to try her salmon cakes. They did not disappoint. They were exquisitely delicious and a nice change from the typical salmon filets. I added the red pepper aioli to serve with them, because I love aioli on anything, from sandwiches to a vegetable dip.

Marie starts by sauteeing the minced vegetables, then letting them cool for a bit before adding to the salmon, which is fresh from the fish market, not canned.I bought about a pound of salmon (Marie’s recipe uses about 1 1/2 pounds) and chopped it with a knife — not so fine that it was like mincemeat, but with pieces that were recognizable as salmon. One pound was plenty for two people and it made four large cakes. I even had one salmon cake left over since we were too stuffed to each finish two of them.

Mix everything together with a wooden spoon. It smelled so good just in its raw state, with all the seasonings, that we knew they’d be even better after they were cooked.

I used a muffin cutter to shape the salmon cakes. Press down with a spoon to make them compact, then gently lift the form. It came off easily. Marie suggests letting them chill for at least two hours to avoid having them fall apart while cooking. Well, I was impatient and waited only an hour, and it worked out fine. I dusted them with bread crumbs after they had chilled for a while.

Then I sauteed them in a saucepan on both sides with a little olive oil, before placing them in the oven to finish at 450 degrees F.

Mine took about ten minutes in the oven to cook, but they were quite thick. Depending on how thick you make them, you might need less, or more time in the oven. Serve them as is, with a squirt of lemon, or with this simple red pepper aioli sauce I made in the blender. These were so good I plan to make them for company real soon

Now, the other reason I am posting this recipe of Marie’s, is to lend support to a friend who has recently been diagnosed with stage four ovarian cancer. Marie has just started treatment for this dreaded scourge and her challenge is formidable. In solidarity and to honor his mother, Marie’s son has signed up to run the Boston marathon in her name to raise money for cancer research. Although we initially met on the blogosphere, I’ve also met Marie in person, and she is just as sweet and sincere in real life as she comes across on her blog. She has given so much to her readers with her recipes over the last nearly 15 years, let’s show her that we’re behind her 100 percent in the fight of her life. If you can, here’s the link where you can donate:

http://danafarber.jimmyfund.org/site/TR?fr_id=1930&pg=personal&px=2424186

Click here to connect with me on Instagram and find out what’s cooking in Ciao Chow Linda’s kitchen each day (and more)

Marie’s Salmon Cakes
Author: PROUD ITALIAN COOK
Ingredients
  • 1-1/2 lbs. fresh salmon or 4 filets, skin removed. hand chopped into small chunks ( I was able to make 7 cakes with that amount)
  • 1 celery stalk, small dice
  • ¼ onion, small dice
  • 2 green onions, sliced small
  • 2 small mini red peppers or half of a large red pepper, small dice
  • 1 yellow mini pepper or ¼ of a large, small dice
  • zest of 1 lemon
  • 1 tablespoon capers, rinsed
  • a pinch of cayenne
  • ½ teaspoon Old Bay seasoning
  • 1 large garlic clove, chopped fine
  • 1 heaping tablespoon chopped parsley
  • ⅓ cup full fat mayo
  • ⅓ cup panko bread crumbs and a little extra to coat the top and bottom of the cakes
  • 1 heaping tablespoon of Dijon mustard
  • olive oil
  • salt and pepper
  • LINDA’S EASY RED PEPPER AIOLI:
  • 1 red pepper, roasted, or sliced and sauteed in olive oil until limp
  • 6 cloves garlic, sauteed in olive oil until soft (I sauteed them with the red pepper)
  • 1/2 cup mayonnaise
  • dash of paprika
  • juice of half a lemon
Instructions
  1. Drizzle the bottom of a small sauté pan with olive oil and toss in all the diced veggies, onions, peppers, celery and garlic, cooking until translucent. Turn off heat and let them cool down completely.
  2. Into a bowl add the chopped salmon, the cooled down veggies, the mayo, zest, breadcrumbs and Djon and a little salt and pepper to taste.
  3. Gently toss well to incorporate ingredients.
  4. Form your salmon cakes into 3×1 inch deep patties. Note: I use a biscuit cutter to form mine as stated in the post.
  5. Refrigerate the salmon cakes for at least 2 or more hours for best results, I would not form and then cook them right away.
  6. When it’s time to cook, heat the oven up to 450F.
  7. Drizzle the bottom of an oven proof skillet with olive oil.
  8. Pour some panko breadcrumbs on a flat plate and press the bottom and top of each salmon cake into it then into the heated 1 skillet.
  9. When each cake is lightly golden on each side place the oven proof skillet into the oven and finish it off, anywhere to around 6 or 8 additional minutes, oven vary so you be the judge.
  10. Serve with a squeeze of lemon and tartar sauce, or an aioli of your choice.
  11. FOR THE RED PEPPER AIOLI:
  12. Saute the red pepper and garlic with a tablespoon olive oil over low heat until softened.
  13. Do not brown the garlic.
  14. Place the garlic, red pepper, mayonnaise, paprika and lemon juice in a blender and whir until smooth.
  15. It may be thin, but it thickens as it sits.
  16. Serve room temperature with the salmon cakes.
  17. It’s also good as a dip, or a spread on sandwiches.


Thursday, September 22, 2022

Fig Focaccia


I know, I know. It’s the third fig recipe in a row I’ve posted, but I couldn’t help myself. Before figs disappear from the markets (or your fig tree), this is a recipe you have to try. It’s got that mixture of sweet and salty that’s so addictive, you’ll find yourself eating the whole pan, unless you share with friends and family. I made it for a first anniversary party of the artists’ coop I’m involved with, and it disappeared quicker than a popsicle on a hot day. The dough is the same as other focaccia post I’ve written — it’s a very shaggy dough and you leave it to rise overnight in the refrigerator.

The next day, you punch it down, then dump it onto a cookie sheet but don’t try to stretch it out immediately. Let it sit for a half hour or more, then spread it out, using fingers that have been dipped in olive oil.

Place the figs on top, gently pressing down, then scatter some kosher salt or coarse sea salt on top, plus some minced fresh rosemary.

Bake for about 20-30 minutes at 450 degrees and your house will smell divine.

To finish, drizzle a little honey over the whole thing.

I guarantee people will come back for seconds and thirds.

Click here to connect with me on Instagram and find out what’s cooking in Ciao Chow Linda’s kitchen each day (and more)

Fig Focaccia
Author: Ciao Chow Linda
Ingredients
  • 1¼ oz. envelope dry active yeast (about 2¼ tsp.)
  • 2½ cups lukewarm water (from 105 degrees to 110 degrees)
  • 2 tsp. honey
  • 4-5 cups flour
  • 1 Tablespoon kosher salt or 5 teaspoons table salt
  • 6 Tbspns. extra-virgin olive oil
  • about two cups of figs, cut in half or quartered, if large
  • a few tablespoons minced rosemary
  • kosher or coarse sea salt
  • honey to drizzle at the end (about 1/4 cup)
  • olive oil or butter to grease the pan
Instructions
  1. Put the yeast into the water and add the honey.
  2. Let it sit a few minutes to see if the yeast is active.
  3. It should start foaming slightly.
  4. Add the water mixture to four cups of flour and the salt, stirring with a spatula or wooden spoon.
  5. Keep adding more flour until you have a shaggy dough.
  6. Grease a large bowl with a couple of tablespoons of olive oil.
  7. Dump the dough into the bowl, cover with plastic wrap and refrigerate overnight.
  8. Remove the dough from the bowl and dump onto a cookie sheet that’s been generously greased with olive oil.
  9. Don’t try to spread the dough out now.
  10. Let it rest for at least a half hour or more and it will be easier to spread out.
  11. Put some olive oil in a bowl, dip your fingers into it, and then dimple the dough all over using your fingers.
  12. Place the quartered figs on the dough, pressing down slightly.
  13. Scatter the kosher coarse or sea salt and rosemary on top.
  14. Bake for about 20-25 minutes at 450 degrees until brown.
  15. Remove from the oven and immediately drizzle with honey.
  16. Cut and serve.


Monday, September 12, 2022

Fig Spice Cake

Pardon me for posting two fig-centric recipes in a row, but it’s the height of fig season and this cake is simply too good not to try. Even if you haven’t got a fig tree, or FWFT (friends with fig trees), you can find figs in the farmers’ markets right now, so hurry and get some to make this cake. You’ll need about a cup’s worth, half the amount of the bowl of figs I was lucky enough to receive from my friend Madeline.

The cake comes together quickly in a bowl, stirring by hand. No waiting for butter to soften either, since it uses oil (I used olive oil and a little less than originally called for) instead. The recipe, from a book called “Under the Fig Leaf” also contains pecans as an optional ingredient, but if I were you, I wouldn’t skip them. They add a nice crunch to the cake.

While the cake is nearly finished baking, you make a quick glaze that you cook for three minutes. Then poke holes all over the cake and pour the hot glaze over everything.

It’s such a moist and flavorful cake with a great texture all by itself, but next time I make this (and it will be soon with those leftover figs), I’m going to make sure to have either whipped cream or ice cream on hand to serve alongside the cake.

Click here to connect with me on Instagram and find out what’s cooking in Ciao Chow Linda’s kitchen each day (and more)

Fig Spice Cake

Ingredients
  • 2 cups all purpose flour
  • 1 1/2 cups sugar
  • 1 teaspoon salt
  • 1 teaspoon baking soda
  • 1 teaspoon ground cloves
  • 1 teaspoon ground nutmeg
  • 1 teaspoon ground cinnamon
  • 3 large eggs, lightly beaten
  • 1 cup vegetable oil (I used about 3/4 cup olive oil)
  • 1 cup buttermilk
  • 1 teaspoon vanilla extraaact
  • Recipe from the cookbook “Under The Fig Leaf”
  • 1 cup fresh figs, chopped, stems removed
  • 1 cup pecans, chopped
  • FOR THE GLAZE:
  • 1/2 cup sugar
  • 1/4 cup butter
  • 1/4 cup buttermilk
  • 2 teaspoons light corn syrup
  • 1/2 teaspoon vanilla extract
Instructions
  1. Preheat oven to 325 degrees.
  2. Blend together the first 7 ingredients in aa large bowl.
  3. Stir in the eggs, oil aand buttermilk, mixing well.
  4. Fold in the vanilla, figs and pecans.
  5. Pour into a greased and floured 9 x 13 x 2 inch baking dish,
  6. Bake for 35 minutes or until a toothpick inserted into the center comes out clean.
  7. Remove to a wire cooling rack.
  8. Pierce the top of the cake all over with a toothpick or a fork.
  9. Drizzle glaze over the cake.
  10. Serve witth whipped cream or ice cream, if desired.
  11. FOR THE GLAZE:
  12. Bring all the ingredientts to a boil in a small saucepan and cook for 3 minutes
  13. Pour over the cake.


Tuesday, August 30, 2022

Fig Pecan Scones


It’s that time of year when figs are in abundance both in farmers’ markets and on backyard fig trees. However, my ornery fig tree has an abundance of healthy leaves but few figs growing on it. I’ll be lucky to get a half dozen to ripen at most. Last year was a bit better, and we enjoyed perhaps a dozen ripe figs, all ripening one at a time, making it impossible to bake anything that required more than one or two. It’s not the first fig tree I’ve grown, and hope springs eternal, but let’s just say I’ve given the ultimatum before to fig trees that don’t produce. I’ve got one planted in a pot for a year now also, and I’m going to try that as a backup in case this turns out to be a recalcitrant producer too.

In any event, I froze some of last year’s harvest, intending to use them sooner than this, but here I am making fig scones again. I made them in the past with fresh figs and found the flavor a little too mild, so I added some dried figs to the mix too, and I loved the combination of both types of figs.

I also added some pecans to the dough, just because I love pecans. But almonds and figs are a great combo too. If I were to do that, I’d add almond extract instead of the vanilla in the recipe.

Chop the figs into small pieces. If using frozen figs, don’t defrost them fully. Just enough to cut into pieces.

Shape the dough into a circle (be careful not to overwork the dough or the scones will be tough). Cut into eight sections, almost to the bottom of the dough to the pan. Sprinkle more pecans on top.

Cut them and separate the scones and serve as is, warm from the oven.

But for a little sweeter touch, drizzle some of the sugar-y glaze on top.

They are soft and crunchy at the same time. I hope you enjoy them. By the way, if you’ve got a stubborn fig tree that is slow to deliver, try using the leaves alone in this quick and delicious recipe for flounder baked in fig leaves: https://ciaochowlinda.com/2020/09/flounder-baked-in-fig-leaves.html

Click here to connect with me on Instagram and find out what’s cooking in Ciao Chow Linda’s kitchen each day (and more)

Fig Pecan Scones
Author: Ciao Chow Linda
Ingredients
  • 2 cups all-purpose flour
  • 1 tablespoon baking powder
  • 1/4 teaspoon salt
  • 1/3 cup sugar
  • 1/2 cup (1 stick) cold butter, cut into small pieces
  • 1 large egg
  • 1/2 cup heavy cream , plus extra for brushing the top
  • 1 teaspoon vanilla
  • 1 teaspoon vanilla extract
  • 1 cup chopped fresh figs
  • 1/2 cup chopped dried figs
  • 1/2 cup chopped pecans (save some for the top)
  • 3/4 cup confectioner’s sugar
  • enough water to form a drizzle
Instructions
  1. Preheat oven to 400 degrees and line a baking pan with parchment paper.
  2. Combine the flour, baking powder, sugar and salt in a bowl.
  3. Blend in the butter with your fingers, a fork or a pastry blender, until it resembles coarse sand.
  4. Beat the egg with the cream and vanilla and stir it into the flour and butter mixture with a wooden spoon.
  5. Add the pecans and the figs.
  6. Do not overmix.
  7. Knead it together until it forms a ball, then flatten into a 9 or 10 inch circle.
  8. Take a knife and make indentations, cutting into eight pieces, almost down to the bottom of the pan.
  9. The mixture will be sticky.
  10. Sprinkle more pecans on top, if desired.
  11. Bake at 400 degrees for at least 30 minutes.
  12. It may need another 5-15 minutes depending on the diameter and thickness of your circle.
  13. If you want, you can cut all the way through the dough and bake each scone individually.
  14. It will take about 20-30 minutes if you do it that way.
  15. Let the scones cool completely if you want to glaze them.
  16. Otherwise eat warm from the oven with butter.
  17. If glazing, mix the confectioners’ sugar with enough water to get a consistency of a glaze.
  18. Drizzle on top.

Friday, August 19, 2022

Bulgur Salad

Summertime is the season for barbecues, picnics and salads, but you may be looking for something different than the ubiquitous potato, macaroni or tomato salad. If you’ve ever eaten the middle Eastern dish of tabbouleh, you’ve had bulgur, a cracked wheat grain from kernels that are parboiled and dried before packaging. As a result, bulgur takes just a few minutes to cook, making it the perfect, easy grain when you want something different and don’t have much time. Just bring some water to a boil, dump in the bulgur, place the lid on top, turn off the heat and wait ten minutes. Fluff it with a fork, and you’re ready to use it — either hot with condiments, or in this case, cold with a lot of veggies and salad dressing. It’s like an artist’s canvas waiting for your creativity. In this case, I added chickpeas, cucumbers, peppers, tomatoes, scallions and parsley, plus some sheep’s milk feta cheese, then tossed it with a simple oil and vinegar dressing. It’s a great side dish, but could be a whole meal in itself, since it’s got the chickpeas and feta for protein, along with the vegetables. So try it and bring it to your next party or make it just for yourself. It lasts for a few days in the fridge, so you can enjoy the leftovers for lunch.

Bulgur Salad

Author: Ciao Chow Linda
Ingredients
  • 2 cups bulgur
  • 5 cups water
  • 1/2 cup cucumber, finely diced
  • 1/2 red pepper, minced
  • 3 scallions, sliced thinly
  • a dozen cherry or grape tomatoes, cut into quarters
  • 6 ounces sheep’s milk feta, cut into small pieces
  • 1 15 ounce can chick peas, drained and rinsed
  • a bunch of parsley, minced
  • 1/2 cup olive oil
  • 1/4 cup vinegar (I used white balsamic)
  • salt, pepper to taste
Instructions
  1. Bring the water to a boil.
  2. Add the bulgur, turn off the heat and put a lid on the pot.
  3. Let it sit for 10-15 minutes, then fluff with a fork and place in a bowl to cool.
  4. When the bulgur is cool, add the rest of the ingredients and mix well with the oil and vinegar.
  5. Adjust seasonings if more salt or pepper is needed.


Tuesday, August 2, 2022

Ravioli with Creamy Corn Sauce

Summertime is the best season for flavorful produce here in New Jersey– peaches, melons, tomatoes, and sweet corn, among others. That’s why we’re known as the “Garden State!” I hope you’re in the midst of corn season too because you’ve got to try this luscious dish to be savored only when fresh corn on the cob is available. These ricotta-stuffed ravioli are bathed in a sauce based on butter, cream and sweet corn. This dish is not only delicious but really quick to make too, assuming you use purchased ravioli. Strip the corn from the cobs and mince the herbs. Place the ravioli into a pot of water that’s come to a rolling boil.

For this dish, I bought cheese ravioli from Pastosa in Manasquan, NJ. The flagship store is in Brooklyn, but there are several other locations in New York and New Jersey. I got to the store just as it was closing at 6 pm so had little time to browse, but was amazed at the large selection of Italian products, fresh meats and prepared foods. I can’t wait to go back and peruse longer.

The sauce comes together quickly while the ravioli are boiling. Just melt the butter in the pan, and add the rest of the ingredients. 

Let the sauce reduce slightly, then add the ravioli directly to the pan once they’re cooked.
Don’t worry if a little water comes along with the ravioli. You can just let it cook a couple more minutes to reduce further.The first time I made this, I used home-made ravioli and white corn, which has become the most prevalent in markets these days. If you can find yellow corn, it really makes for a prettier dish. And if you can find ravioli as good as Pastosa makes, save yourself the time and trouble of making your own.

Click here to connect with me on Instagram and find out what’s cooking in Ciao Chow Linda’s kitchen each day (and more)

Ravioli with Creamy Corn Sauce
Author: Ciao Chow Linda
Ingredients
  • 2 ears of yellow corn, kernels stripped off the cob
  • 4 tablespoons butter
  • 3/4 cup heavy cream
  • 1/4 cup dry white wine
  • a few sage leaves
  • minced chives
  • a few basil leaves
  • a small grating of nutmeg
  • salt, white pepper to taste
  • 3 dozen small cheese ravioli
  • grated parmesan cheese for topping
Instructions
  1. Melt the butter in a large saucepan.
  2. Pour the heavy cream and white wine into the saucepan.
  3. Add the corn and cook the ingredients at high heat for a couple of minutes until it starts to thicken slightly.
  4. Add the salt, pepper and herbs and stir.
  5. Remove the cooked ravioli from the boiling water and place into the pan with the sauce.
  6. Don’t worry if a little water comes along with the ravioli, you can reduce the sauce further if you want.
  7. Gently stir the ravioli in the sauce.
  8. Serve with grated parmesan cheese.


Monday, July 25, 2022

Easy Grilled Sea Bass

This summer’s heat wave has been unrelenting, with many places in our area reaching more than 100 degrees. Who feels like heating up the kitchen in this weather? Not I, but I still like to eat well, and can only eat out so often or get takeout before I crave a home cooked meal. This sea bass dish is so simple to make, when you use a disposable aluminum pan on your grill. It keeps the heat outdoors; it’s delicious and good for you too. I cooked the tomatoes in the pan for a few minutes first, before adding the fish, because the fish takes only five minutes on a hot grill, not enough time for the tomatoes to soften, especially since some of them aren’t on the bottom of the pan in direct contact with the hottest part of the pan. Just snuggle all the ingredients in the pan. It’s easy for us to get locally caught sea bass this time of year, but if you don’t have access to it, use another type of fileted fish, like flounder, branzino or snapper. Make sure to use abundant minced herbs. In this case, I used chives, thyme and parsley.

In addition to the capers and olives, I added a couple of small hot peppers to give it a bit more tang. It really wasn’t very hot since I didn’t split the peppers and expose the seeds, so give it a try. I also added some pickled green peppers and they gave it some zip too.

It took only five minutes to cook on the grill, resulting in this flavorful, easy-to-make meal fit for company. I’ll be making this many times before the summer is over, substituting whatever is the freshest catch in the fish market that day. If your fish is thicker, just leave it for a longer time on the grill.

I served it with some rice (and other vegetables not shown). I’ve even been known to plug in my rice cooker in an outlet outdoors, eliminating the need to turn on the indoor burners entirely.

Click here to connect with me on Instagram and find out what’s cooking in Ciao Chow Linda’s kitchen each day (and more)
Easy Grilled Sea Bass
Author: Ciao Chow Linda
Ingredients
  • one pound sea bass (or any other filleted fish like flounder, branzino, etc.)
  • 2 tablespoons olive oil
  • 2 tablespoons butter
  • about 6 to 8 cherry or grape tomatoes, cut in half or quartered if large
  • about a dozen olives, pitted
  • 2 tablespoons capers
  • a couple of red hot peppers
  • a few green pickled peppers
  • minced fresh herbs (I used thyme, parsley and chives)
  • half a lemon
  • salt and pepper
  • a disposable aluminum pan
Instructions
  1. Place the olive oil and butter in the disposable pan.
  2. Add the chopped tomatoes, a litlte salt and pepper and place the pan on top of a grill.
  3. Cook the tomatoes for about five minutes to soften a little, because the fish will take only five minutes and in the tomatoes won’t soften enough if you wait to put them in when you put in the fish.
  4. Meanwhile, season the fish with salt and pepper and the herbs.
  5. After the tomatoes have cooked for five minutes, remove the pan from the grill and add the fish to the disposable pan, flipping them in the butter and olive oil once to moisten the fish.
  6. More liquid will be released from the fish after a few minutes.
  7. Add the rest of the ingredients, spreading them evenly around the pan.
  8. Place the pan on the hot grill once again, and close the lid on the grill.
  9. Cook for about 5 minutes, longer if the fish is thick.
  10. Remove to a serving platter aand enjoy.