Monday, November 28, 2022

Pork Belly Porchetta

If you’ve ever eaten porchetta in Italy, you know it’s savory, it’s succulent and it’s insanely delicious. It’s usually served on a roll and eaten as a sandwich. Frequently, you’ll see an outdoor vendor selling porchetta sandwiches at street fairs and markets, and they’re hard to resist. There’s also a terrific informal trattoria in Rome and in Milan called “La Prosciutteria” where you can buy fabulous porchetta sandwiches which I once snuck back into the U.S. (shh!)

Now you can make your very own porchetta, with flavors and crackling skin similar to the ones you get in Italy. A lot of recipes will show using a pork loin wrapped in a pork belly, but those roasts become so large and unwieldy and serve enough to feed a small neighborhood. The center of the pork loin also has a tendency to dry out, even when it’s wrapped in a pork belly. I’ve also cooked a pork shoulder in a “porchetta-style,” splayed out and spread with herbs and spices then tied up securely and roasted for hours. While it’s delicious, it doesn’t come close to the results you get cooking a pork belly alone. After all, pork belly is the part of the pig where bacon comes from, and we all know everything tastes better with bacon. When cooked at a low temperature for many hours, a pork belly will result in one of the best things you’ve ever eaten, with a crunchy outer skin and plenty of meat in the interior that just melts in your mouth.

I was able to find this pork belly at Costco, and made it for our Thanksgiving meal instead of turkey, a break with tradition that no one regretted. You should prep it at least a day ahead of time to give the herb and spice rub time to do its magic, but it can prepared up to three days ahead and sit in the refrigerator, making it perfect for holidays when you’ve got lots of other dishes to prepare at the last minute.

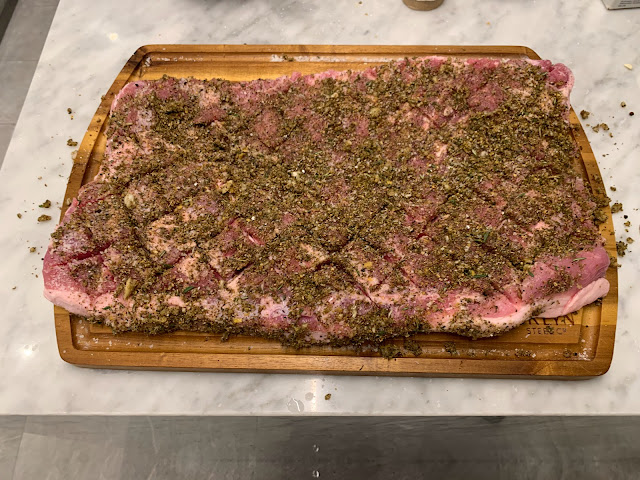
Score the pork belly and season with the herb, spice and garlic mixture.


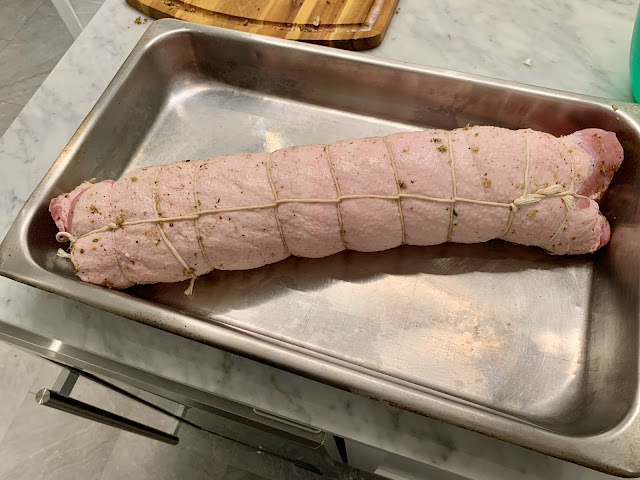
Then roll it up like a jelly roll and using butcher’s twine, secure it tightly all the way around.


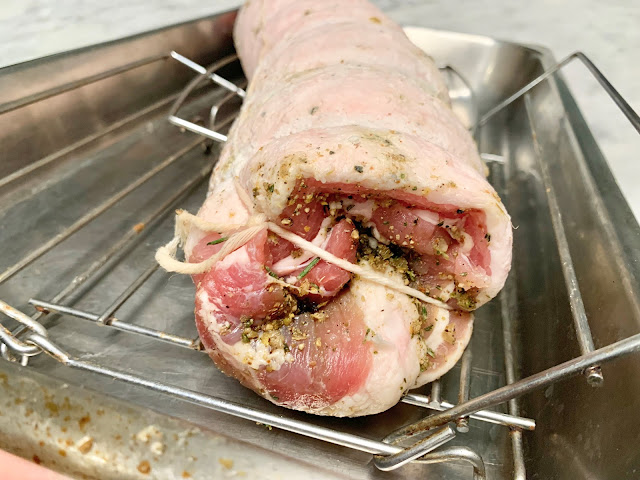
Here’s a side view, and you can see it’s got plenty of meat, not just fat (although it’s got plenty of that too.) The recipe also calls for you to rub the exterior of the roast with a mixture of kosher salt and baking powder, which I did.  

I then wrapped it tightly in aluminum foil and placed it in the refrigerator for a full day and a half. Place it on a wire rack to roast.


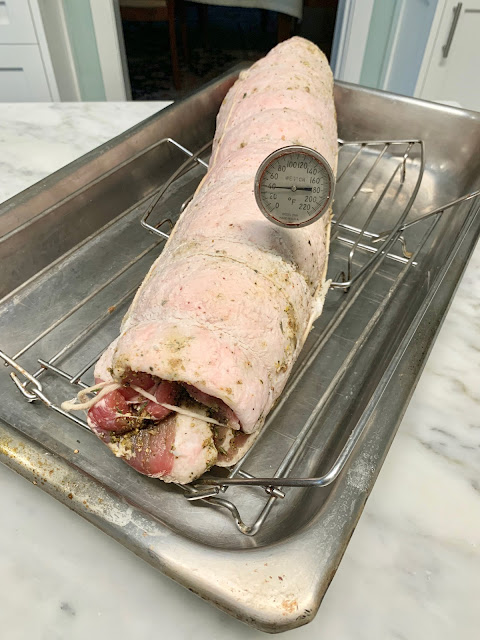
It cooks for a long time, starting at 300 degrees for about two hours or until the temperature reaches 160 degrees. 

The recipe (from J. Kenji Alt-Lopez) says to roast it another two hours at the same temperature, but after two and a half hours, I lowered the oven temperature to 250 degrees and cooked the roast for nearly four more hours since it suited our time schedule better (We wanted to go to a nearby park with our granddaughter while the roast cooked).  Besides, a long, slow roast results in really tender meat. Once you start to see drippings, you should also baste it every half hour, but I skipped this step while we skipped out to the park and it didn’t have any negative effect. 

For the final half hour, the recipe says to crank up the heat to 500 degrees, but after ten minutes at that high temperature, I could see that the upper skin was starting to burn. So I removed the roast from the oven, lowered the temperature to 400 degrees and let it continue to brown. Next time, I think I’ll keep it at 400 degrees for the full last half hour, or even stretch it a little longer until it achieves this nice golden outer crust.  In total, I think my roast was in the oven for six and a half hours. Sinking your teeth into that juicy crunchy crust is almost the best part.

But the inside is pretty darn irresistible too, with those fennel, garlic and rosemary flavors. Try it sometime when you’ve got a large family gathering — maybe even this Christmas or New Year’s Day. Since we were only five for Thanksgiving this year, we had lots of leftovers, but enjoyed a slice of porchetta on a crusty roll the next day. Slathered with some red pepper aioli or even some leftover cranberry sauce, it was the perfect day-after-Thanksgiving treat.

Check out Ciao Chow Linda on Instagram here to find out what’s cooking in my kitchen each day (and more).

The full recipe is from J. Kenji Lopez-Alt/Serious Eats

Pork Belly Porchetta
Ingredients
  • 1 whole boneless, rind-on pork belly, about 12 to 15 pounds (5.4 to 6.8kg)
  • Recipe adapted from J. Kenji Lopez-Alt/Serious Eats
  • 2 tablespoons whole black peppercorns
  • 3 tablespoons whole fennel seeds
  • 1 tablespoon crushed red pepper
  • 3 tablespoons finely chopped rosemary
  • 12 cloves garlic, grated on a microplane grate
  • grated rind of one lemon
  • Kosher salt
  • 2 teaspoons baking powder
Instructions
  1. Place pork belly skin-side down on a large cutting board.
  2. Using a sharp chef’s knife, score flesh at an angle using strokes about 1-inch apart.
  3. Rotate knife 90 degrees and repeat to create a diamond pattern in the flesh.
  4. Toast peppercorns and fennel seeds in a small skillet over medium-high heat until lightly browned and aromatic, about 2 minutes. (I forgot this step and skipped it.)
  5. Transfer to a mortar and pestle or spice grinder and grind until roughly crushed, along with the rosemary, red pepper and lemon peel.
  6. Place the spices, herbs and lemon peel in a small bowl and add the minced garlic.
  7. Season pork liberally with salt then sprinkle with the spice mixtures.
  8. Use your hands to rub the mixture deeply into the cracks and crevices in the meat.
  9. Roll belly into a tight log and push to top of cutting board, seam-side down.
  10. Wrap kitchen twine tightly around the pork.
  11. Combine 2 tablespoons kosher salt with 2 teaspoons baking powder. Rub mixture over entire surface of pork.
  12. If roast is too large and unwieldy, carefully slice in half with a sharp chef’s knife. Wrap tightly in plastic and refrigerate at least overnight and up to 3 days. If desired, porchetta can also be frozen at this point for future use
  13. Adjust an oven rack to the lower-middle position and preheat oven to 300°F (150°C).
  14. Place pork in a V-rack set in a large roasting pan, or if cooking both halves at the same time, on a wire rack set in a rimmed baking sheet.
  15. Place roasting pan in oven and roast until internal temperature of pork reaches 160°F (71°C), about 2 hours, basting with pan drippings every half hour.
  16. Continue roasting until a knife or skewer inserted into the pork shows very little resistance asides from the outer layer of skin, about 2 hours longer.
  17. (I lowered the temperature to 250 and roasted for 3 hours longer)
  18. Increase oven temperature to 500°F (260°C) and continue roasting until completely crisp and blistered, about 20 to 30 minutes longer.
  19. (After about 10 minutes with the oven at 500 degrees, the skin was starting to burn, so I lowered the temperature to 400 degrees and finished roasting for 20 more minutes.
  20. Alternatively, you can remove the roast from the oven and tent with foil for up to 2 hours before finishing it in a preheated 500°F oven.
  21. Tent with foil and allow to rest for 15 minutes (I rested it for 1/2 hour, which gave me time to bake popovers and finish the mashed potatoes and other vegetables.)
  22. Slice with a serrated knife into 1-inch thick disks and serve.


Tuesday, November 15, 2022

Corn Pudding

Are you still deciding on sides for Thanksgiving? To some, they’re the best part of the meal (although desserts are prettty high in the running too). If you want to make a delicious and easy side dish that serves a lot of people, look no further than this corn casserole. The recipe comes from  Southern Living magazine. and can even be made the day before and stored in the fridge, ready to bake on Turkey Day.I served it last Thanksgiving and it even impressed a gluten-free friend, who said she could eat it since it contained only six tablespoons of flour for the whole casserole — not enough for her to be worried about.  We were only four people around the table last year, so I had a ton of the casserole leftover and my guests went home with some of it. But you could easily cut the recipe in half if you’re having only a few people around the table. No matter how many are at the table, or what you serve, it’s a time of gratitude for the blessings in our lives. I hope your Thanksgiving and the year ahead are filled with blessings for you and the ones nearest to you.

Check out Ciao Chow Linda on Instagram here to find out what’s cooking in my kitchen each day (and more).

Corn Pudding
Ingredients
  • 4 large eggs
  • 2 1/2 cups half-and-half
  • 2 (15-oz.) pkg. frozen corn (I didn’t thaw it)
  • 8 ounces fontina or Swiss cheese, (I used a combination of cheddar and Swiss cheese) shredded (about 2 cups)
  • 1/2 cup grated yellow onion (from 1 large onion)
  • 6 tablespoons all-purpose flour
  • 2 teaspoons minced garlic (about 2 garlic cloves)
  • 2 tablespoons chopped fresh chives, plus more for garnish
  • 1 tablespoon chopped fresh thyme, plus more for garnish
  • 2 teaspoons kosher salt
  • 1 teaspoon black pepper
Instructions
  1. Whisk together eggs and half-and-half in a large bowl.
  2. Pulse corn, in 2 batches, in a food processor until coarsely chopped, about 5 times.
  3. Add to egg mixture along with cheese, grated onion, flour, garlic, chives, thyme, salt, and pepper. Stir to combine.
  4. Transfer to a lightly greased 13- x 9-inch baking dish; cover and chill until ready to bake, up to 1 day ahead.
  5. Preheat oven to 350°F.
  6. Remove casserole from refrigerator while oven preheats.
  7. Bake, uncovered, until golden and bubbly around edges and center is just set, about 45 minutes.
  8. Let stand 10 minutes before serving.
  9. Garnish with thyme and chives.


Monday, November 7, 2022

Pumpkin Spice Coffee Cake

I hope you’re not “pumpkined-out” yet this fall, because this is one recipe (from the website “Handle With Heat” ), you need to try. It’s got that seasonal pumpkin and spice flavor, it’s moist, and has an irresistible crunchy crumb topping, finished with a glaze of maple sugar. 
Don’t fight it — just make it
Click here to connect with me on Instagram and find out what’s cooking in Ciao Chow Linda’s kitchen each day (and more)
Pumpkin Spice Coffee Cake
Ingredients
  • From the website “Handle The Heat”
  • FOR THE STREUSEL:
  • 1/2 cup light brown sugaar
  • 1/4 cup all-purpose flour
  • 1/2 cup finely chopped pecans
  • 1 teaspoon ground cinnamon
  • 3 tablespoons unsalted butter, melted
  • FOR THE CAKE:
  • 2 cups all-purpose flour
  • 1 teaspoon baking powder
  • 1/2 teaspoon baking soda
  • 1/2 teaspoon fine salt
  • 1/2 teaaspoon ground cinnamon
  • 1/4 teaspoon ground ginger
  • 1/4 teaspoon ground nutmeg
  • 1/2 cup light brown sugar
  • 1/2 cup granulated sugar
  • 1 cup pumpkin puree
  • 1/2 cup vegetable oil
  • 4 ounces sour cream at room temperature
  • 2 laarge eggs, beaten
  • FOR THE GLAZE:
  • 1/2 cup powdered sugar, sifted
  • 2 tablespoons maple syrup
Instructions
  1. Preheat oven to 350 degrees.
  2. Spray the bottom of an 8-inch square pan with nonstick spray.
  3. MAKE THE STREUSEL:
  4. In a small bowl, combine all the streusel ingredients with a fork until crumbly.
  5. MAKE THE CAKE:
  6. In aa large bowl, stir together the flour, baking powder, baking soda, salt, cinnamon, ginger, nutmeg, brown sugar and granulated sugar.
  7. In a small bowl, stir together the pumpkin puree, oil, sour cream and eggs.
  8. Make a well in the center of the dry ingredients, then pour in the wet ingrients.
  9. Gently stir until just combined.
  10. Spoon half the batter into the prepaared pan, Sprinkle with half the streusel.
  11. Spread the remaining batter over the streusel.
  12. Sprinkle with the remaining streusel.
  13. Bake for 35 minutes or until aa toothpick inserted in center comes out clean.
  14. Glass and ceramic pans take longer to bake than metal.
  15. Cool for 15 minutes
  16. MAKE THE TOPPING:
  17. In a small bowl, combine the sugar and maple syrup until a thick, pourable icing forms.
  18. Drizzle over the warm cakae.
  19. Cut into squares and serve.