Friday, March 29, 2019

Mushroom Beef Barley Soup

Although the calendar says Spring, there’s still a nip in the air most days, and it will be a while before we in the Northeast U.S. can reliably leave the house without wearing a jacket or sweater. So for those days in between seasons, when it can still feel a bit chilly, this mushroom beef barley soup is like a warm hug at the dinner table. You can make this without the beef, but I found it an ideal way to use up a small bit of leftover pot roast I had made a couple of days earlier. It was only a couple of ounces, but when shredded and added to the soup, it added a real depth of flavor.

Use any kind of mushrooms you want – from supermarket white button mushrooms to shiitake. I used baby portobello mushrooms. I also added a parmesan rind to the soup as it was simmering, something I do with many kinds of soups.

It takes only about forty five minutes from start to finish to make this satisfying and delicious soup, and with a side salad and a good loaf of bread, dinner is ready.

Click here to connect with me on Instagram and find out what’s cooking in Ciao Chow Linda’s kitchen each day (and more)

Mushroom Beef Barley Soup
Author: Ciao Chow Linda
Ingredients
  • 1/4 cup minced carrot
  • 1/4 cup minced celery
  • 1/2 cup minced onion
  • 2 garlic cloves, minced
  • 2 T. olive oil
  • 2 T. butter
  • 8 ounces mushrooms, chopped (I used baby portobello mushrooms, but use any mixture you like)
  • 1 cup pearled barley
  • 4 cups chicken broth
  • 2 cups beef broth
  • 1 cup water
  • 1 leftover parmesan cheese rind
  • 1 cup shredded leftover beef stew (optional)
  • salt, pepper
  • minced parsley
Instructions
  1. Sauté the onion, garlic, celery and carrot in the olive oil over low heat, until limp.
  2. Add the butter and mushrooms and sauté a few minutes.
  3. Add the barley, the broths, the water, the parmesan cheese rind, the leftover beef stew plus the salt and pepper.
  4. Cook over low heat for about 30- 45 minutes or until barley is softened and flavors have blended.
  5. Add parsley at the end, and serve with grated pecorino or parmesan cheese.
  6. The barley will swell as the soup cooks and if the soup gets too thick, add more water.


Tuesday, March 19, 2019

Marcella Hazan's Ragù Bolognese

Before there was Lidia, there was Marcella. I’m talking about Marcella Hazan, who reigned as the doyenne of Italian cuisine until her death in 2013. Her cookbooks are classics in the Italian food repertoire and are the first place I go to when I’m looking for a traditional recipe like basil pesto or gnocchi alla romana. Born in Italy, she wrote her cookbooks in Italian, and her husband, Victor Hazan, translated them into English. Married for 58 years, theirs is a love story that continues even after she is gone. Victor has taken over Marcella’s Facebook page since her death, and occasionally posts beautiful tributes to her, including these lines: “I am at life’s end and in looking back I can see how Marcella and I were squeezed from a single lump of clay.” Or these: “Where cooking was concerned she didn’t need to check how others were doing it. She didn’t have to because Marcella didn’t have doubts, she knew, and out of that knowledge, whose mysterious creative source had always been a wonder to me, she produced the pure, expressive taste of her cooking.”

I don’t know why it took me this long to make her ragù Bolognese, but I’m glad I finally tasted for myself what Marcella followers have known for decades. It doesn’t get better than this. It takes a long time to simmer, but it’s worth the long wait.

Start by sweating the vegetables in olive oil and butter – carrots, celery and onion.

Add the ground meat and cook until it loses its pink color, then add the wine.
Next comes the unusual step of adding milk and seasonings that include a generous grating of nutmeg. It looks curdled at first, but after it cooks and the milk gets absorbed into the meat, it will look more blended.
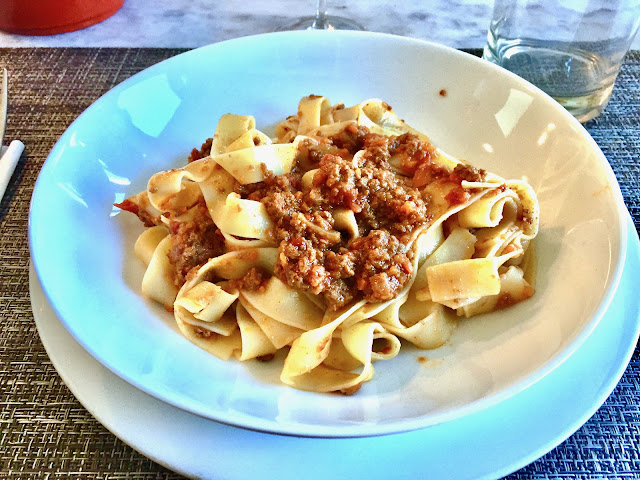
Be patient, it may take a while for this step. The tomatoes are added last, after the milk has become absorbed. Turn the heat to low and let it simmer for at least three hours – even longer if you have time. After the lengthy cooking at low temperature, you’ll be left with this rich, dense ragù.
Perfect for adding to a bowl of pappardelle, as I did, or if you prefer, use tagliatelle, or fettuccine.
The recipe makes more ragù than I needed for the pound of pasta I cooked, so I served the leftover ragu another night with a bowl of polenta. It was equally as good and soul satisfying. 
Grazie Marcella, for this gem of a recipe. And grazia, Victor, for keeping those memories alive through Marcella’s Facebook page.

Click here to connect with me on Instagram and find out what’s cooking in Ciao Chow Linda’s kitchen each day (and more)

Marcella Hazan’s Bolognese Ragù
Ingredients
  • 2 tablespoons chopped yellow onion
  • 3 tablespoons olive oil
  • 3 tablespoons butter
  • 2 tablespoons chopped celery
  • 2 tablespoons chopped carrot
  • 3/4 pound ground lean beef, or a combination of beef, veal and/or pork
  • salt
  • 1 cup dry white wine
  • 1/2 cup whole milk
  • 1/8 teaspoon nutmeg
  • 2 cups canned whole tomatoes, chopped, with their juice
  • 1 pound pasta – tagliatelle or pappardelle (you’ll have leftover ragu)
Instructions
  1. In a Dutch Oven or large heavy pot, add the onion with the oil and butter and saute briefly over medium heat until translucent.
  2. Add the celery and carrot and cook for 2 minutes.
  3. Add the ground beef, crumbling it in the pot with a fork.
  4. Add 1 teaspoon salt, stir, and cook only until the meat has lost its red, raw color.
  5. Add the wine, turn the heat up to medium high, and cook, stirring occasionally, until all the wine has evaporated.
  6. Turn the heat down to medium, add the milk and the nutmeg, and cook until the milk has evaporated. This may take a while.
  7. Stir frequently.
  8. When the milk has evaporated, add the tomatoes and stir thoroughly.
  9. When the tomatoes have started to bubble, turn the heat down until the sauce cooks at the laziest simmer, just an occasional bubble.
  10. Cook, uncovered, for a minimum of 3 1/2 to 4 hours, stirring occasionally.
  11. Serve with tagliatelle, or pappardelle, and a good sprinkling of grated parmesan cheese.


Monday, March 11, 2019

Celery Root Soup with Crispy Shallots

How many times have you passed the vegetable aisle in your supermarket and walked right by the celeriac, without giving it a second thought? This gnarly, under appreciated root vegetable, also known as celery root, deserves some love.

For those of you on a low carb diet, it makes a fantastic substitute for mashed potatoes. Find a recipe for that here. But it also makes a really delicious, velvety soup, that’s perfect for this time of year, when winter’s chill is still upon us. Use chicken stock, as I did, or vegetable stock if you’re a vegetarian. And skip the cream if you’re counting your calories (although it’s a scant 1/4 cup for about four to six servings) But please don’t skip the crispy shallots on top. They really dress it up and make it company worthy.

Everything gets cooked in a pot, then the bay leaf and thyme get removed and the soup is blended until smooth.

You can make this soup and be sitting down to eat it in a half hour start to finish – less time than it would take to get take out from the store.

Click here to connect with me on Instagram and find out what’s cooking in Ciao Chow Linda’s kitchen each day (and more)

Celery Root Soup with Crispy Shallots
Author: Ciao Chow Linda
Ingredients
  • 1 large celery root (celeriac), about 1 pound, trimmed and cut into chunks
  • 2 T. butter
  • 1/2 cup chopped sweet onion
  • 1 apple (I used honey crisp),cored, peeled and roughly chopped
  • 4 cups chicken broth (or water or vegetable broth)
  • 1/2 cup white wine (you can use dry or sweet, I used Riesling)
  • 1 bay leaf
  • a few sprigs of thyme
  • salt, white pepper
  • 1/4 cup heavy cream, optional
  • FOR THE CRISPY SHALLOT:
  • 1/4 cup olive oil
  • 1 large shallot, sliced
Instructions
  1. Melt the butter in a saucepan, and add the onions.
  2. Cook the onions until they are translucent, then add the rest of the ingredients, except the cream.
  3. Reduce the heat to a simmer, cover the pot and cook until everything is fork tender.
  4. It should take about a half hour.
  5. Remove the thyme and bay leaf from the pot.
  6. Using a blender or stick blender, puree everything until very smooth.
  7. Adjust seasonings if necessary, and add cream.
  8. If soup is too thick, add some water or broth.
  9. If it’s not thick enough, continue to cook until the soup is reduced a little.
  10. TO MAKE THE CRISPY SHALLOTS:
  11. Place the olive oil in a saucepan and add the shallots to the cold olive oil.
  12. Turn up the heat and let the shallots fry until crispy.
  13. DO NOT leave the stove because they can easily burn.
  14. The leftover olive oil, once cool, is fabulous to use in salad dressings.
  15. Pour the soup into bowls, drizzle with some of the olive oil and top with the crispy shallots.


Monday, March 4, 2019

Bomboloni For Carnevale

Calling all fry-babies. It’s only a couple of days until Ash Wednesday, signaling the end of Carnevale and beginning of Lent. During Carnevale, Italians typically feast on rich, (and often) fried foods, like the addictive fried cookies called chiacchiere, or the doughnut-hole-like specialty called castagnole, both of which you can read about and find a recipe for by clicking on those names.

Another treat that’s eaten in Italy all year long, but especially at Carnevale, are these fluffy filled doughnuts, called bomboloni. In the Trentino Alto-Adige region and other Northern parts of Italy, they’re often called Krapfen, a nod to their Austrian name. They’re also called fasnacht in Germany, where they’re served on Fasnacht Day, the day before Ash Wednesday. Call it Fat Tuesday in the U.S., or martedi grassa in Italy, but either way, it’s meant to be the last hurrah of merriment and gluttonous eating before the solemn 40 days of Lent.

I had been wanting to make bomboloni for a long time, and got a push to make them after learning that my daughter-in-law had a weakness for them. Last summer when we were in Tuscany together, she went out early while we were all still asleep to hunt for bomboloni for our breakfast. Once she gave birth to my granddaughter last fall, I felt I had to indulge her with home made bomboloni.

They’re not at all hard to make, but they do require some advance preparation because of the yeast dough, which needs to rise twice until tripled in size. This is what the dough looks like before rising. Sorry I don’t have a photo of the risen dough, but it completely filled the bowl that contained it.

Once it’s risen enough, it’s a very easy dough to work with and roll out into a rectangle. Use a biscuit cutter, or if you don’t have one, the rim of a glass to cut out circles.
Place the rounds on a baking sheet and allow them to rise until tripled in size again, another one and a half hours or so.
Then carefully fry in hot oil until they’re browned. Use a thermometer to check the temperature of the oil, which should be about 170-180 degrees. If it’s too hot, the bomboloni will brown on the outside and might still be raw inside. If it’s not hot enough, you’ll have greasy bomboloni. You might want to make a test one before frying all of them, and cut into it to see if it’s fully cooked. Have a large plate of sugar handy. Drain the bomboloni on paper towels, and roll them immediately in the granulated sugar. You could use powdered sugar as an alternative.
You can certainly eat them as is, but they’re even better if you fill them. Use a pastry bag with a plain tip that has a large opening. Cut a slit in the side, insert the tip and squeeze in some of the filling. It’s a little easier if you have someone helping you. I use an easy pastry cream recipe that’s made with whipped cream and instant vanilla pudding.You can also use Nutella, or even a good jam as your filling.Either way, they’re best eaten the same day they’re made, which was certainly not a problem here.

Click here to connect with me on Instagram and find out what’s cooking in Ciao Chow Linda’s kitchen each day (and more).

Bomboloni
Author: Ciao Chow Linda
Serves: 18-20
Adapted from Valentina, The Baking Fairy
Ingredients
  • FOR THE BOMBOLONI DOUGH:
  • 250g (2 cups) bread flour
  • 250g (2 cups) all-purpose flour
  • 75g (heaping ⅓ cup) granulated white sugar
  • 100g (7 tbsp) unsalted butter, at room temperature
  • 20g fresh cake yeast or 1 package (7g) dry instant yeast
  • 7g (1½ tsp) salt
  • 150g (3) whole large eggs
  • 40g (2) egg yolks
  • 110g (1/2 cup) lukewarm water
  • zest of 1 orange
  • 1 tsp vanilla extract
  • granulated sugar, for coating
  • pastry cream, Nutella, or jam, for filling
  • FOR THE VANILLA PASTRY CREAM FILLING:
  • 1 box instant vanilla pudding
  • 1/2 cup whipping cream
Instructions
  1. First, dissolve the yeast in the lukewarm water, and allow it to sit until it blooms.
  2. In the bowl of a stand mixer fitted with a dough hook, combine all ingredients except for one of the whole eggs, and beat on medium speed for 5 minutes, then high speed for 5 more minutes.
  3. Add in the remaining egg, and beat on medium speed until a smooth and elastic dough forms {you may have to add a little more flour if it seems too sticky}.
  4. Knead by hand for a couple of minutes, then place the dough in a large, lightly oiled bowl, cover with plastic wrap, and allow to rise in a warm place for at least 2 hours until tripled in size.
  5. After the first rise, lightly knead the dough, roll it out to 1.5 cm/0.5 inch thickness, and cut out rounds. I found a regular water glass to be the perfect size!
  6. Transfer all your rounds to baking sheets lined with wax paper, spray lightly with water, and cover with plastic wrap or a tea towel. Allow the bomboloni to rise another hour and a half until they triple in size once more.
  7. When ready to fry, heat vegetable oil in a large, deep pan to a temperature between 170-180C {a frying thermometer comes in handy}.
  8. Fry the bomboloni a few at a time, making sure to not crowd the pan. Fry them for about 3 minutes on each side, until they are golden brown, then drain off the excess oil, and set them on a wire rack to cool.
  9. While they are still warm, pour some granulated sugar in a small bowl, and roll the bomboloni around until completely coated in the sugar.
  10. FOR THE VANILLA PASTRY CREAM FILLING:
  11. Make the vanilla pudding according to instructions on box.
  12. Whip the cream with 2 Tablespoons confectioner’s sugar until it reaches soft peaks.
  13. Gently fold the whipped cream into the pudding.
  14. Fill a pastry bag that has a long metal tip, with the filling.
  15. Insert a knife into the side of a bombolone and squeeze in some of the filling.