Sunday, August 29, 2010

Bounty Of The Garden Pasta

August 2010 117

  Ever have days when nothing is defrosted from the freezer and you’ve got to come up with something for dinner other than peanut butter sandwiches or a fried egg? For the most part, I’m not a “take-out” kind of gal unless you’re talking Indian food, where my culinary expertise is sorely lacking.

No, I’d rather rely on a box of pasta. It’s such a versatile ingredient that lends itself to any kind of sauce or ingredient – from walnuts to canned tuna to homemade meatballs. This time however, I had only to walk to the garden to draw inspiration.

The garden delivered the inspiration in spades -  eggplants, tomatoes and some lacinato kale (or Tuscan kale, which is used in ribollita). Bingo, my dinner plans were set.

I cubed the eggplant and laid them on a cookie sheet with the tomatoes, dribbled the whole thing with oil and some herbs and set the cookie sheet on the grill, to cook the veggies:

August 2010 115Meantime, I started the pasta cooking and for the last few minutes the kale was thrown in. 

August 2010 114

Drain the pasta and kale, add the grilled eggplant and tomatoes, sprinkle with parmesan cheese and dinner’s ready.

August 2010 116

Bounty of the Garden Pasta

printable recipe here

serves 2 to 4 depending on appetites

2 Japanese-style eggplants (or 1 large regular eggplant), cubed

2 cups grape tomatoes (or plum tomatoes)

1/4 cup olive oil

3 cloves garlic

fresh herbs (parsley, basil)

salt, pepper

1/2 pound ziti, penne or other pasta

handful of lacinato kale, or spinach if you prefer

olive oil to drizzle on top

parmesan cheese

Peel the eggplants if you like. What I do is peel off alternate strips of the eggplant, leaving some skin on. Place the eggplant pieces and the tomatoes on the cookie sheet with the olive oil and place over the grill for about five minutes.  Add the garlic, herbs, salt and pepper to the cookie sheet and grill another five minutes or until the eggplant is softened.

Meanwhile boil the pasta and for the last few minutes of the cooking time, add the kale. Save a bit of the pasta water in a cup, but drain the rest after the pasta is cooked.

In a large bowl, combine the grilled veggies with the pasta and the kale. Add some of the reserved water if needed. Drizzle with olive oil and top with grated parmesan cheese.

Technorati Tags: ,,

Wednesday, August 25, 2010

Seafood Salad

June2010398_thumb1 Raise your hand if you’ve ever left a restaurant wishing you had the recipe to one of its dishes. I feel that way many times but rarely do I have the nerve to ask the chef for a recipe. Not that I’d get it, although it has happened on occasion. This recipe however, seemed easy enough to figure out without asking anyone for it. I was inspired to make it after eating it at a restaurant in Rome when we were living there.

My Dad was visiting for three weeks and was a bundle of energy, climbing the entire staircase to the cupola of St. Peter’s and other shenanigans you don’t normally associate with 85 year olds.  Four years later and I think he still can outpace us. So one Sunday afternoon I left my husband at home to recoup and headed out with just my Dad for a Sunday afternoon. After visiting the church of Santa Maria Maggiore with its spectacular mosaics, we were hunting for a place in the neighborhood to eat lunch and stumbled on a basement-level restaurant filled with Roman families enjoying a Sunday pranzo. One of the specialties of the house was this seafood salad, with its orange-flavored dressing. That’s what sets this apart from any other seafood salad.

It’s a refreshing first course or main meal for the last remaining weeks of summer.

Seafood Salad

printer friendly recipe here

Makes enough for six to eight first-course servings, or four main-course servings, depending on your appetite

1/2 pound swordfish, thinly sliced

1 lb. medium shrimp, with the shells on

3/4 lb. scallops (if they’re large, cut in quarters as I did)

1/2 lb. squid, cleaned and cut into rings

Make a court-bouillon by filling a large pot with four cups of water, and add one onion, one carrot, a stalk of celery with the celery tops, a bay leaf and 10 peppercorns. Bring to a rolling boil and cook for ten minutes.

You want to only barely cook the seafood so don’t be concerned about the very short cooking times in the recipe below. The seafood will continue cooking in the dressing which contains a lot of citrus. Don’t forget, when you’re making ceviche, the seafood doesn’t get any prior cooking.

If the shrimp is frozen make sure it is thoroughly defrosted before cooking or it will get mushy. Add the shrimp to the boiling water and after one minute, add the scallops. Cook the scallops only one minute and add the thinly sliced swordfish and squid for only one minute more. This means you’ve cooked the shrimp for a total of three minutes, the scallops for two minutes and the swordfish and squid only one minute. That’s all you’ll need, but I stress, the water should have been at a rolling boil when you started and the fish should be totally thawed and not ice cold. It’s best if you take it out of the refrigerator a half hour or so before cooking so it’s closer to room temperature.

Drain the seafood from the hot water and immediately plunge the seafood into a bowl of ice water to stop the cooking. There will be bits of celery, peppercorns, etc. floating around in the water, so pick those out and throw them away. Drain out the cold water and pat the seafood dry on paper towels.

Mix the dressing and pour over the seafood, then refrigerate. It’s best to do this at least an hour before serving so the flavors can blend well.

Dressing for Seafood Salad

1/2 cup minced celery

1/4 cup minced parsley

2 cloves crushed garlic

3 T. capers

1/2 cup olive oil

1/2 c. orange juice

juice of 1 lemon

grated rind of one orange and one lemon

Put everything into a jar and shake, or mix with a whisk in a bowl.

Saturday, August 21, 2010

Gwen’s Mother’s Pancakes

August 2010 205 I’m passing the baton today to a guest blogger - Gwen Southgate – a friend of mine who has written Coin Street Chronicles - the poignant tale of her childhood in England during World War II. It’s a story that evokes with heartbreaking and beautiful honesty as well as humor, the poverty and deprivation she and her family endured during World War II. Like so many other children whose families wanted to shield their children from the horrors of bombings in London, Gwen and her brothers eventually were sent to live in England’s countryside for the duration of the war.

Weekly rationing meant that an already poor family had to get by with even less as the war raged on, but in her captivating book Gwen writes about one special treat her mother made that to this day conjures memories of comfort and love – her mother’s pancakes. In her guest blog piece below, Gwen recounts her tale and the recipe for you.

This well-written, self-published book deserves a much wider audience. I hope this short piece below by Gwen will inspire you to read the entire book, which is available from Barnes and Noble and from Amazon.com, in either traditional book form or as an e-reader. And if your local bookstore doesn’t stock it, ask them to order it for you along with a few extra copies for other readers!

If you’re on Facebook, you can also connect with Gwen on her Coin Street Chronicles Facebook page. I know she’d love to hear from you. 

image

Read Coin Street Chronicles to learn more about history, about World War II, about a vanished neighborhood on London’s South Side, and about the masses of London children who were raised by strangers far from the city.  Read it to learn, to laugh and to cry a little too. In the meantime, enjoy Gwen’s mother’s pancakes.

My Mother’s Pancakes

By Gwen Southgate

Not until I was writing Coin Street Chronicles did I realize how important my mother’s pancakes had become to my brother and me in 1943—at which point World War II was in its fourth, and perhaps bleakest, year.

Thin, golden-brown and crispy, with the sharp sour-sweet contrast of lemon juice and sugar with which they had been sprinkled, her pancakes had always been an exciting dish. Before the war they were a once-a-year treat, served only on Shrove Tuesday, the last day before Lent. (The only day of the church calendar, other than Christmas Day, to which our family paid attention, I fear). Every year on that special Tuesday we hurried home from school for our mid-day dinner, eager for the aroma of sizzling pancakes and freshly squeezed lemon juice that would greet us—in place of the usual Tuesday smell of Shepherd’s Pie and cabbage. (Cabbage being the only green vegetable available in the dreariness of February).

However, by 1943 the wartime weekly meat ration was so skimpy that the ratio of meat to carrots in Tuesday’s Shepherd’s Pie was vanishingly small, and for the rest of the week dinners were usually meatless. So pancakes had become a regular weekly part of our diet—to the delight of my brother and me, now ever-voraciously hungry teenagers. But those yummy pancakes filled more than our stomachs. They were also comfort food, an emotional fix for all of us. My mother enjoyed nothing more than piling on our plates the foods that she knew we loved. And my brother and I were somehow soothed by those golden-brown crispy pancakes; the pleasure they gave helped us deal with the stresses of air raids, evacuation, and a difficult stepfather. Not to mention the angst of adolescence.

I made several unsuccessful attempts to find a cookbook with a recipe that produced a crepe-like pancake resembling my mother’s version. (The most spectacular failure involved 4 eggs, and the result was amazingly unpancake-like—an absolutely scrumptious, sort of pan-fried egg custard!) I then fell back on memories of watching my mother whip up a pancake mix—and, after a bit of trial-and-error, the easy-to-remember recipe below emerged.

MY MOTHER’S PANCAKES

printer-friendly recipe here

A cup of flour

A cup of milk

A couple of eggs

With a fork, whisk together the eggs and milk .

Put the flour in a large bowl, and make a ‘well’ in the middle.

Gradually pour the egg-milk mix into the well, stirring gently until all the flour is blended with the liquids.

Beat the mix for a minute or so, until there are a few small bubbles on the surface

Heat butter in a frying pan.

When hot, pour in just enough batter to make a thin pancake (about 1/4 cup for a 9-10 inch pan), Quickly tilt the pan to spread the batter evenly and cook quickly on both sides, until golden brown.

Squeeze lemon juice and sugar on the pancake before rolling it.

Then sprinkle more juice and sugar on the rolled pancake before serving.

Also good with blueberries and/or maple syrup

(Makes about 7 or 8 pancakes. And any left-over mix keeps well in the frig for a day or two.)

* My mother never owned any measuring cups, spoons or scales. A cup was, for her, whatever tea-cup was nearest to hand. Experiment in my own kitchen has shown that most tea-cups are, fortunately, very close to the 1 cup of a standard measuring cup.

Note from Ciao Chow Linda: This is my recipe for the blueberry sauce in the photo:

Blueberry sauce

1/2 cup water

2 T. sugar

2 tsps. cornstarch

grated rind of 1/2 lemon

juice of 1/2 lemon

2 cups blueberries

Mix sugar and 1/4 cup of water in a saucepan. Bring to a boil, letting the sugar dissolve. Take the other 1/4 cup of water and mix in a small cup with the cornstarch, until there are no lumps.  Add to the pot and cook for a couple of minutes until thickened. It will become a little looser when you add the blueberries.  Place the blueberries in the pot and cook a few minutes more, but not so long that the blueberries lose their shape. Add lemon juice and grated rind, cooking only for another minute. If still too thick, add a little more water.


Tuesday, August 17, 2010

The Kids Make Pizza

April 2010 544 Have you ever known a family whose kids were perfect angels, and never bickered with each other growing up? (hmm, thinking, thinking). …………………… OK well then I’m guessing for most of you the answer is no, and I would have to agree with you. I mean anything longer than a 10 minute ride with our two little ones in the backseat was an ordeal (Mom, he touched my knee. Dad, she’s looking at me funny). I think we were tempted to put a plastic barrier in the middle of the backseat at one point or other to keep them from strangling each other.

April 2010 548 All kidding aside, Michael and Christina were typical, normal kids who over the many decades we’ve been married have been the source of our greatest joy. I’m happy to report that they’ve grown up to be wonderful adults and great friends to each other. They love to come home and help out in the kitchen when we’re preparing family meals, but we seldom get a chance to eat a meal cooked by them in their kitchens. They each live in small apartments about an hour away and are so busy with their careers that it’s an option that doesn’t happen often.

So when they decided to have a pizza festa for us a couple of months ago at our son’s apartment, we were delighted to sit back and let them do the cooking. They made three pizzas – the classic one above with tomato sauce and mozzarella, the one below with broccoli rape and sausage:

April 2010 549 And this beauty with potatoes, fontina and caramelized onions

April 2010 560

I may have mentioned to you in a prior post that my husband’s father was a bread baker in Italy, and set up shop in the U.S. after he emigrated here. My husband still has cousins in Italy who bake bread daily and occasionally use the bread ovens to make pizza for special occasions too. I’m happy to see the family tradition carrying forth with our kids too, even if it’s just for family consumption.

I’ll let our son Michael tell you about his recipe and technique:

A few years ago, I got a pizza stone as a Christmas present, and found a restaurant supply store near me that sold pizza peels--those long, flat, oversized wooden spatulas you see at pizzerias--for about $10 each. Great investment.

Ever since then, whenever the mood strikes, I fire up the oven and make a few pies for me and my friends.
If you want to make your own dough, you have to plan things out a few hours beforehand.

Michael and Christina’s pizza:

Printer Friendly recipe here

You can also follow this recipe:
http://ciaochowlinda.blogspot.com/2009/11/pizza-di-patate-potato-pizza.html
Pizza dough (enough for about two 14-inch pies)
1/2 cup warm water plus 1 1/2 cups warm water
1 tsp. sugar
1 package dry yeast
3 tbsp. olive oil
2 tsp. coarse salt
5+ cups flour

Dissolve sugar in 1/2 cup of warm water in a large bowl. Sprinkle in yeast, and let stand until foamy. Stir in oil and salt. Add most of the rest of the water, plus about 5 cups of flour to make a firm, soft dough. Depending on the heat and humidity, you'll have to add more flour, or more water.  After dough is mixed, knead on a lightly floured surface for about 10 minutes. Its texture should be almost silky by this time. Shape it into a ball, put it in a lightly oiled bowl, cover, and let rise for a few hours, until doubled in size.

April 2010 529

When you're ready to make the pizza, punch down the dough, then divide in half. Shape the dough into a disk, make your hands into fists, and drape the dough over your knuckles. Using your knuckles, work your way around the dough by pushing upwards and slightly opening your fingers. Keep repeating until the dough has been stretched a bit.

April 2010 534Then, put the dough on a lightly floured surface and finish flattening it with a rolling pin. (Or try spinning it in the air.)


You can either leave a bit of a crust around the edges, or roll the dough evenly right to the end. I prefer the latter.
Place the pizza stone on one of the lower racks in the oven, and crank it all the way - 500 degrees or hotter - and let it heat up for at least 1/2 an hour. If you have a pizza peel, spread some cornmeal evenly on it, an place
the dough on that before loading it up with toppings. It will slide into the oven much more smoothly.
When putting the pizza in the oven, place the peel over top of the stone. Then, jerk your hands back slightly to release the pizza from the peel.

April 2010 547 

For toppings:

Broccoli rape and sausage
1 bunch of broccoli rabe
3 cloves of garlic, minced
2-3 sausage links
Trim stems of broccoli rape. Get a large saucepan, and heat about 1/4 inch of water with a little salt until it's boiling. Add broccoli rape, and cover with lid. It may not fit easily at first, but will shrink in size as it's steamed. Let it go for about 5 minutes, occasionally turning it so that every piece gets a turn in the water. Drain broccoli rape, and roughly chop into 1-inch pieces.
While it's draining, remove the casing from the sausage. In the same pan, add a tablespoon or so of olive oil and let it heat. Add sausage to pan, and using two spatulas, break it up into pieces as it cooks.
When nearly finished cooking, add garlic. After a minute or two, add in broccoli rabe, and mix everything together well. Set aside and add to top of pizza.

Caramelized Onion and Fontina Cheese topping
1 large onion (you may need more depending on size of pizza)
1/2 pound of fontina cheese
Slice onion into 1/8th inch slices. Saute in pan with olive oil until onions are caramelized, about 10 minutes.
Slice or shred fontina cheese.
Spread onions, then cheese over pizza and bake. For an extra treat, follow directions for potato pizza, and put onions and cheese on top of it.

Tomato and Mozzarella topping:

Spread your favorite tomato sauce over the dough, then top with grated mozzarella cheese and bake in the oven as directed above.

Saturday, August 14, 2010

Macadamia-Crusted Salmon

August 2010 150

If you read my last post about my Alaska adventures, you may remember that I said I would try to recreate a salmon dish I ate at Anchorage’s Glacier Brewhouse. Above is my attempt at just that – sauteed wild Alaskan salmon encrusted in macadamia nuts, topped with an orange-rum glaze and a tumble of mango-peach salsa. I deviated a bit on the side dishes from the original dish (pictured below), which were rice, sauteed onions, red peppers and spinach.

image  Normally, I wouldn’t have used corn as a side dish because the shape and texture looks too much like the salsa, but much of what I cook is dictated by what I have on hand, so corn it was going to be. I added a little color to the corn with swiss chard from the garden and the red peppers I had recently roasted. Although the rice might sop up some of the sauce more readily, this combo was delicious too.

The salmon in the Glacier Brewhouse’s version was quite piquant since they used sriracha chile aioli to marinate the fish, but  I toned mine down somewhat and used oil flavored with jalapeno instead (again, no sriracha chilis on hand, but jalepeno si.) It still had a spicy tang to it, but the orange-rum glaze also added a slight sweetness to it as well.

Start by cooking the jalapenos for a few minutes in the oil, then let the oil cool down before adding the cilantro and marinating the salmon. This provides a great adhesive for the macadamia crust that gets browned in a mixture of olive oil and butter.

August 2010 145

You can make the mango/peach salsa early in the day.

August 2010 143

The corn mixture is made right before serving, as you’re cooking the fish. Just saute a little swiss chard (or spinach) in a tablespoon of olive oil along with some onion. When it’s nearly cooked, trim the kernels off some fresh corn and add to the saucepan, with a tablespoon of butter. Give it a minute or two, adding salt and pepper to taste, then add the chopped red peppers. It’s a winning side dish with grilled meats or roasts as well as fish.

August 2010 153


Macadamia-Crusted Salmon

printable recipe here

(serves four)

4  5 or 6-ounce salmon pieces (skin removed)

1/2 cup crushed macadamia nuts

1/2 cup bread crumbs

1/2 cup olive oil (for marinating)

1 jalapeno pepper

1/4 cup minced cilantro leaves

2 T. olive and 1 T. butter, melted (for cooking the salmon)

Orange Rum Glaze:

1/2 cup orange juice

1/4 cup dark rum

2 T. honey

Mango-Peach Salsa

1 mango, minced

2 peaches, minced

1/2 small green pepper, minced

1/2 jalapeno, seeded and minced

2 T. minced cilantro

juice of 1 lime

dash of salt

Directions for salsa: Mix everything together in a bowl and taste for seasonings. You can make the salsa way ahead of time and keep it in the fridge.

Directions for the Salmon: Cut the jalapeno pepper into about four pieces and place it in a saute pan with 1/4 cup of olive oil. Simmer it for about 10 minutes, then remove the pepper and discard. To the oil that’s been cooking with the jalapeno, add the other 1/4 cup olive oil. This will help to temper the hotness somewhat. If you have a higher tolerance for heat, cook the jalapeno in the entire 1/2 cup olive oil. Place the oil in a plate and let it come to room temperature.

About an hour before you want to cook the fish, place the pieces in the plate with the oil and swish both sides of the salmon in the oil. Let it sit on the counter in the oil while you prepare the rest of the dish.

Place the macadamia nuts in a food processor with the bread crumbs and grind until very fine, pulsing so it doesn’t turn to a paste.

Take the salmon pieces out of the oil and pat into the nut/crumb mixture on both sides. In a heavy skillet, melt the butter with the 2 T. olive oil. Saute on low heat otherwise you’ll burn the outer coating. When it’s browned on one side, flip it over and cook the other side. It should take about five minutes on each side at most.

While the salmon is cooking, make the glaze by putting all the ingredients in a saucepan over high heat. Cook until it’s reduced by about half.

Plate the salmon, spooning some of the glaze on top and finishing with a few tablespoons of the salsa.

Thursday, August 12, 2010

Searching for Mount McKinley

peaks of McKinley

No, I didn’t climb Mt. McKinley, or Denali, as it’s called in the native Athabaskan name, but I spent a good deal of time just trying to see the elusive Alaskan peaks – the highest in North America. After leaving the glorious 7-day cruise on the Coral Princess, we headed north from Whittier to Denali National Park.

Our bus driver told us that the route through Turnagain Arm to Anchorage was one of the most scenic drives in the U.S.  With beautiful glaciers and mountain peaks all around us, I would agree. We stopped a few times on the way to Anchorage to enjoy the scenery close up.

great roadside view

A few pieces of glacial ice were floating near the shore line and I picked this one up and perched it on a rock for a photo op. Isn’t it odd how its shape mimics the shape of the iceberg floating in the background? I didn’t even notice it when I first saw it. Purely coincidental.

resemblance

Stopping off in Anchorage for a few hours, we visited a museum there and even had time for a weekly outdoor market. Reindeer jerky anyone?

Anchorage market 

Later that day, we arrived at our destination for the next two nights: The Talkeetna Alaskan Lodge in Talkeetna. This vantage point is one of the best for viewing the peaks of Denali. But even with blue skies over the lodge, clouds in the distance kept us from viewing Mt. McKinley that day.

Talkeetna lodge

We were ok with that since we had at least four more days to hopefully gaze upon Denali’s peaks. Besides, who can complain when you’re sitting outdoors eating blackened halibut tacos and drinking a sampler of Alaskan beers for dinner?


The TV show “Northern Exposure” was modeled after the town of Talkeetna, which has a funky vibe to it, just like the show did.

K2 aviation

We ate lunch at the West Rib Pub and Grill. Its menu includes an item that was featured on the Travel Channel’s “Man Vs. Food” called “Seward’s Folly.”

lunch place in Talkeetna

It costs $25.95 and it really would be folly to eat this. It contains four pounds of meat: 2 l-lb. arctic caribou patties, 1/2 pound smoked ham, 12 strips of bacon, 6 ounces of Swiss cheese, 6 ounces of American cheese, grilled onion, 3 layers of sourdough bread, shredded lettuce, and what the restaurant calls “Fat Ass Sauce.” A couple from Spain was sharing this mammoth beast as we left. How do you say “cardiologist” in Spanish?

Seward's Folly

Hike anywhere in Alaska and you’re likely to come across beautiful wildflowers, including these two specimens – horsetail on the left and fireweed on the right. Fireweed is ubiquitous along roadsides, and blooms from the bottom up. Alaskans say that when the petals at the top open, summer is nearly over.

We took the Alaska railroad to get from Talkeetna to Denali – very relaxing, very roomy and very slow.

rain to Denali

Still, the scenery was beautiful.

mountains, river We found our way up to the dome car and had it practically to ourselves the entire trip. The conductors on the train were very personable – chatting with us for hours about Alaska and the train. From the intercom, another conductor announced points of interest to the passengers. Still no views of Mt. McKinley, but we did see a mama bear and her baby cub right next to the tracks.

in the dome car to Anchorage

We arrived in Denali National Park and took a two-hour guided hike with Mike, one of the park rangers. We got instructions on what to do if a bear approaches (hold your ground, make noises, don’t run) and what to do if a moose approaches (run fast away from it). 

Jamie the park ranger

No bear sightings yet, no moose sightings yet, and no Mt. McKinley sightings yet. But we did see more pretty wildflowers, including the forget-me-nots on the right – Alaska’s state flower.


And lots and lots of wild mushrooms too.

Birch trees were plentiful here. The beavers love to chomp on them and use them to build dams.

birchtrees


Here’s evidence of some beaver's work, and the dam that resulted:

Still no Mt. McKinley peaks and still no large wildlife (unless you count my unshaven husband). The best hope for seeing wildlife was in the far reaches of the park so we signed up for a 13-hour day trip out to Kantishna, the farthest place in the park open to vehicles – no cars allowed - only buses. Some of the roads seemed quite perilous, with severe switchbacks and steep drops off to the side.

curve in the road Still no sighting of Mt. McKinley, but clouds lifted on parts of the mountains and the colors were surreal – like a paint box of crayons had been used. I was beginning to understand the term “purple mountain majesty.” 

late afternoon colors

We did begin to see some wildlife, albeit from pretty far away.  No need for that bear training from the park ranger. I shot these grizzlies from the bus, using a 200 mm lens.

grizzlies on the move We got pretty close to some wildlife though, including this fox that was being chased by an eagle.

fox running from eagle

We came across quite a few ptarmigan too – the state bird. Their plumage turns white as snow in winter.

ptarmigan There were also loons floating in streams along the way.

loon

We saw moose and herds of caribou too. A fellow passenger on the bus, Bernie Unger, took these photos with a 300 mm lens and was kind enough to send them to me.

Moose_7664

caribou 1 Our bus driver, Gitta, in addition to her expert driving and wildlife spotting, kept us thoroughly mesmerized along the way with her personal stories. This remarkable woman, who was born in Greenland of Danish parents, one summer years ago visited Alaska. She met her future husband there, got married, and moved with him to the Alaska bush - far from any settlement. They built a cabin and raised four boys with no electricity, no heat and no running water, relying only on what they could hunt or fish to sustain themselves. Their mode of transportation was either by canoe or by dogsled (16 dogs at one point). Despite all the challenges, she homeschooled the boys (they speak English, Danish and German) who have all either graduated college, or are nearing college age.  If she ever decides to write her life story, I’d be the first to read it. 

our driver Gitte Stryhn Midpoint in the day, we arrived at the Kantishna Roadhouse, where we ate lunch and had a choice of attending a lecture or panning for gold. We chose the lecture.

Kantishna roadhouse

It was given by Emmitt Peters, who father, Emmitt Gordon Peters, is an Athabaskan Alaskan native who won the Iditarod Sled Dog Race in 1975 (a more than 1,000 mile race), shattering the previous record by six days. Emmitt Jr. was informative and kept us laughing with his humorous anecdotes.

Emmitt talks about the Iditarod Outside, Emmitt and a team of dogs gave a demonstration of the teams’ power. Many of these huskies have very light eyes and need protection from the bright sun and snow.

protect those blue eyes

After lunch we boarded the bus to head back, still hoping for a glimpse of Mt. McKinley. Eielson Visitor’s Center, 66 miles inside the park, features a window with a view of the mountain and a photo below the window, outlining the various peaks. We had to settle for the photo below the window since McKinley itself was hiding behind the clouds.


Denali where are you

Also on display at the visitor’s center was this magnificent quilt of Mt. McKinley by Ree Nancarrow. In addition to the expert quilting job, Ree also hand-colored all the fabric. Click here for a better description of all the plants and animals.

fantastic quilt

We were sad that Mt. McKinley kept hiding from us, but we still had a great time on the bus trip and the next day too, when we took a wild whitewater rafting trip on the Nenana River. The bulky “dry suit” came in handy when I jumped into the frigid river for a swim.

On our last night in Denali, we had a spectacular sunset that occurred at about 11 p.m. or so. I could get used to these long days of daylight.

sunset in Denali It was time to head back to Anchorage, and on the train, we got a glimpse of Wasilla, where the Iditarod race starts, and home town of you-know-who.

Wasilla sign

On our last day in Alaska, we took a bike ride along the river in Anchorage. Lots of people were fishing for salmon, which were easy to spot since they were a brilliant red color.

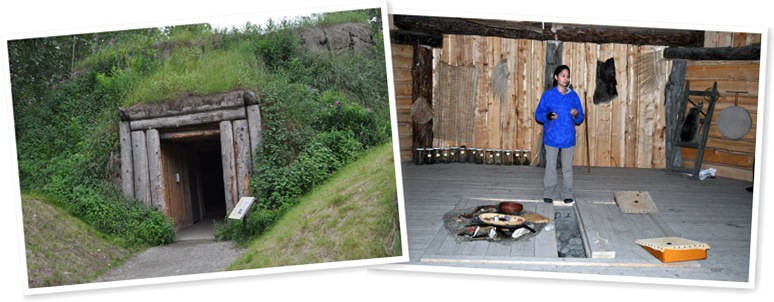
  On a highway just outside Anchorage, we visited the Alaska Native Heritage Center, where visitors can see how native Alaskans lived, worked and played.

This fellow was just about finished constructing a kayak, but using modern materials for the covering instead of the traditional animal skins.

 modern day kayak

And this man, David Boxley, is a Tsimshian carver. His work has received national prominence and is many museums and public spaces across the country.  Here he is carving a totem, but he also creates beautiful prints and cards from Alaskan native designs.

carver David Boxley

During the trip, I ate salmon prepared in many different ways – from salmon on a plank to salmon quesadillas – but this meal of macadamia encrusted salmon at Anchorage’s Glacier Brewhouse was by far my favorite. In my next post, I’m going to show you my attempt at recreating this delicious dish.

THE best salmon dish

So for now, it’s goodbye Alaska – We had a great time and can’t wait to return. Next time, I hope Mt. McKinley comes out of hiding.

Alaskan license plate