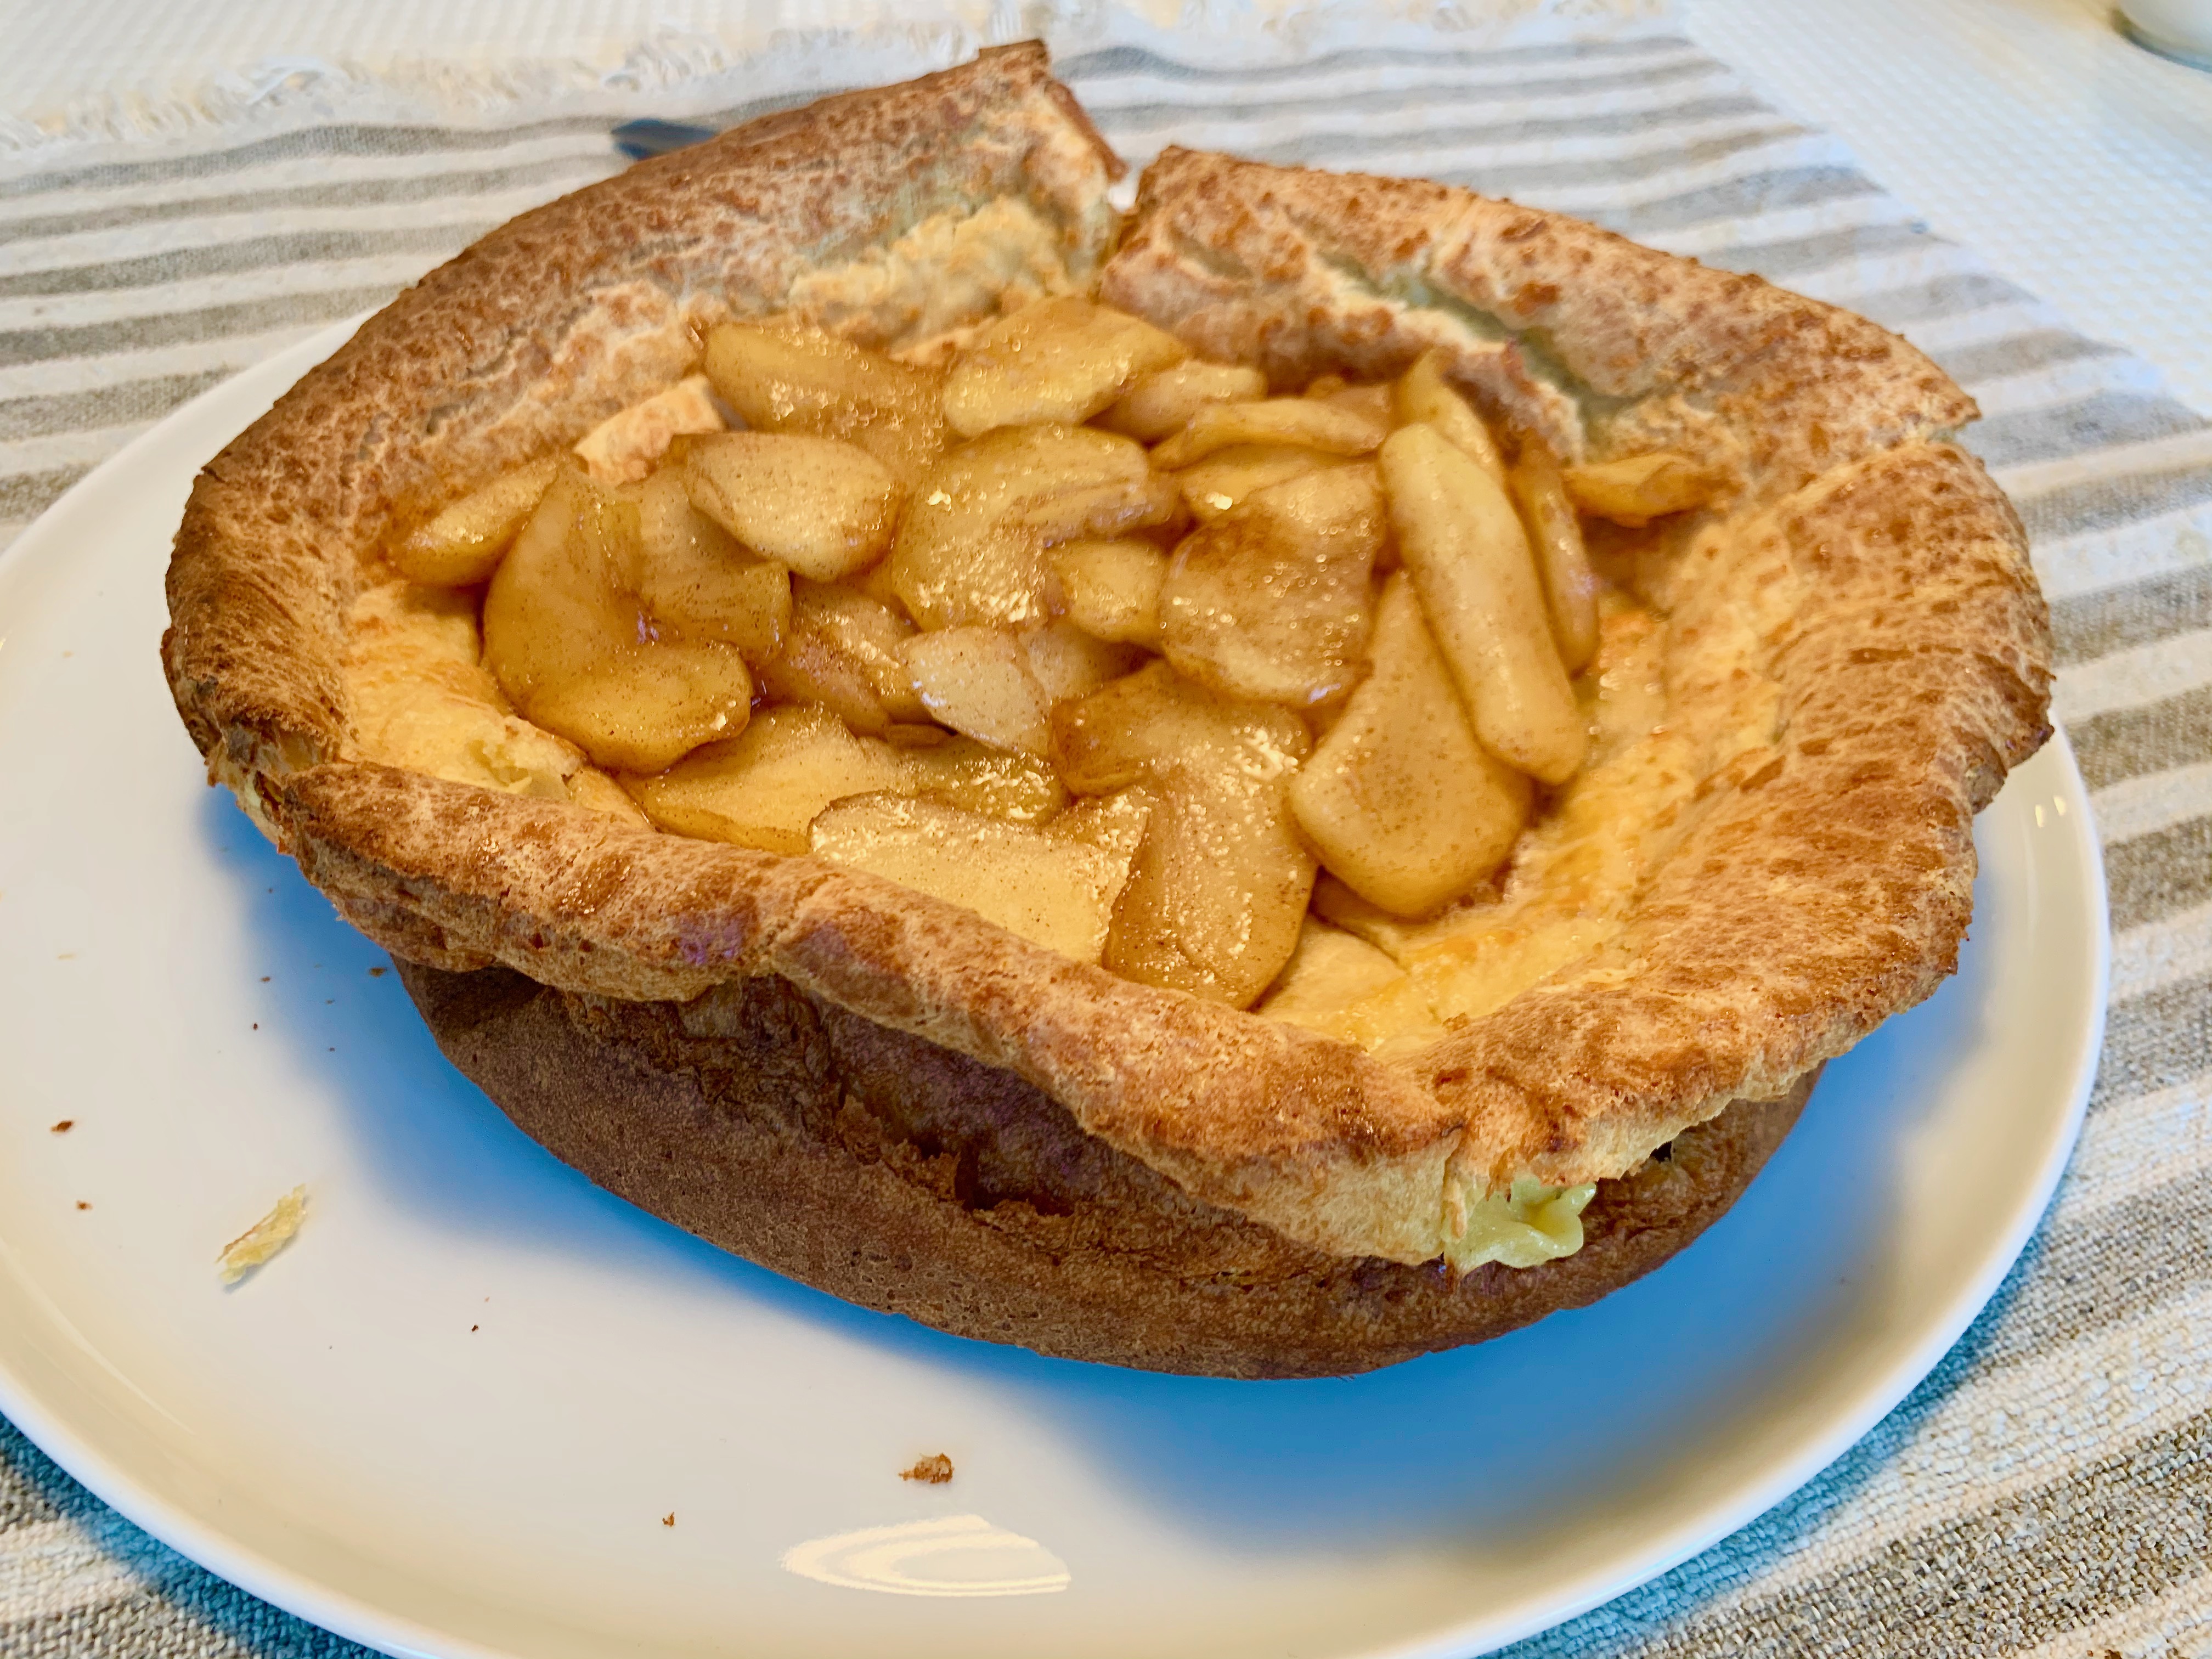
I’ve been wanting to make one of these eggy treats – called Dutch baby or German pancake –for quite a while and it wasn’t until I saw it being made on America’s Test Kitchen that I finally got around to it. Well, that’s not exactly true. I tried making one about a year ago and it wasn’t exactly photogenic. But I should have had a bit more faith, since the center started to deflate after a minute or two of removing it from the oven, bringing in the sides to form a high ridge above the custardy center. I was starting to become a believer. By the time I spooned all the apples to the interior, it was a vision of deliciousness and we couldn’t wait to dive in.
The key to this Dutch baby’s success has a lot to do with an unusual approach to oven temperature. It seems counter intuitive, but you start it in a cold oven, cranking it to 375 degrees only after you place the pan in the oven. Starting it in a cold oven allows for a slower build-up of heat, so the center can start to set before the oven reaches the temperature necessary to give the highest lift to the rim (which takes about 25 -30 minutes). A lot of Dutch babies have a very thin base, but this technique allows for a thicker center, which is more satisfying to eat and better able to serve as a base for the apple topping. It slipped out very easily from the cast iron skillet I used onto a serving platter.
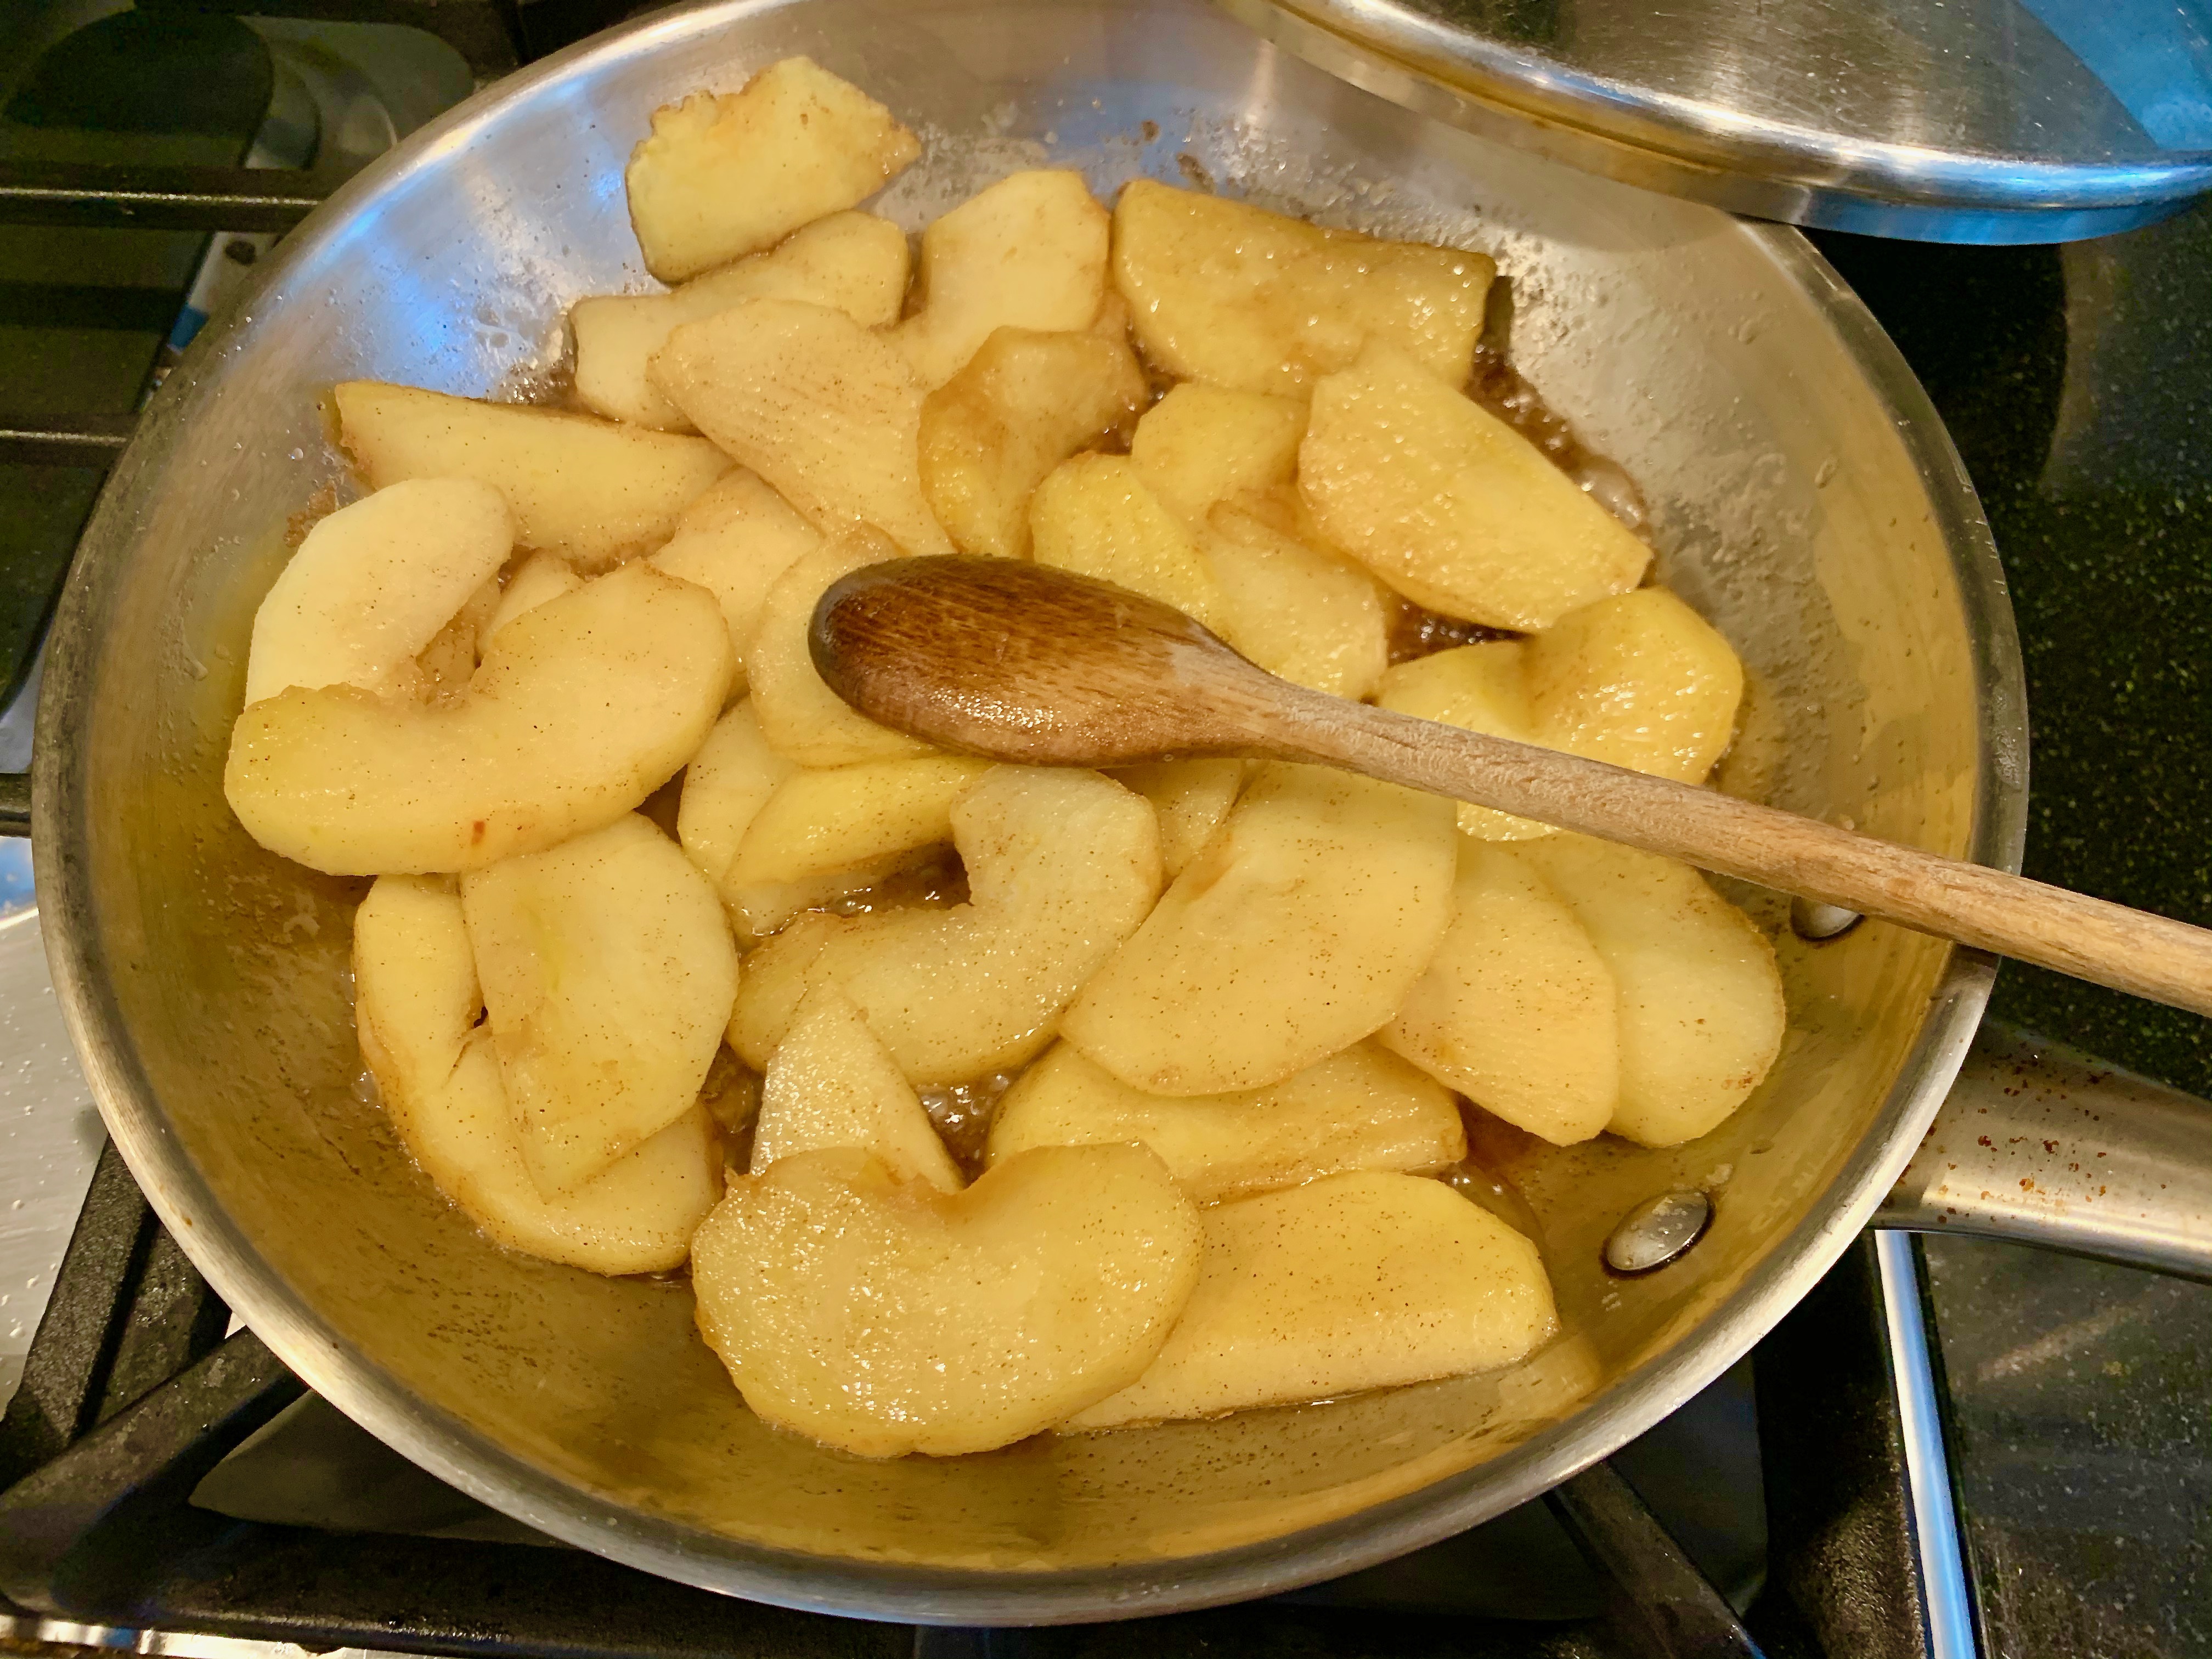
This apple Dutch baby recipe also calls for the apples to be cooked separately in a saucepan, rather than cooked with the batter, ensuring that you don’t end up with a heavy, leaden pancake.
Spoon the apples over the Dutch baby, then either sprinkle with powdered sugar or serve with maple syrup. Cut a slice or two for yourself. It would be a delicious way to start the new year.
Click here to connect with me on Instagram and find out what’s cooking in Ciao Chow Linda’s kitchen each day (and more)
Dutch Baby/German Pancake with spiced apples
Author: Ciao Chow Linda via America’s Test Kitchen
Looking for a last minute gift for friends, neighbors or relatives? You still have time to make this, and it’s really great to give away — not just because it’s delicious and a nice thing to do at holiday time, but also because it’s so darn addictive, you’ll have to get it out of the house before you eat it all. It makes a lot, so you’ll have plenty for passing to sweets lovers.
The hardest part is making the toffee, because it can easily burn if you’re not keeping an eye on it. Conversely, if you don’t cook it enough, it will be too soft and won’t have that crunch you associate with toffee. If you have a candy thermometer, you’re one step ahead of the game. I found mine broken in a drawer, so I had to rely on another way to gauge whether it was ready — dropping a bit from a wooden spoon into a glass of ice water. If it’s still pliable after you’ve dropped it in the water, it’s not done. If it snaps crisply, it’s done, so you can pour the syrup over the nuts and chocolate.
Spread half of the nuts (toasted to bring out the best flavor) over a sheet of parchment paper, then spread half of the chocolate that you’ve broken up either by hand or in a food processor. Pour the syrup over everything.
After you’ve poured the syrup over the nuts and chocolate, then spread the remaining chocolate over the syrup. Wait a few minutes for the chocolate to soften, then smooth it over the candy with a spatula. Sprinkle the remaining nuts on top and wait for it to cool. Take a knife, and cut into pieces. If you’re like me, you’ll have a lot of loose bits that won’t look too great as gifts, so save those for yourself to eat out of hand, or for using as an ice cream topping.
Place into attractive boxes, tins or jars, and spread some good cheer to others before you eat it all.
Click here to connect with me on Instagram and find out what’s cooking in Ciao Chow Linda’s kitchen each day (and more)
1 teaspoon espresso powder, optional; for enhanced flavor
3 tablespoons (43g) water
1 tablespoon (21g) light corn syrup
1 teaspoon baking soda, optional (see “tips,” below)
2 cups (227g) diced pecans or slivered almonds, toasted
2 2/3 cups (454g) semisweet or bittersweet chocolate, finely chopped; or chocolate chips
Instructions
In a large, deep (3 quart) saucepan, melt the butter.
Stir in the salt, sugar, espresso powder, water, and corn syrup, and bring the mixture to a boil.
Boil gently over medium heat, without stirring, until the mixture reaches hard-crack stage (300°F on an instant-read or candy thermometer; you’ll be taking it off the heat a few degrees sooner).
The syrup will bubble without seeming to change much for awhile, but be patient; all of a sudden it will darken, and at that point you need to take its temperature and see if it’s ready.
(If you don’t have a thermometer, test a dollop in ice water; it should immediately harden to a brittleness sufficient that you’ll be able to snap it in two, without any bending or softness).
This whole process should take about 10 to 12 minutes.
Pay attention; too long on the heat, and the syrup will burn.
While the sugar is boiling, spread half of the nuts in an even, closely packed layer on a parchment-lined 9″ x 13″ pan.
Top the nuts with half the chocolate.
When the syrup has reached 295°F, remove from the heat and stir in the baking soda; it will foam up, so use caution.
Pour the syrup quickly and evenly over the nuts and chocolate.
Top with the remaining chocolate and let sit for 2 to 3 minutes, until it softens; spread the chocolate with an offset spatula in an even layer and immediately sprinkle the remaining nuts on top.
While the candy is still slightly warm, pull it out of the pan and use a thin spatula to loosen it from the parchment.
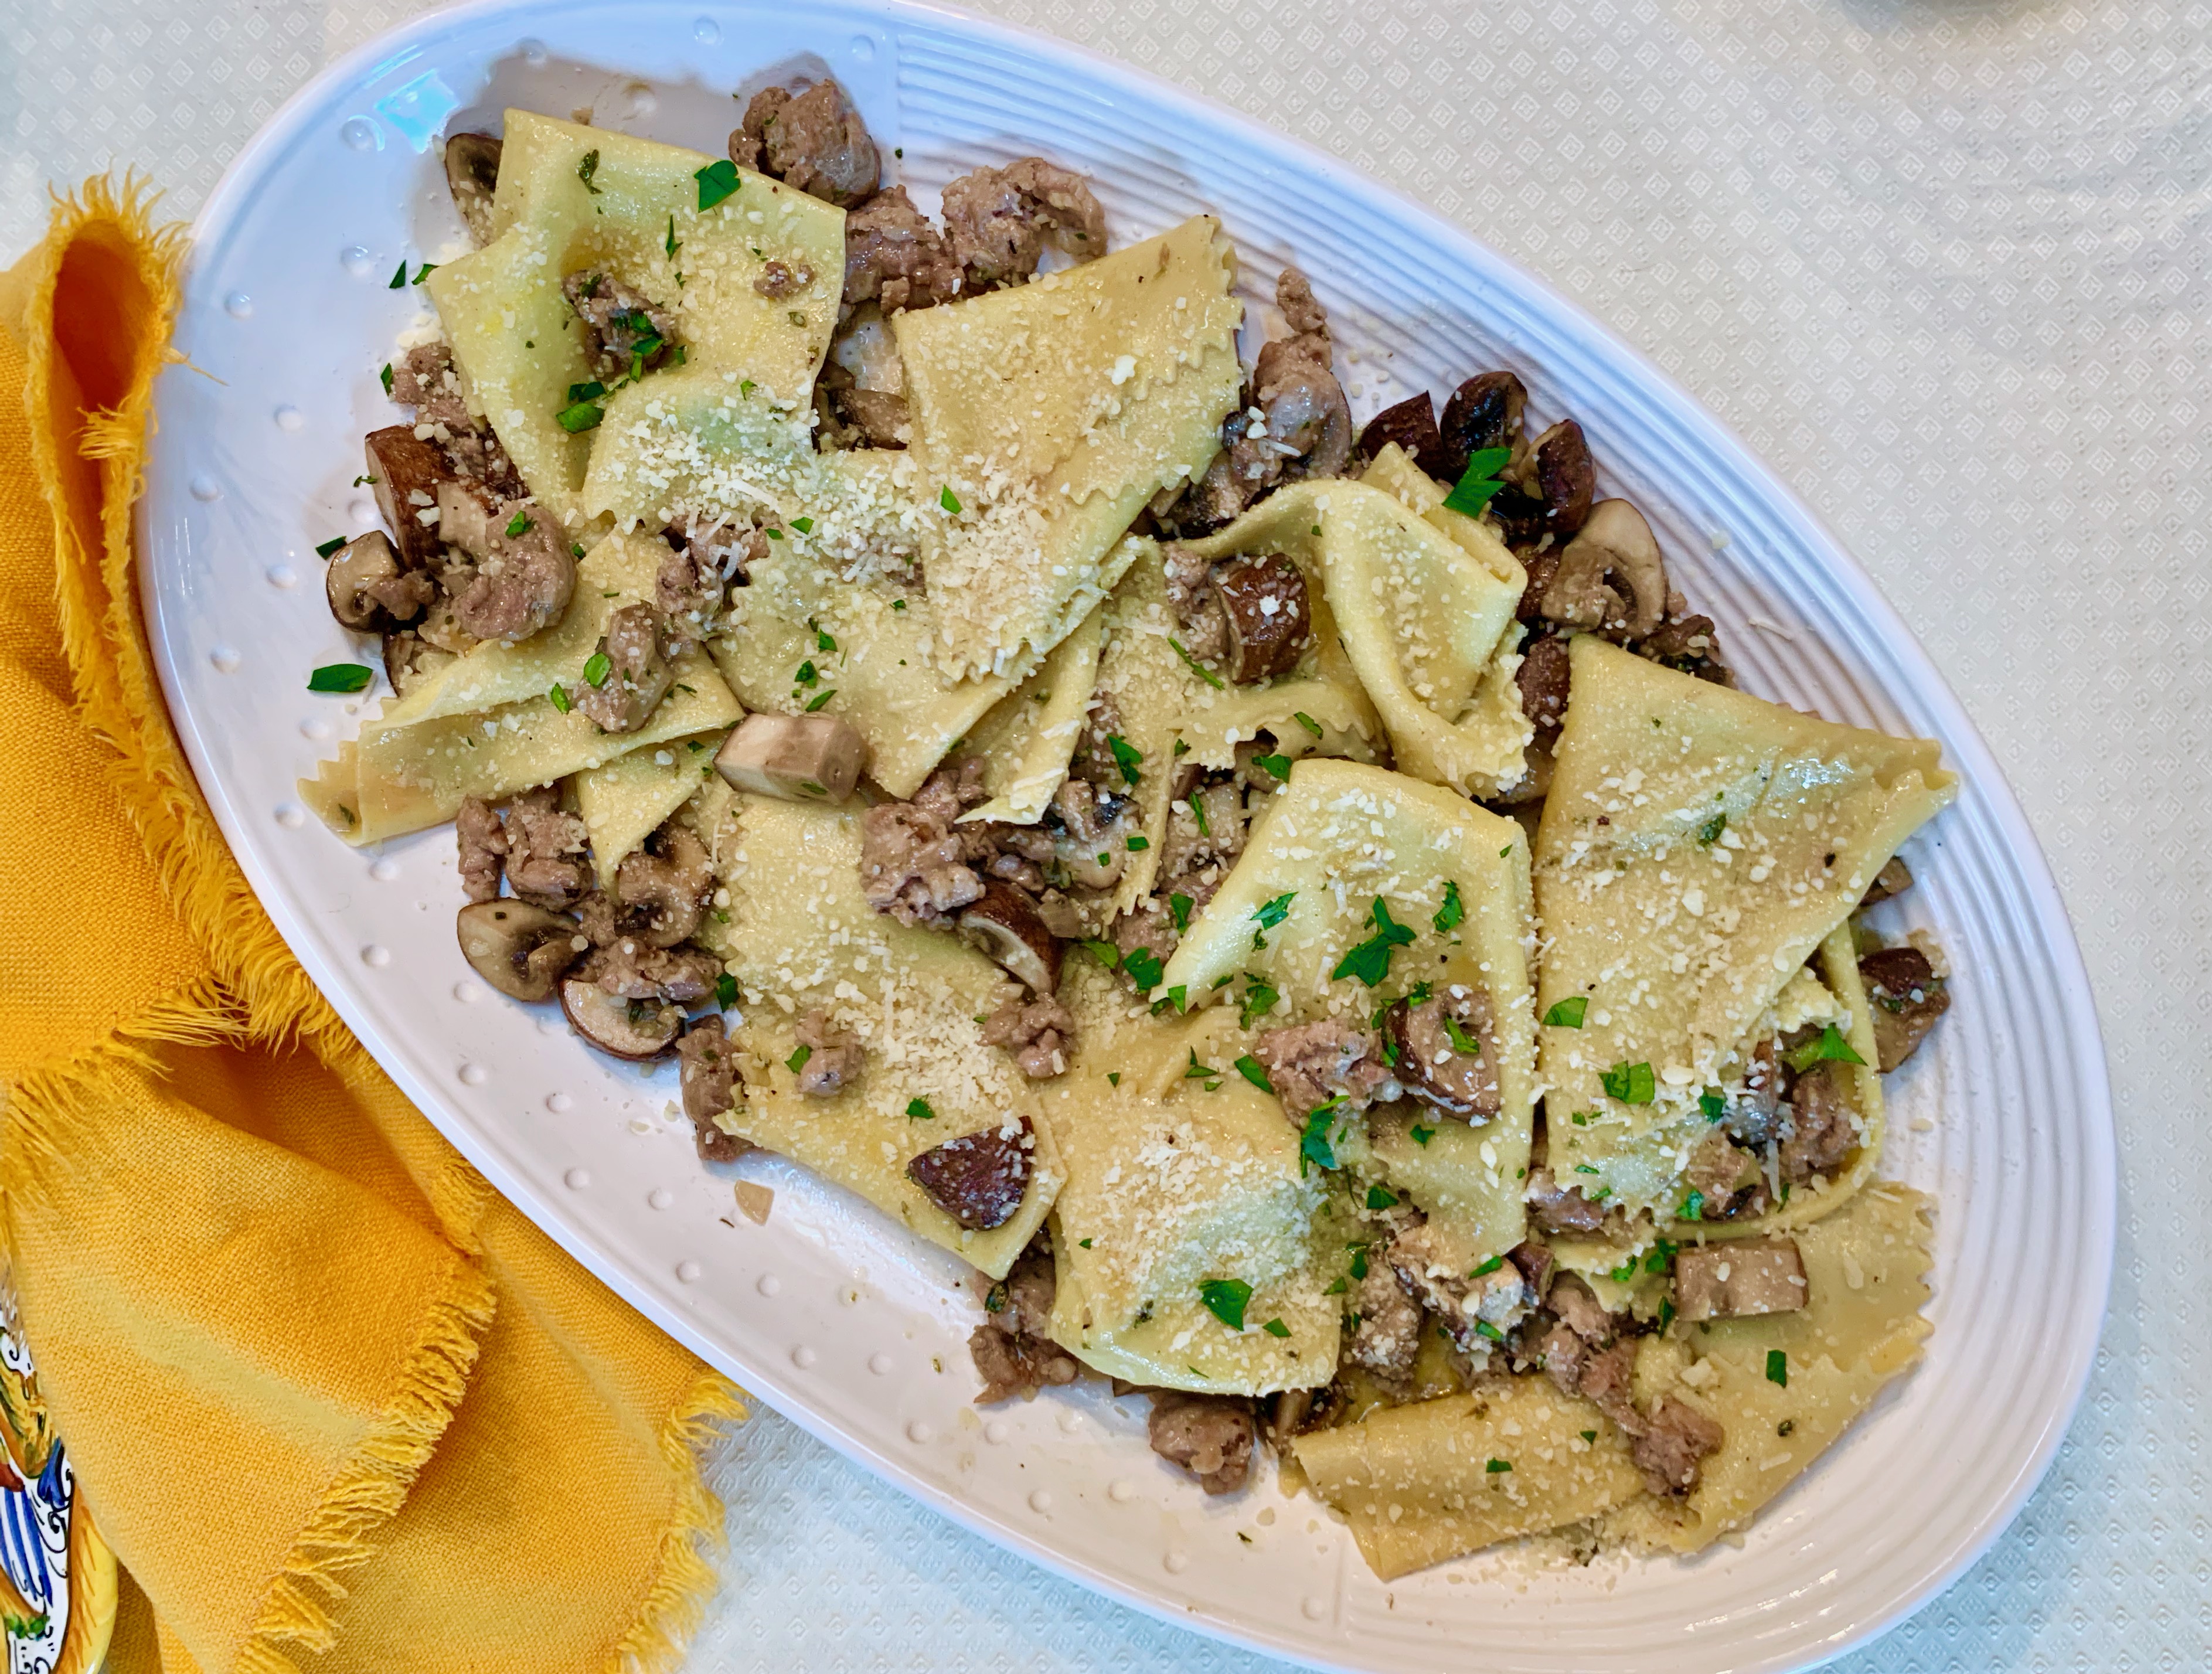
If there’s a holiday or special occasion in my household, ravioli are bound to be on the menu. They’re my husband’s favorite pasta, conjuring childhood memories of helping his mother by pressing a fork into the edges of each pillow of dough to help secure the filling.
But when I thought about making them last week to help my dad usher in his 99th orbit around the sun, I realized I’d never really blogged about the basic ravioli in tomato sauce that is the hands-down favorite in my family. I’m here to correct that now, with this bountiful platter of ricotta and parmesan cheese-filled ravioli. I sometimes deviate slightly and add greens to the traditional cheese filling (spinach, swiss chard or even the wild greens I forage for in the spring and freeze) and I’ve included that in the recipe below. Whether I add the greens or just fill them with the cheese, they disappear from the platter before you can say abbondanza.
Let me show you how I make them and hopefully get you inspired. If you take it in steps and make the sauce ahead of time, it won’t seem so daunting. I usually make a big pot of sauce with meatballs and sausage every couple of months, and freeze enough for four or five meals. It’s easy to pull a container from the freezer and just concentrate on the pasta-making itself. For the basic meatballs and sauce recipe, click here.
The dough can be made a day or two ahead of time too, and stored in the refrigerator in plastic wrap. I used to make it the old-fashioned way, by forming a mound of flour, then making a well, adding the eggs, and kneading it until smooth. But years ago, I started using the food processor to do most of the work, and haven’t looked back since. You still have to knead it a little when you remove it from the food processor, but it’s very little labor compared to doing it all by hand. It does need to rest at least a half hour before you proceed to roll it out and shape it into ravioli.
You can roll it out by hand with a rolling pin if you’re a purist (or a masochist), or you can get one of these hand-cranked pasta machines. I’ve had mine for 50 years (yea, I’m old) and it still works great. I keep it at the shore house for when I’m inspired during the summer.The rest of the year, I roll out the pasta with the attachment to my KitchenAid mixer, which makes things go a lot quicker.
I have the filling all ready to go though, before starting to roll the pasta. Make sure to drain the ricotta a few hours or overnight. I have used cheesecloth, or even coffee filters to hold the ricotta, with weights on the top. You’d be surprised at how much water comes out. And I always buy the full-fat ricotta cheese. Don’t skimp on the calories here please. The filling in the photo contains wild greens, but as I said, you can omit the greens and just go with the cheeses.Here’s another nifty tool that I started using a few years ago. It makes much more uniform ravioli, plus you won’t be likely to have ravioli with too much dough around the edges, as you might if you formed them by hand. But this too, is totally unnecessary, and in some ways, the hand-formed ones have a certain nostalgic charm, bringing back more vivid memories from my childhood, as I watched my mother shape them at the kitchen table.
Here you can see what to do when you make the ravioli using the form. I generally spray the form first with PAM, or brush lightly with oil. Then you place a sheet of the dough over the form, add a spoonful of the filling, wet the edges of the dough with water, and place a second sheet of pasta over the filling.Press down carefully, starting from the center, to eliminate any air bubbles. Cut off the excess dough from the edges, then flip it out, and cut between each raviolo.
You’ll have perfect, uniform ravioli this way.Alternately, if you don’t have the ravioli form, place a sheet of dough directly on your counter or board, add dollops of filling, and moisten between the filling with a brush of water, before adding a second sheet of pasta and helping it to adhere.Then press down gently to eliminate air bubbles, and use a rolling cutter, or a knife, to cut between the individual ravioli.You don’t really need to make the fork indentations if you’ve sealed between the layers of dough and pressed down properly, but my husband likes this job, and it’s a little more “insurance” to keep the ravioli from bursting open when you cook them in water.
By the way, after they come to an initial boil in the water, lower them to a simmer, since a vigorous boil could also cause them to rupture.
With the leftover scraps, I roll out the dough again, but the more you add the leftover scraps together and reroll them, the tougher they get. So I cut them into small “quadretti” to use in soups, where the texture is less important.
I made the ravioli last week to bring to my dad, who lives about an hour away, with his wife. (I also kept a bunch for my husband or there would have been mutiny). My dad was recovering from some dental work and could eat only soft foods, but it was also part of my gift to him to celebrate his birthday. It’s hard to fathom that he was born nearly 100 years ago — the year Warren Harding was inaugurated president of the U.S.; the year Babe Ruth achieved 139 home runs; the year of the first Miss America contest in Atlantic City; and the year that the police in Sunbury, Pennsylvania, issued an edict requiring women to wear skirts at least 4 inches below the knee! Until the pandemic, he was still occasionally playing golf and beating guys much younger than he. I hope I’m as nimble and sharp-witted when (and if) I get to be his age!
I love making pasta, I love maintaining family food traditions, and I love my dad.
I hope you make ravioli for someone you love too.It’s a win-win for everyone — including you, especially if you give yourself a big serving!
Click here to connect with me on Instagram and find out what’s cooking in Ciao Chow Linda’s kitchen each day (and more)
1 pound whole milk ricotta cheese, drained overnight if possible
1 cup parmesan cheese
a few sprigs of parsley, finely minced
optional – 3/4 cup chopped spinach or wild greens, or broccoli rape, cooked and squeezed tight of liquid
salt, pepper
nutmeg
FOR THE PASTA:
1 1/2- 2 cups flour, adding more as needed
pinch of salt
3 eggs
Instructions
Mix the ingredients for the filling. If using frozen spinach, don’t cook it. Let it thaw, then squeeze all the liquid, or as much as possible from the spinach. If using wild greens or broccoli rape, cook in water until tender, then drain, cool, and squeeze out all water possible. Mince and mix with other filling ingredients.
For the pasta, blend everything in a food processor. It’s best to start with less flour and add more as you need, since it’s much more difficult if you have too much flour and not enough liquid. Blend everything until the dough comes together in a ball. If it’s too wet, add more flour. Knead a little more on a floured surface until it’s very smooth, like a baby’s bottom. Cover with plastic wrap and let it rest at least a half hour.
After it has rested, roll it through a pasta machine, starting with the thickest setting and ending up about two settings short of the thinnest setting. Try to roll it out so that you have an evenly long piece of dough that will fit across your ravioli form. If you’re not using a ravioli form, just lay out the dough on the counter, drop about a tablespoon of filling, evenly spaced across the dough, then cover with another layer of dough. Spread a little water with your finger, along the edges, to help the sealing. Starting from the middle, press down on the spaces between the ravioli, working out to the edges. Using a pasta/pastry crimper (or a knife if you don’t have one), crimp the dough between the filling, then separate the ravioli, and use a fork to crimp along the edges, ensuring the ravioli don’t open when boiled.
When cooking in the boiling water, lower the temperature so that the ravioli just come to a low simmer, or low boil. If they boil too vigorously, you risk bursting the ravioli.
Need a coffee break after all that shopping and wrapping gifts? Ma certo! And you’ll need something to go with that, no? These crumiri cookies, traditional in Italy’s Piedmont region, are the perfect treat to accompany a good cup of espresso. They’re sweet, but not overly sweet. In fact, a sprinkling of powdered sugar or drizzle of chocolate adds just the right touch to make these cookies stand out. They’d also make a great gift to ship to some of those friends and relatives you can’t see due to the Covid pandemic.
The hardest part is squeezing the dough through a piping bag. After my initial attempt, when I put all of the dough in the piping bag, I realized it would be easier if I put only about 1/4 of the dough at a time. It was pretty easy after that adjustment. But if you don’t have a piping bag, you can just roll the dough into logs, then shape into “horseshoes” and bake that way.
You won’t get the ridges that give the cookies the distinctive shape that comes with a piping tip, but they’ll still be delicious. I used white cornmeal because that’s the only type I had on hand, but if you have yellow cornmeal, they’ll be a prettier color and closer to the traditional crumiri you see in Italy.
To drizzle with chocolate, just melt a few squares of dark chocolate (or milk chocolate, if you prefer), and scoop it into a pastry bag. You don’t need a special tip, just snip a bit off the bottom of the bag.
Then drizzle some, and leave others just coated with confectioners’ sugar.
Don’t forget to get the espresso brewing!
Click here to connect with me on Instagram and find out what’s cooking in Ciao Chow Linda’s kitchen each day (and more)
Are you “pumpkined-out?” I can’t blame you if you are since you’ve probably been gobbling the remaining leftovers since Thanksgiving — and I know for a fact that some folks (you know who you are) have even raided the refrigerator for a pumpkin pie breakfast. Still, this recipe (adapted from Everydaypie.com) is so delicious I just couldn’t wait until next Thanksgiving to share it. There’s no shame in baking another pumpkin pie before the season is out. I used a “cheese pumpkin” for this recipe, which gave it an exceptional flavor, but you can certainly use canned pumpkin instead. Actually, you could even make this pie with different squashes too, or even pureed sweet potatoes. Whatever you do, make sure you prick the crust and blind bake it before filling it or you’ll end up with a wet bottom — and who wants that?
To blind bake the crust, I usually butter one side of a piece of aluminum foil and place it into the uncooked pie crust, then gently pour in some beans to weigh it down. These beans have been reused countless times over the decades. They’re at least thirty years old, if not older. I just store them in a tin until I need them again. Follow the instructions in the recipe below.
Place dollops of the mascarpone filling atop the pumpkin, then swirl them in using a knife, or chopstick. Since I was using some pumpkin I had leftover from another recipe, I had only about 1 1/2 cups and it really didn’t fill the crust as high as I would have liked. Try to use about 2 cups of pumpkin, which is what you’ll get from a 15 ounce can.
I have to say that this was really one of the best pumpkin pies I’ve ever eaten, and I don’t know if it was because of using the cheese pumpkin, the addition of mascarpone, the mixture of spices, the perfectly baked crust or a combination of all of them. I do know that I’ll be making this again and I won’t wait for next Thanksgiving to do so. I hope you try it too. Don’t forget to add the whipped cream on top!
Click here to connect with me on Instagram and find out what’s cooking in Ciao Chow Linda’s kitchen each day (and more)
1–9″ pie crust, homemade or purchased, blind baked (see instructions below)
1 cup (8 ounces; 227 grams) mascarpone cheese, room temperature
¼ cup (50 grams) granulated sugar
4 large eggs, divided
1 teaspoon vanilla extract (This turned the mascarpone a beige color, so I might eliminate it next time and just add the vanilla to the pumpkin instead.)
½ cup packed (100 grams) light brown sugar
1–½ teaspoon ground cinnamon
1/4 teaspoon nutmeg, freshly grated
Pinch cloves
1 (15 ounce) can 100% pumpkin puree (I used 1 1/2 cups of freshly cooked and drained pumpkin but 2 cups would have been better)
heavy cream for whipping and decorating the top of pie
Instructions
TO ROLL AND BLIND BAKE THE PIE CRUST:
Roll out the pie dough to an 11″ circle and line a 9” pie plate, crimping the edges as desired.
Prick the bottom of the dough all over with a fork to let steam escape during baking. Place the pie in the freezer for 30 minutes to let the pie dough chill.
While dough is chilling, preheat oven to 375ºF.
Remove the pie from freezer and line the pie dough with a parchment round piece of paper (or aluminum foil that is greased on the side that touches the pie dough) and then add pie weights (or dry rice or beans or lentils) to fill the pie shell, making sure to push pie weights to the edges.
Bake for 20 minutes on the lower rack, then remove from oven and remove the parchment and pie weights.
Return to oven and bake for an additional 10 minutes.
Set aside until ready to use. Lower the oven to 325ºF.
ASSEMBLE THE FILLING:
Using an electric mixer on medium speed, beat the mascarpone and the sugar, until smooth.
Add in 1 egg and beat until thoroughly combined.
Scoop out ½ cup of the mascarpone mixture and set aside.
Then, add to the mascarpone mixture the remaining eggs, vanilla, brown sugar, cinnamon, nutmeg, cloves and pumpkin puree.
Beat together until fully combined.
Add half of the pumpkin filling to the fully baked pie crust.
Spoon in a few dollops of the set aside mascarpone filling to the pumpkin mixture.
Then, pour the remaining pumpkin mixture over the top. Spoon drops of the remaining mascarpone mixture.
Using a knife, chopstick or toothpick gently swirl through all layers of the pumpkin filling to achieve a marble effect.
TO BAKE:
Bake the pie on the middle rack for 45-55 minutes, or until the pie reaches a temperature of 180ºF and the outer edges have started to puff up but the center is still slightly wobbly.
Remove from the oven and let cool at room temperature before placing in the refrigerator for at least 4 hours to finish firming up.
OK, now if this pasta dish has you drooling, let me tell you it’s really easy to make and so delicious you’ll be eating seconds and thirds and fending off marriage proposals from anyone who tries it. Of course, that assumes you make your own pappardelle, following the instructions here. But if you don’t have the time or inclination to make your own pasta and instead buy a good quality pappardelle, and serve this ragù as the accompaniment, you’re still likely to have suitors filling up your dance card after they fill their stomachs.
It all starts with that beef stew I recently posted. I asked you to put some aside in the freezer for a reason (before adding the peas and carrots.)
When you defrost it, add a 1/2 can of Italian cherry tomatoes with the juices. It’s not the same with fresh cherry tomatoes, so make sure you buy the canned ones. If it’s hard to find canned cherry tomatoes where you live, you can buy them online at many places, including here. By the way, I have no financial interest in this brand or any other, so choose whatever brand you like.
After you’ve added the tomatoes, some wine, chestnuts and a little seasoning, let everything simmer for another 1/2 hour to 45 minutes to blend the flavors. You’ll get a thick and flavorful ragù that is just begging for some pasta to keep it company.
I was lucky to find fresh chestnuts from Italy in the produce section at my local grocery store. You’ll see plenty of sealed bags of chestnuts on the shelves that are already peeled and cooked, but they come from China, and I’m leery of the quality control, so I always seek out the Italian ones. The fresh ones are not that hard to cook and clean. Just cut a slit or make a cross cut in each chestnut; place them in a pan with cold water; let it come to a boil; boil for two or three minutes, then drain the water and roast the chestnuts in a 425 degree oven for about 15-20 minutes. They should be fully cooked by then. It’s easier to peel them when they’re hot, and some of the skins will peel off easily. Others are a little more resistant, but for this recipe it doesn’t matter if the chestnuts come off in one piece. You’ll be breaking them up to put in the sauce anyway. (But munch a few with a good glass of wine while you’re peeling them too!)
Get the pasta water boiling (“Butta la pasta,” as we say in Italian) and add the pappardelle, then toss the pasta with the sauce.My mouth is watering just looking at this dish. By the way, you can freeze any of those chestnuts if you’ve cooked more than you need for this recipe. With chestnut season so short, you’ll be glad you did. As the dish below says, take your photo first, then dig in.
Click here to connect with me on Instagram and find out what’s cooking in Ciao Chow Linda’s kitchen each day (and more)
2 cups leftover beef stew (without carrots or peas or potatoes – just the meat and the sauce)
1 cup canned cherry tomatoes with the juice (1/2 of a 14 oz. can)
1/2 cup red wine
1 teaspoon of finely minced fresh rosemary
1 cup cooked chestnuts, broken into pieces
pappardelle (about 1 lb.)
Instructions
Take the leftover beef stew, and cut, or shred the chunks of beef into small pieces.
Place the beef in a saucepan with the canned cherry tomatoes, the wine, the chestnuts and the rosemary and let it all simmer for about 1/2 hour to 45 minutes.
Boil the pasta until it is cooked and toss gently with the sauce.
Although we’ve had warm, nearly 80-degree days here in New Jersey recently, it’s most unusual for this time of year. Cold weather in November is as predictable as election results on the first Tuesday of the month (oh wait………. well, let’s not go there).
And when the down comforter comes out, and the fireplace kicks in, so does my need for comfort food. One of my favorite meals to make (and eat) when the temperature drops, is this beef stew. You may like potatoes in your beef stew, and if so, feel free to add them. But I prefer mine served over creamy, cheesy, soft polenta. And this polenta doesn’t require stirring over a stove for an hour since you make it in the oven, stirring only once every twenty minutes. If you prefer, you can also serve the stew over mashed potatoes, buttered noodles or rice.
Another reason I omit potatoes from beef stew (aside from the fact that reheated potatoes never taste that good) is because I like to set aside some of the beef stew (before the addition of peas and carrots) to use in another recipe, one that I’ll write about in an upcoming blog post. Without divulging that recipe right now, suffice it to say that it’s worth making this beef stew just to have the leftovers. I know you’ll thank me for it later. For now, the beef stew and polenta is pretty darn comforting too.
Click here to connect with me on Instagram and find out what’s cooking in Ciao Chow Linda’s kitchen each day (and more)
1/4 cup olive oil, or more as needed to brown the cubes
one large onion, minced
2 garlic cloves, minced
1/2 cup red wine
2 cups beef broth
1 cup water
1 cup canned cherry tomatoes, (or crushed tomatoes if you can’t find the cherry tomatoes)
salt, pepper
1 sprig of fresh rosemary, minced
2 T. minced fresh sage
1 cup frozen peas
1 or 2 carrots, peeled and sliced
1 squirt of “kitchen bouquet” (if you can find it – it helps make everything a richer brown color)
FOR THE OVEN BAKED POLENTA:
1 cup cornmeal
3 cups water
2 cups milk
1 teaspoon salt
4 tablespoons butter
1/2 cup parmesan cheese
Instructions
If the beef cubes are large, cut them into smaller pieces, about 1/2″ to 3/4.”
Dust the cubes with flour, salt and pepper.
Saute the cubes in the olive oil, in one layer, repeating as necessary, and turning on each side until browned,
Remove the beef cubes from the pot, add more olive oil, if needed, and cook the onions over low heat until translucent.
Add the garlic cloves and cook for another couple of minutes
Put the beef cubes back into the pan, and pour in the red wine.
Let it cook for a minute, then add the canned tomatoes, beef broth and water, and season with salt, pepper, paprika, rosemary and sage.
Place the lid on the pot and place in the oven at 325 degrees for 2 – 3 hours, or until the meat is fork tender.
Place the frozen peas in the pot about 1/2 hour before removing it from oven.
Boil the sliced carrots in water and when nearly done, remove the carrots from the water and add to the beef stew in the oven, stirring to blend everything,
If you can find “Kitchen Bouquet,” add about 1 teaspoon to the pot.
It will give it a rich, brown color.
If the liquid in the beef stew is not thick enough, remove the cover, and cook on top of the stove for a bit, until some of the liquid has evaporated and thickened.
Serve over polenta, noodles or mashed potatoes.
FOR THE POLENTA:
Whisk together the cornmeal, milk, water and salt.
Place in the oven, uncovered, with the beef stew during its last hour of cooking.
Whisk or sttir every 20 minutes.
If it looks like it needs more liquid, add more water or milk.
After an hour, it should be thickened enough. It will thicken some more when you add the cheese.
If it’s still not thickened enough, return to the oven for another 20 minutes,
Add the butter and stir.
Remove from the heat, and stir in the parmesan cheese.
Fazzoletti (the Italian word for handkerchiefs) is a pasta I’ve been wanting to make for a long time, after eating it years ago at Le Virtù, a favorite Philadelphia restaurant. I finally got in the fazzoletti-making mode a couple of weeks ago and decided to channel fall flavors, with sausage and mushrooms in the sauce. But to kick it up a further notch, I added saffron to the dough. Saffron is expensive here in the states, but a little goes a long way. It’s a lot less expensive in Italy, and it’s much fresher if you buy it near the source (Abruzzo is famous for its saffron from Navelli). So whenever I’m in Italy, I buy saffron, whether in a pretty little ceramic container, as I bought in Santo Stefano di Sessanio, or in paper packages, that you can find in any supermarket in the country. One of my very favorite ways to use it is in the classic risotto alla Milanese, a recipe I wrote about here.
The dough is made with OO flour, the gold standard when making pasta, with its fine, soft grain and high gluten content. I added two of the small glassine envelopes of saffron to the dough, after dissolving it in a tablespoon of warm water. And yes, you can taste the saffron in the pasta, although it is subtle. Dump everything into a food processor, leaving some of the flour aside because when you’re making an egg/flour pasta, it’s much easier to add more flour to a wet mixture than add more eggs to a dry pasta mixture. Feel free to mix it on the countertop, but you’ll need a lot more muscle. Even with the food processor, take it out and knead it on the counter, adding more flour if it’s too sticky, and kneading it until it’s as soft as a baby’s bottom. Cover it and set aside for at least a half hour, which gives the gluten time to relax and do its thing. It’ll be much easier to work with as a result.
This is the amount of pasta I made using the recipe below.
As you can see, I made about a dozen fazzoletti, that each measured 4″ x 4″, plus a lot of pappardelle that I plan to use in a separate recipe. Of course, you can always buy packaged pasta, or even fresh pasta in the refrigerated section, but you’ll have a hard time finding fazzoletti pasta, and there’s nothing quite so delicious as home made. I had a few scraps left over and cut them into thin spaghetti that I’ll most likely use in chicken soup.
The sauce comes together quite quickly, with some olive oil, herbs, sausage, shallots and mushrooms, all cooked in one pot.
Lift the cooked fazzoletti from the boiling water directly into the sauce, letting some of the water come along with it. Stir and mix everything together gently so you don’t rip the pasta. Add more of the pasta water, if needed.
Serve on a large platter, sprinkled with a drizzle of olive oil, some parmesan cheese and minced parsley.
Wait till you bite into this toothsome, yet silky pasta with these complementary flavors. If you’re like me, you’ll have a hard time stopping at one bowl.
Click here to connect with me on Instagram and find out what’s cooking in Ciao Chow Linda’s kitchen each day (and more)
1 1/2 links of sweet Italian sausage (about 1/2 pound)
8-10 small portobello (or cremimi) mushrooms
1 shallot, minced
1 garlic cloves, minced
1/4 olive oil
fresh sage leaves
fresh thyme leaves
salt, pepper
minced parsley
a little pasta water
parmesan cheese
Instructions
Dissolve the saffron in the hot water.
Place the flour (keep 1/2 cup of the flour aside) and eggs and the watered down saffron into a food processor (or mix by hand if you have the strength).
If the dough is too sticky, add the rest of the flour, a little at a time.
When the mixture has turned into a ball, remove to a wooden board.
Knead a bit more (keeping flour on the board) until the dough is smooth.
Shape it into a ball (or two balls) and wrap in plastic wrap, or keep covered under a bowl.
Let the dough rest for a half hour.
When ready to shape the dough, roll it by hand to a thin consistency, or using a pasta machine, roll it to the smallest number on the setting.
For the fazzoletti, cut into 4 inch squares.
This recipe makes a lot of fazzoletti, but you can shape some of it into fettuccine, or pappardelle or other shapes and reserve for other meals.
I used 12 fazzoletti for two people and it was plenty for a meal.
If you’re making it as a first course, you will want fewer fazzoletti for two people.
Boil the fazzoletti in ample salted water and add to the sauce.
FOR THE SAUCE;
Add half the olive oil to a large saucepan.
Heat to a medium heat, and add the sausage, crumbling it into pieces, and removing the casing.
Wash the mushrooms and cut into quarters.
Add the mushrooms to the sausage and when almost cooked, add the minced shallot and garlic.
Add the fresh sage leaves and thyme leaves and let everything cook for about 10 minutes.
Start cooking the fazzoletti in the boiling water.
They should take only a few minutes to cook.
Meanwhile, if the sauce looks too dry, add some of the pasta water.
Drain the fazzoletti and add to the sauce.
Don’t worry if some of the water comes along with it.
Gently stir the pasta into the sauce, letting it absorb the flavors, and reducing the water.
Season with salt and pepper.
When the water is nearly all gone, add the rest of the olive oil.
Toss gently into a serving bowl, and sprinkle with grated parmesan cheese and minced parsley,
Have you got a celebration coming up? If not, consider this afternoon a good enough occasion for a celebration. Forget Norman Vincent Peale. If you want to win friends and influence people, chocolate is where you want to be and this is the route to take. This cake has great flavor and texture, and is the second best chocolate cake around. THE best chocolate cake I’ve ever eaten is a chocolate truffle cake from a local shop here in town (Olive’s) and the hubs is getting it for me for my birthday this week. (Yea!) Only fitting, since I made this cake for his birthday earlier this year.
Most of you don’t live within a quick drive to my town and that shop, so I’ve giving you the next best thing. It’s almost the same recipe as Hershey’s “Perfectly Chocolate Cake” but since I had buttermilk in the house from another recipe, I decided to use that instead of regular milk. Buttermilk adds a bit of a tang, and makes a big difference in the tenderness of cakes. Even if you don’t have buttermilk in your refrigerator, you can create it by squeezing a little lemon juice into regular milk and letting it sit for five to ten minutes.
This ratio of chocolate frosting to cake is crucial, in my humble opinion, but then again, I’m a pushover for chocolate frosting (well, any kind of buttercream frosting, actually).
Click here to connect with me on Instagram and find out what’s cooking in Ciao Chow Linda’s kitchen each day (and more)
1 cup hot coffee, cooled (I use espresso, and add more water to bring to one cup)
CHOCOLATE BUTTERCREAM FROSTING:
1 cup butter softened
1 teaspoon vanilla
1/2 teaspoon salt
1/2 cup dark cocoa powder
4 cups powdered sugar
1/4 cup heavy whipping cream
Instructions
MAKE THE CAKE:
Preheat oven to 350 degrees F.
Grease and flour two 8″ cake pans, and line the bottoms with parchment paper for easy removal later.
Whisk together in a large bowl of a standing mixer (or use a hand mixer) the sugar, flour. cocoa powder, baking soda, baking powder and salt.
In a separate mixing bowl, add the buttermilk, vegetable oil, eggs and vanilla, and whisk to combine.
Beat at a low speed, then and slowly pour in the wet ingredients until just combined, scraping sides of the mixing bowl if necessary.
Keeping the mixer at a slow speed, carefully pour in the coffee. Mix until just combined, scraping the sides of bowl as needed.
Pour batter into the prepared pans and bake for 30-35 minutes, until a toothpick inserted into the center comes out clean.
Remove cakes from oven.
Let cool in the pans for 15 minutes, then flip gently onto cooling racks to continue cooling.
Remove the parchment paper and cool completely before frosting.
MAKE THE FROSTING:
Beat the butter, vanilla and salt together until smooth and creamy.
Whisk together the cocoa powder and powdered sugar, then add the mix and the whipping cream to the butter mixture, a little at a time until mixed together.
Continue beating for 3 or 4 minutes until the frosting is light and fluffy.
Frost the cake, using about 1/3 for the inside of the cake and the rest for the tops and sides.
If you want to decorate as I did, shave some chocolate using a vegetable peeler and press on the sides (It can be messy)
For the top, microwave an ounce or two of dark chocolate with a 3-4 tablespoons of cream.
You may need to add more cream to get to a pourable consistency.
Stir until it is liquid enough to pour, then drizzle in lines across the top.
Using a toothpick or butterknife, swipe across the opposite directions of the chocolate lines, first in one direction, then the other, to get the wave pattern.
I love carefree summer days at the beach, but when autumn rolls around, and some of my favorite foods are at their peak — like butternut squash — I enjoy spending more time in the kitchen. Pumpkins and squash are so redolent of crisp fall days, of Halloween, heartier cooking and family time. Unfortunately, Covid has severely limited family time, although we were all tested recently so we could gather for my granddaughter’s second birthday – YEA!!! I decided to make gnocchi for the occasion, one of my husband’s all-time favorite meals, and I knew it would be equally welcomed by my son, daughter-in-law, and granddaughter. The recipe is included below, but if you want a photographic step-by-step tutorial on making potato gnocchi, click here. If you haven’t got a gnocchi paddle, a little wooden implement that makes these ridged impressions, you can easily use a fork to roll them, as my mom always did when I was growing up — or even the rough edges of a cheese grater.
Getting the right consistency is the key to successful gnocchi, and it helps to have a “feel” that comes after you’ve made them a number of times. Too much flour and they’re leaden. Too little flour and they disintegrate in the water. So after you’ve mixed the dough, make a few gnocchi and test them out by boiling them in water. You’ll know right away if you need to add more flour. It’s so much easier to add more flour, but if you’ve already added too much, then you’ve got a problem. You can make these ahead of time, but refrigerate them on floured dishcloths if you’re making them the day before you serve them. You can freeze them too, but in my experience, they sometimes attract too much water from the freezer and fall apart when later boiled in water. Instead, I boil them to start with, drain them on paper towels or dishcloths, then lay them on cookie sheets and put the cookie sheets in the freezer. After the gnocchi have individually frozen, you can pull them off the paper towels or dishcloths, and pop them in plastic bags, ready to be reboiled again whenever you want to serve them. They seem to retain their consistency better, at least for me.I wanted to showcase some fall flavors with the gnocchi, so I cut up some butternut squash (I’ve used honeynut squash too, which I love) and some mushrooms. Roast at high temperature after you’ve drizzled with olive oil, salt and pepper. You can do this ahead of time too, even the day before, and just set it all aside in the refrigerator until you need it.
Fry up some sage leaves in olive oil, drain on a paper towel, and sprinkle with salt. They’re hard to resist as a crunchy snack, so make a bunch if you have enough sage to spare.
Melt the butter in a large pan, add some fresh sage leaves and let the butter absorb the sage flavor for a couple of minutes. Then add the roasted squash and mushrooms, and scoop the cooked gnocchi directly from the boiling water into the pan with the butter and vegetables. Don’t worry if some water comes along with it. In fact, reserve a bit of water to add in order to get a little more “sauce.” Toss everything gently, and remove the sage leaves, which have become soggy. Serve with grated parmesan cheese sprinkled on top, and some crispy sage leaves on the side.
It’s a family favorite, as you can see from my little granddaughter. They was worth making just to see her sweet little smile.
Click here to connect with me on Instagram and find out what’s cooking in Ciao Chow Linda’s kitchen each day (and more)
Gnocchi with Butternut squash, Mushrooms and crispy sage
a handful of mushrooms (cremini, baby portobello or button mushrooms)
2 tablespoons olive oil
seasoned salt, pepper to taste
FOR THE SAUCE:
8-12 tablespoons unsalted butter
a dozen sage leaves
some water from boiling the gnocchi
grated parmesan cheese
FOR THE CRISPY SAGE LEAVES:
olive oil
sage leaves
Instructions
FOR THE SQUASH AND MUSHROOMS:
Cut the squash into small pieces, cut the mushrooms into halves, or quarters if large, and toss with the olive oil and seasonings.
Roast in a 475 degree oven for 10 minutes, or until the pieces are tender.
FOR THE CRISPY SAGE LEAVES:
Place a little olive oil in a shallow saucepan and when it’s hot, add the sage leaves.
Fry for a minute or two and flip, removing to a paper lined plate.
Sprinkle salt on them immediately and set aside.
FOR THE GNOCCHI:
Bake the potatoes uncovered in a 375 degree oven for about an hour or until done.
Remove from oven and when you can handle them, peel them.
Put chunks of the potato through a ricer and spread on a cookie sheet.
Let it cool completely, then mix with the eggs, salt, pepper and nutmeg and cheese.
Add flour, 1/4 cup at a time.
You may not need all 2 cups flour, or you may need more.
Just add enough until the dough comes together and you can easily roll it into a big “log.”
Cut the log into four or five pieces, then take each piece and roll it out like a snake, about 1/2 inch to 3/4 inch thick.
Using a knife, cut off some pieces of the roll, maybe about 1/2″ each.
Take each 1/2″ gnocco and make an imprint on it, using either a fork or a gnocchi paddle.
At this point, you can refrigerate if not using immediately — even overnight.
Bring water to a rolling boil, add salt and the gnocchi and let simmer gently until they rise to the top.
The recipe makes about 225 gnocchi so freeze half if you like.
If I’m planning to freeze some, I actually cook them all in the water, then drain them on paper towels, place half on a cookie sheet and put those in the freezer. When they have frozen hard, I move them to a plastic bag and keep them in the freezer until I need them.)
FOR THE SAUCE AND TO ASSEMBLE:
Melt the butter in a saucepan, then add the sage leaves, letting them simmer a few minutes to impart their flavor.
Then using a slotted spoon, remove the gnocchi from the water and place them directly into the pan with the melted butter and sage leaves.
Don’t worry if a little water comes along when you ladle out the gnocchi, in fact, it’s good to add a little of the water to the sauce.
Add the roasted squash and mushroom pieces, and gently stir everything together.
Place everything into a serving bowl, sprinkle with parmesan cheese and scatter the crispy sage leaves on top.