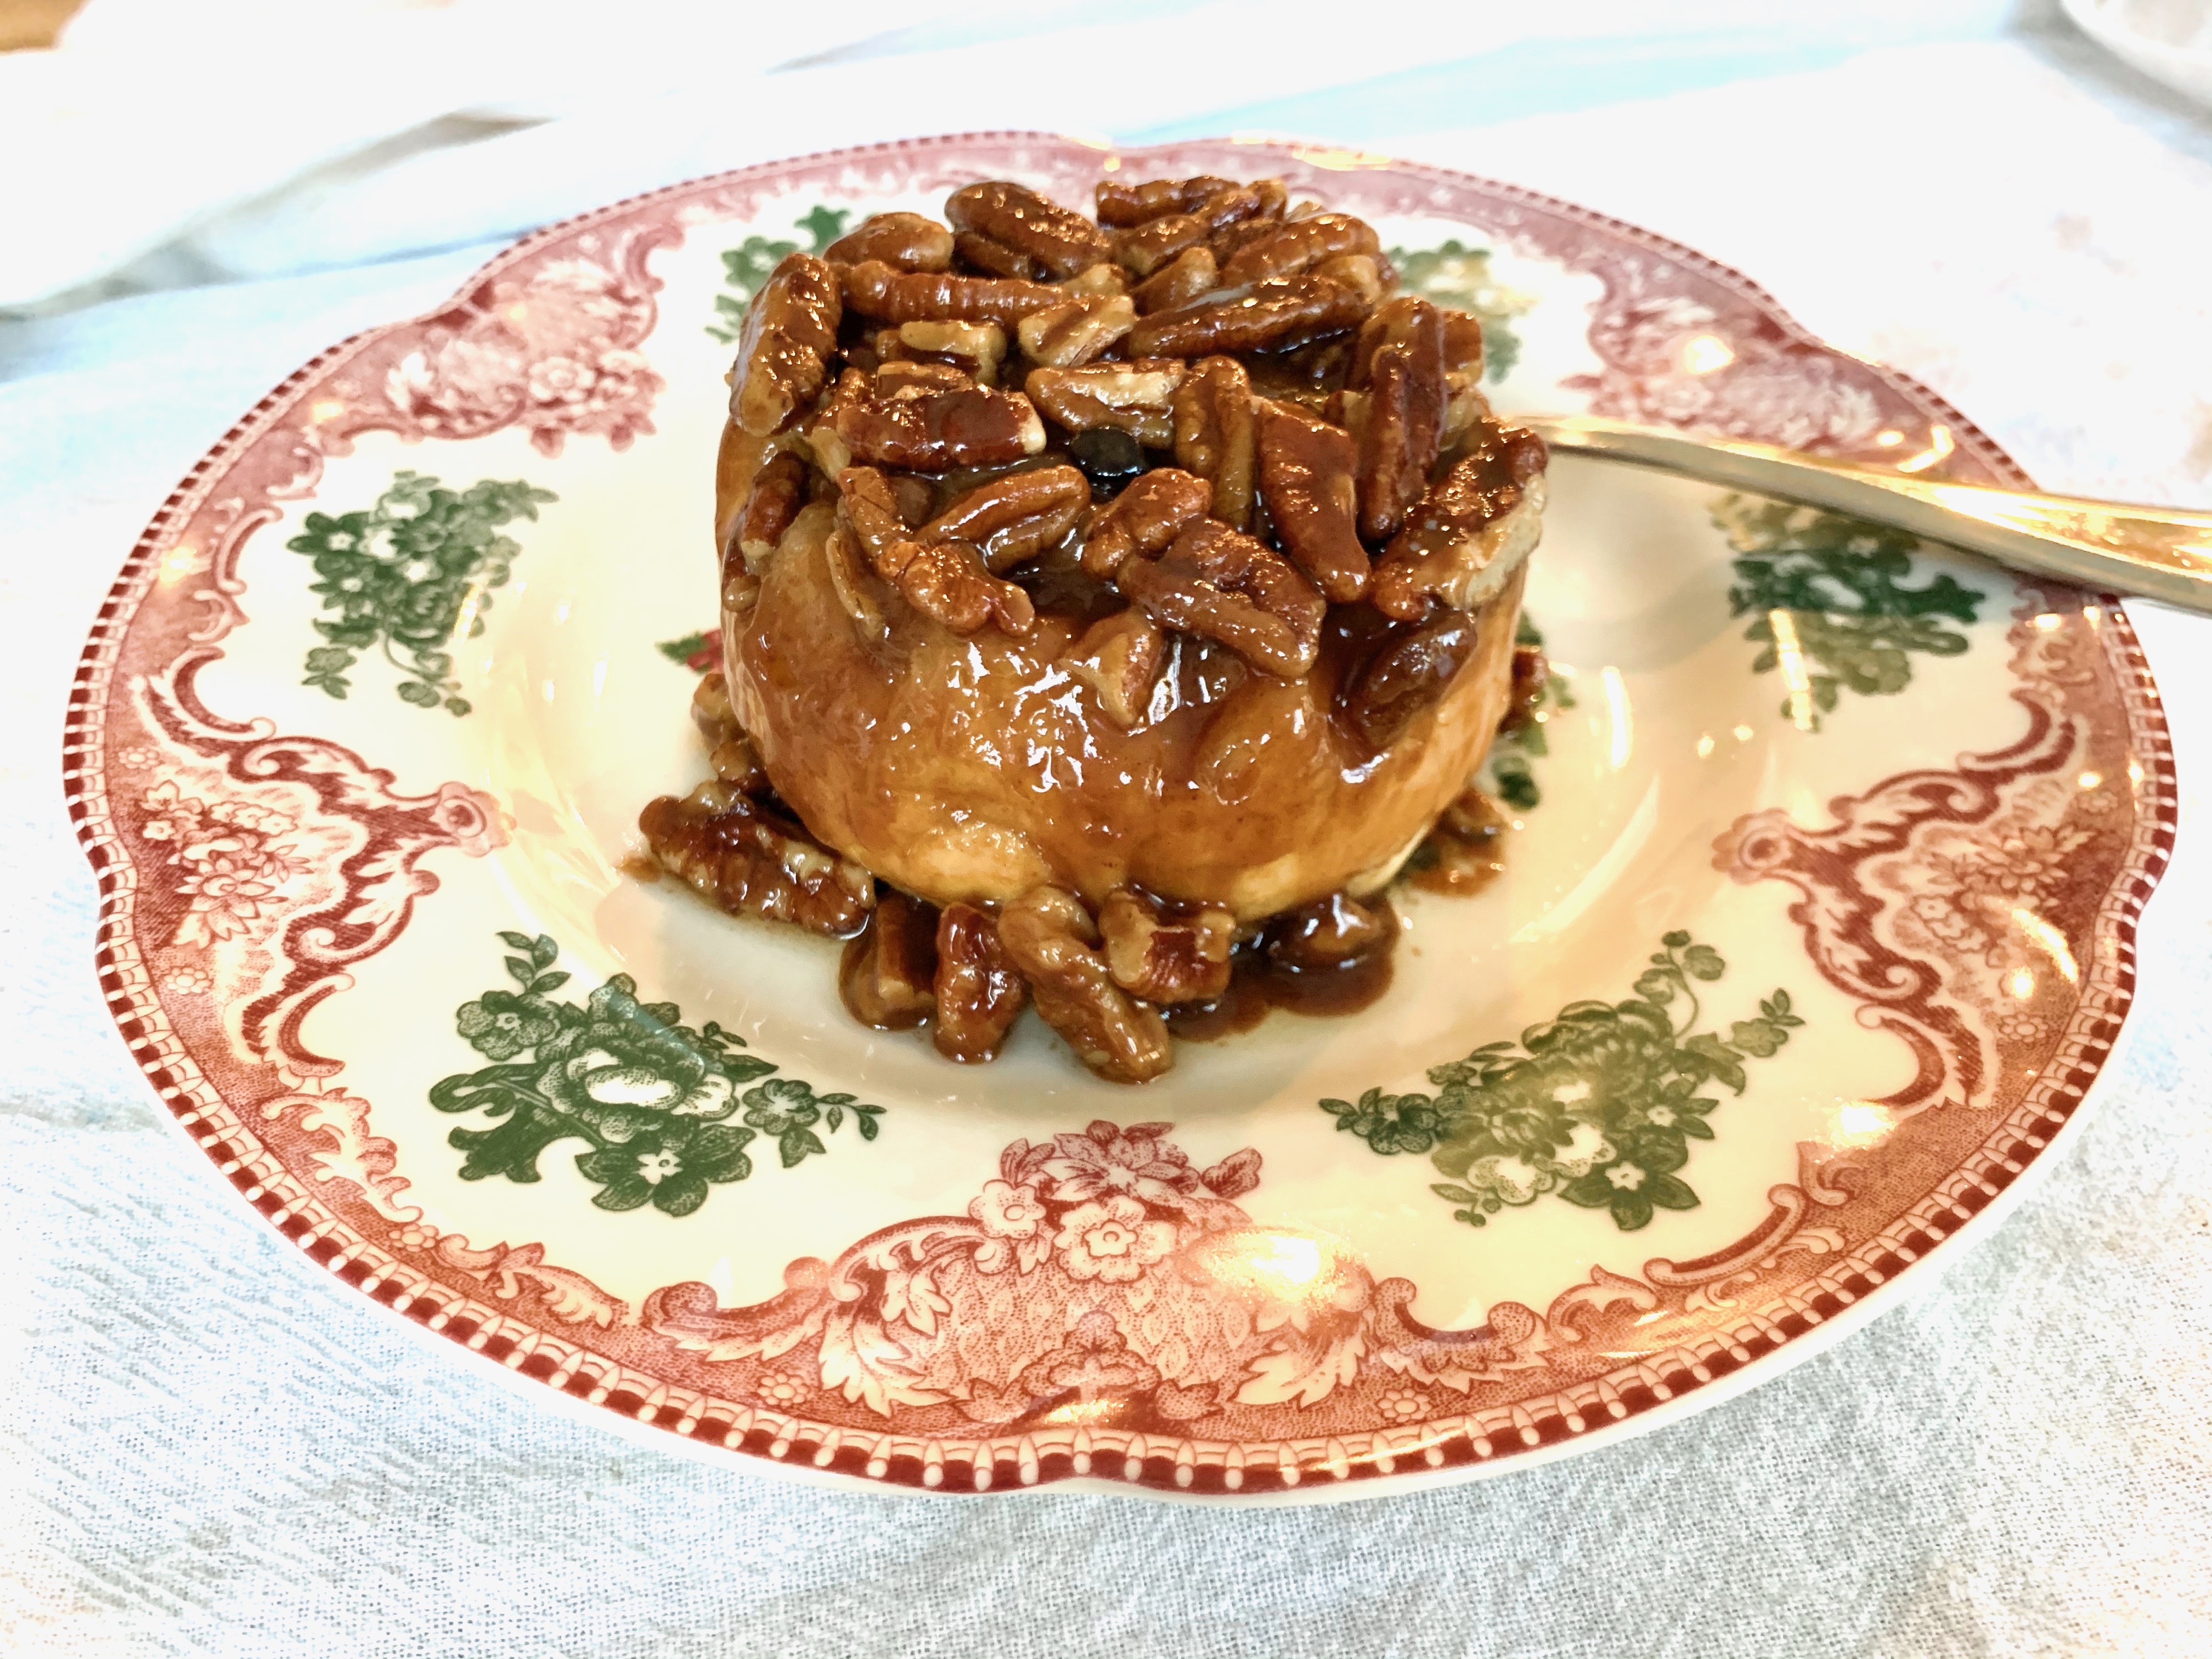
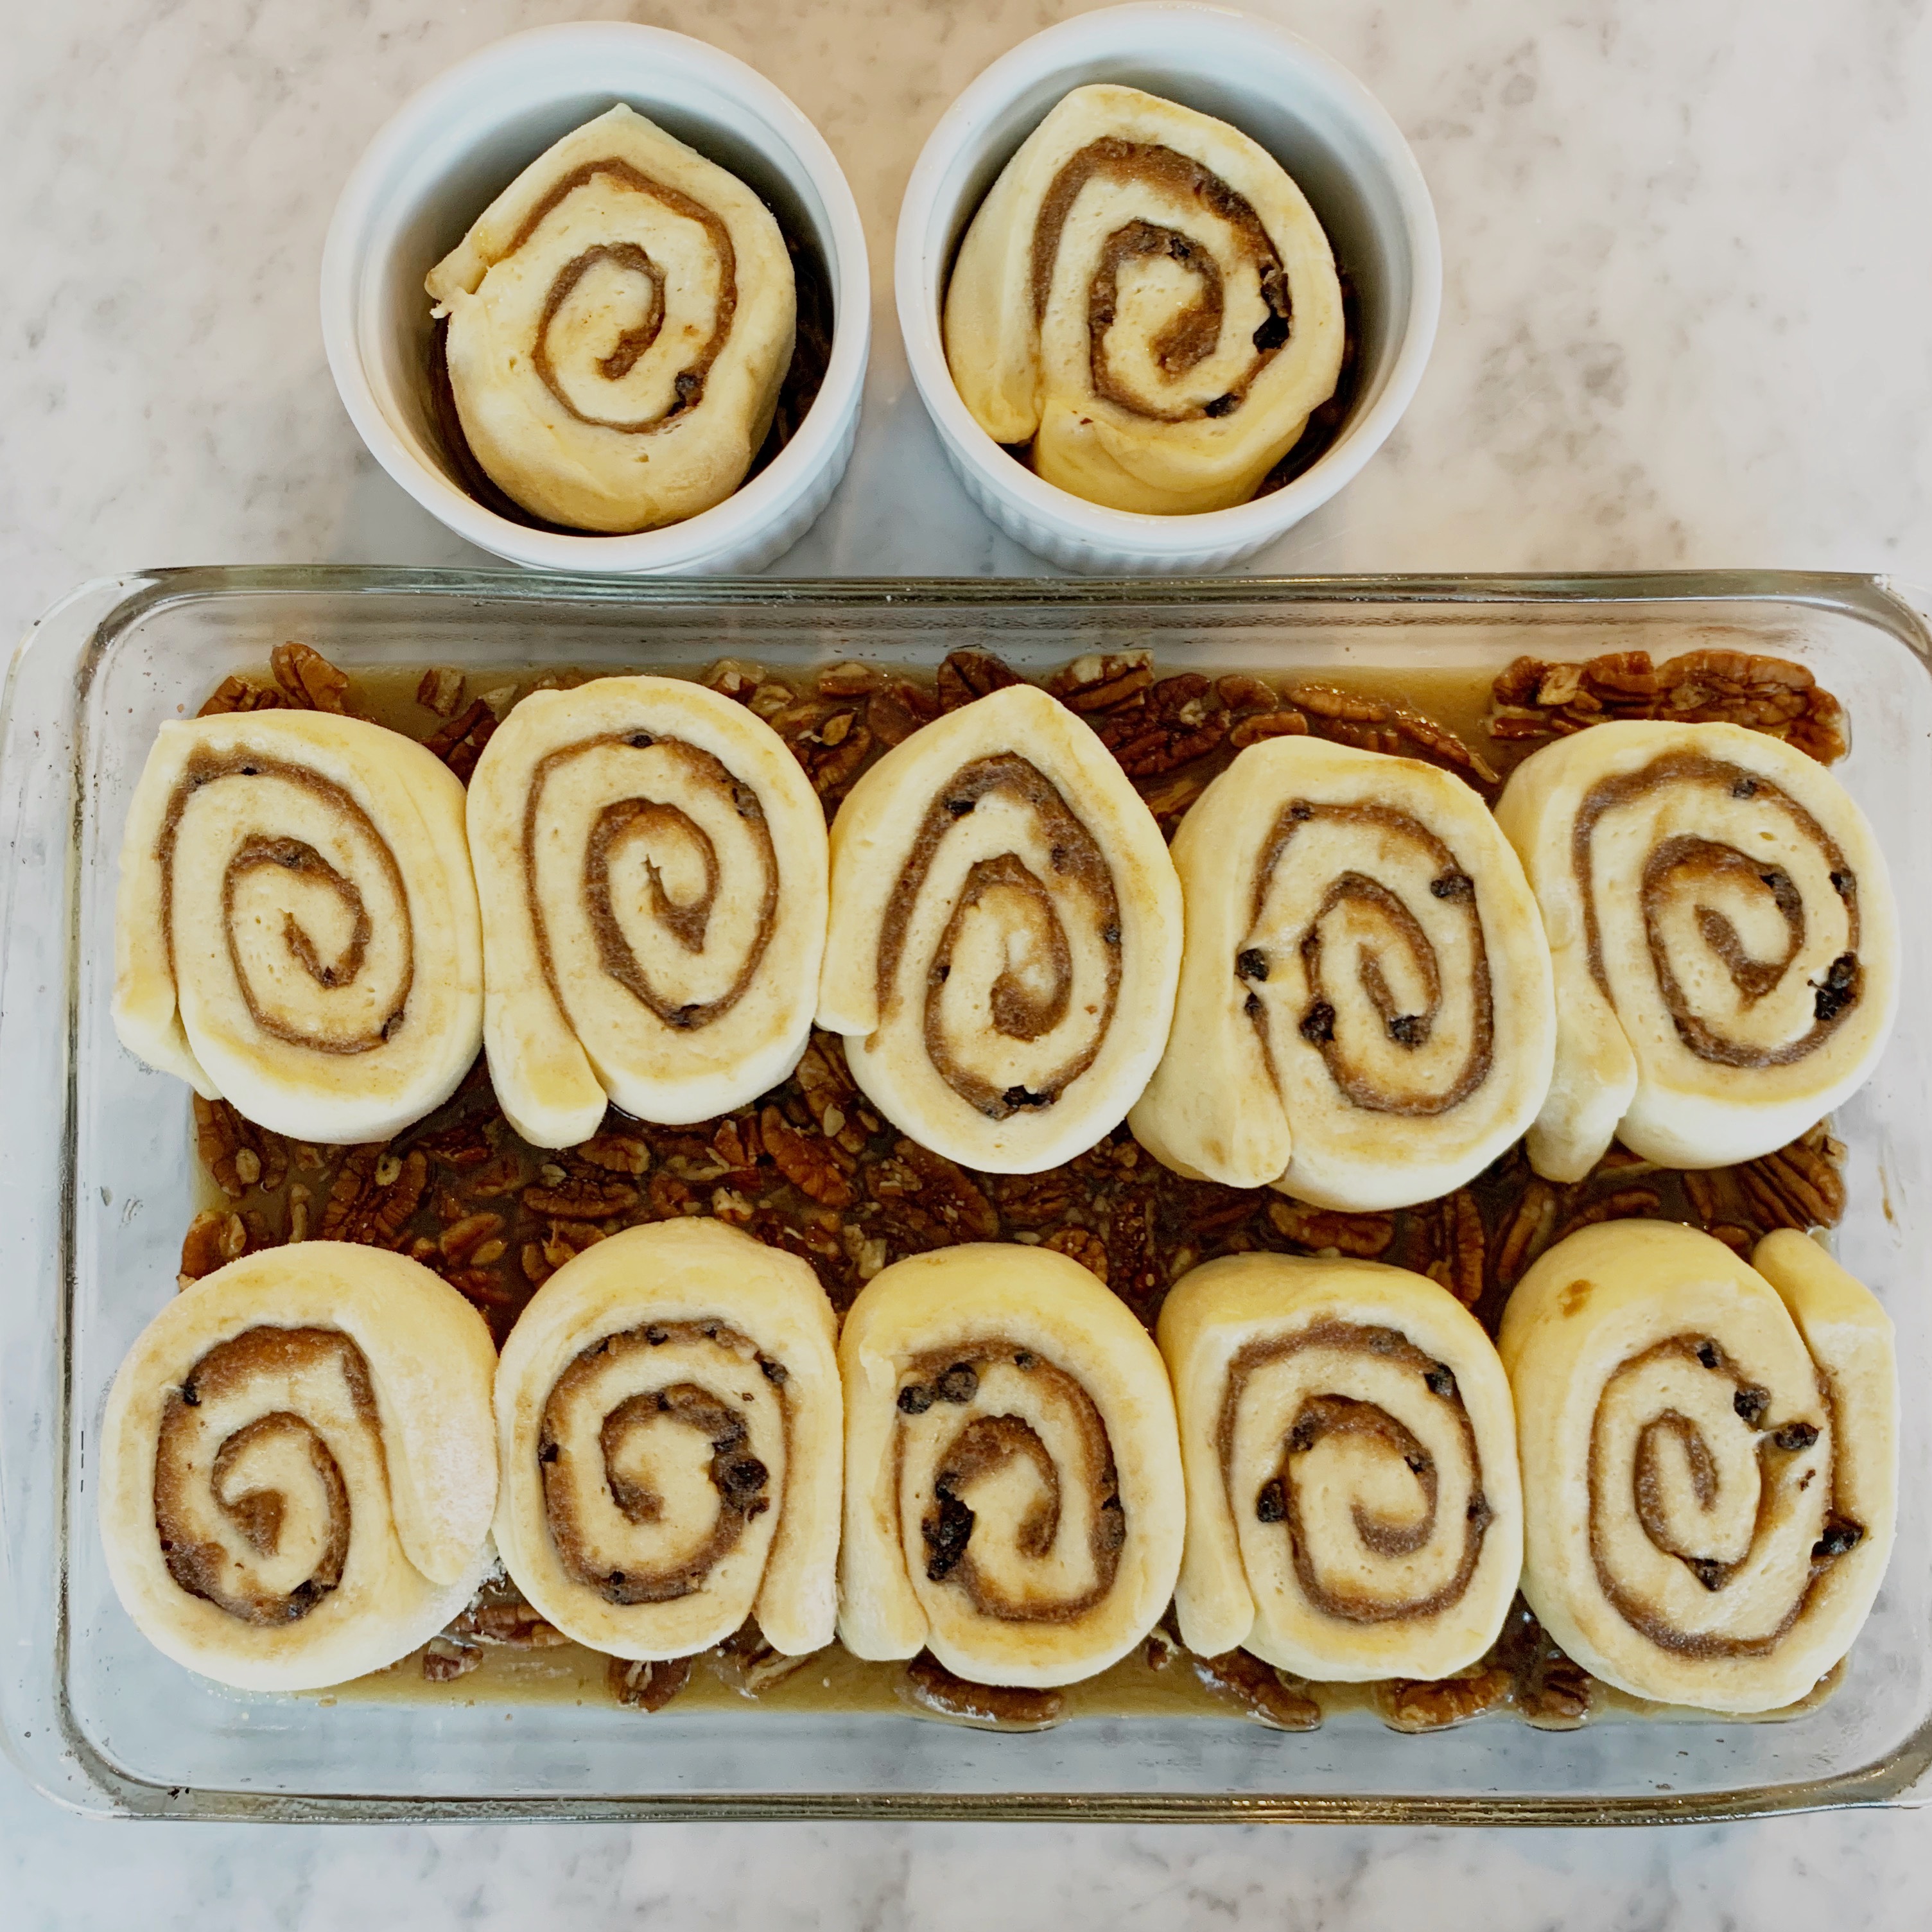
When I know I’m going to have overnight guests in the house, I like to prepare at least one special breakfast ahead of time, rather than leave my guests to fend for themselves with only a box of cereal and cold milk. Last year I made a polenta breakfast bake that was a big hit with everyone. This year, I finally decided to make pecan sticky buns. They’re a weakness of mine that I used to order occasionally at Panera’s but has now been taken off the menu. This recipe, from the blog, Dinner At The Zoo, is nearly identical, and makes enough for a crowd. I added some currants, which the original recipe did not call for. You could also add raisins if you like. Or leave them out completely. The recipe called for all twelve pieces to be baked together in a 9″ xy 13″ rectangular pan, but there didn’t seem to be room in the pan I had, so I placed two rolls in separate ceramic round ramekins. I really liked them better in the individual ramekins since the syrupy topping had more room to ooze down the sides as in the top photo. If I had twelve ramekins, I’d bake them all this way. But they were pretty terrific in the rectangular pan too.
The dough is a very supple dough, enriched with eggs and butter, and requiring two rises. Here it is, doubled in size, after the first rise.Next, you roll out the dough to a rectangle that’s 12″ by 18″ and spread the butter/cinnamon/currants filling over the dough. Then roll up the dough tightly, starting from the long side, cut it into twelve pieces and place each piece on top of the pecan sticky topping.The rolls will puff up more during the second rise, after you’ve spread the filling and rolled them up. Then they get baked in the oven where they’ll increase in size even more. At this stage, I let them cool, and covered them with aluminum foil to place in the freezer. I removed them from the freezer the night before I wanted to serve them, and warmed them at 350 degrees for about 20 minutes before serving.
Flip them over onto a platter, or just a cookie sheet lined with parchment paper, then tear apart, or slice to serve.
Having been sick all through Christmas (and still not recovered), I was grateful to be able to pull this out from the freezer and serve while we were opening our gifts.
It’s an indulgence to be sure, but oh so worth it for the holiday or a special occasion. You can start on your diets in the new year.
I hope you all had a wonderful Christmas, Hanukkah, Kwanza, or whatever holiday you celebrate.
Click here to connect with me on Instagram and find out what Ciao Chow Linda is up to in the kitchen (and other places too.)
Whether it’s a good French baguette or hefty Italian bastone, I love a good loaf of bread, and don’t need any extra incentives to eat more. But this one is irresistible and can weaken my resolve to consume fewer carbs. It’s an easy-to-make stuffed bread treat that’s a kissin’ cousin to pizza. Your family and friends will love it (unless they’re gluten intolerant). With a glass of wine and a side salad, it was dinner for me and my husband last night. We could have eaten the whole thing by ourselves, but we stopped before we became truly gluttinous. You don’t have to make it in a Christmas tree shape, but that certainly does make it festive for the holidays. You could simply make it in a circle or wreath shape, or in a square format. I started out with frozen pizza dough – about a one pound package. Of course, you can make your own dough, if you’ve got the time and inclination. But there’s enough going on at this time of year, that I take short cuts when I can find them.
Start out by rolling or stretching the dough to a rectangle that’s about 6 inches by 16 inches. Have cooked sausage (1 large piece of Italian sausage, with the casings removed — crumbled and cooked in olive oil.) and some shredded mozzarella cheese nearby. Cut the dough into 16 pieces. You’ll need 15 for the actual tree, and one for the stump.
Press the piece of dough into a square shape and into the center of each piece of dough, place a small bit of the sausage and some of the cheese. Pinch the ends together firmly to seal. Make sure none of the filling is visible or it will leak onto the baking sheet.
Arrange the balls into a Christmas tree shape, pinched ends underneath, with the stump (which you have also filled with cheese and sausage) at the bottom.Brush with beaten egg and bake in the oven. As soon as it comes out of the oven, brush with the garlic-infused olive oil, sprinkle with parmesan cheese, parsley and bits of tomato to decorate. Serve immediately.
Bet you can’t eat just one!
Click here to connect with me on Instagram and find out what Ciao Chow Linda is up to in the kitchen (and other places too.)
mozzarella cheese, about 2 cups shredded, or 1 large ball
1 cup cooked Italian sausage, crumbled and cooled
1 egg, beaten
1/8 cup olive oil
2 cloves garlic
1/4 cup grated parmesan cheese
a few sprigs of parsley, minced
marinara sauce, optional
Instructions
Roll out the pizza dough into a rectangle, about 6 inches by 16 inches long.
Cut the rectangle in half lengthwise, then cut each rectangle into 8 pieces.
Flatten out each piece of dough into a square shape, then holding a piece of dough in your hand, stretch it a bit to accommodate a piece of sausage and a bit of the mozzarella cheese.
Pinch the dough together, enveloping the filling inside the dough, shaping it into a ball.
Place on a silicon baking mat, parchment paper or on a greased cookie sheet.
If you’re making a tree shape, you’ll need 15 pieces, plus another one for the stump.
If you’re making a circle shape, make as many as will fit on your cookie sheet.
After filling the dough, place on the Silpat mat, with the pinched side facing the baking sheet, making sure the dough balls touch each other slightly.
Beat the egg and brush a little of the beaten egg over the dough balls.
Bake in a preheated 15 to 20 minutes or until golden.
While the dough is cooking, gently saute the garlic cloves in the olive oil.
Drain the garlic, retaining the oil.
Brush the oil over the dough, and sprinkle with the grated parmesan cheese and parsley.
Decorate with bits of chopped tomato or roasted peppers.
Serve immediately, with marinara sauce, if desired.
Are you wondering what to serve for dessert during the holidays? This delicious and beautiful ricotta cheesecake would be perfect on your table, with its festive cranberry topping.
The recipe is from a wonderful cookbook called “Feast of the Seven Fishes” by Daniel Paterna. While the book contains many seafood recipes and is an ode to the Brooklyn neighborhood where Paterna was raised, this showstopper of a cheesecake really captured my attention. It’s shown without any topping in the book, and you could surely enjoy this cake even without any embellishment. Containing ricotta, rather than cream cheese, it’s not at all heavy and it’s easy to make too.
One tip — I didn’t roll out the crust with a rolling pin as the recipe says. I didn’t even refrigerate it for the recommended half hour. Using my hands, I pressed it into a disk over a piece of parchment paper, then kept pushing with my palm and fingers until it reached 14 inches in diameter. I then lifted the parchment and pressed it into the greased pan. Don’t worry if some breaks off. It’s easily patched together. The cake will sink a bit after removal from the oven.
The little recess on top is a perfect nest for the topping, if you choose to add one. I love cranberries and typically have leftover cranberries after Thanksgiving, but you could serve this plain and simply dusted with confectioner’s sugar, or use other fruit — raspberries, strawberries or whatever you like — to crown this beauty. Buone feste!
Click here to connect with me on Instagram and find out what Ciao Chow Linda is up to in the kitchen (and other places too.)
Torta Dolce di Ricotta with cranberry topping
Author: Daniel Paterna/Feast of the Seven Fishes/Ciao Chow Linda
2 cups all purpose flour, plus extra to dust board and pan
3/4 cup sugar
zest of one lemon
1/2 cup unsalted butter, softened, plus extra to grease the pan
2 large eggs
FILLING:
8 large eggs
3 pounds ricotta cheese, drained of excess water
2 teaspoons vanilla
1 1/2 cups sugar
zest of 2 oranges
juice of 1 orange
juice of 1 lemon
FOR THE CRANBERRY TOPPING:
1 bag of fresh cranberries
3/4 cup water
3/4 sugar
zest of one orange
1/4 freshly squeezed orange juice
Instructions
FOR THE CRANBERRY TOPPING:
Place the cranberries, water, sugar, orange juice and orange zest in a pan.
Turn the heat to high and cook until the cranberries are popping and release their juices.
After about five minutes, remove from heat and refrigerate for a couple of hours, to thicken.
FOR THE RICOTTA TORTA:
Preheat oven to 350 degrees and butter and flour a 10-inch springform pan, then set aside.
To make the crust, place the flour, sugar and zest on a pastry board or clean, dry flat surface.
Mix thoroughly to combine.
Add the butter and work it into the dry ingredients.
Gather the mixture into a mound and create a well in the center.
Add the eggs, beating with a fork and grabbing the dry mixture until the dough begins to form.
Shape into a disk and refrigerate for 30 minutes.
Meanwhile, make the filling by combining the eggs, ricotta cheese, vanilla, sugar, orange zest, orange juice, lemon juice in a large mixing bowl.
Mix thoroughly and set aside.
Remove the dough from the refrigerator and place on a large board or clean, dry flat surface, lightly dusted with flour.
Using a floured rolling pin (I just used my fingers and palms of my hand and pressed it onto a piece of parchment paper) roll the dough out into a large circle, approximately 14 inches in diameter.
Now roll the dough over the rolling pin and carefully unwind it over the baking pan, gently easing it to fit evenly in the bottom and up the sides of the pan.
(I lifted up the parchment paper and placed the dough into the pan. Don’t worry if some of it breaks. You can easily patch it.)
Pour or spoon the filling mixture into the crust, leaving about 1/4 inch below the rim of the pan.
Place the pan in a preheated oven and bake for 1 hour and 45 minutes, until the center is slighy firm.
Cool for at least 2 hours.
Spread the cranberry topping over the cake.
Carefully run a knife or spatula around the sides of the pan to remove it, so that no crust is pulled away when you release the spring of the pan.
Fall is the season for squash of all kinds – pumpkins, butternut, acorn and many other types, and I love them all. Sometimes there can be too much of a good thing however. After making the stuffed pumpkin from my previous post, we finished all the stuffing and some of the pumpkin flesh, but after three days, we were still left with a lot and were bored with eating buttered pumpkin again. Rather than continue to eat it all as a vegetable, I took some of it and whirred it in the food processor to use in these muffins.
I found the recipe on the internet from a website called Celebrating Sweets, and let me tell you, the muffin part was delicious and a great way to use up some of the leftover pumpkin, but that crumb topping — oh my. It just took the muffins to a new level. I think I’m going to keep cooking up more pumpkins just to have the leftover for these muffins. Or maybe I’ll just buy a can of pureed pumpkin instead and make it easy on myself. I may pour the batter into a cake tin and make this as a cake next time.
Hope you all have a wonderful Thanksgiving!
Click here to connect with me on Instagram and find out what Ciao Chow Linda is up to in the kitchen (and other places too.)
In a medium bowl, combine sugars, cinnamon, salt, and melted butter.
Whisk until combined.
Add flour, and stir until the flour is combined.
Set aside.
FOR THE MUFFINS:
Preheat oven to 350°F.
Grease a 12 cup muffin tin, or line with paper liners.
In a medium bowl, combine flour, cinnamon/spice, baking soda, baking powder, and salt.
In a large bowl, whisk eggs, brown sugar, oil, pumpkin puree and vanilla, until combined.
Add flour mixture, and stir until combined (I use a rubber spatula), being careful not to over-mix.
Divide the batter between 12 muffin cups.
Pinch off small pieces of the crumb topping and scatter them over the tops of each muffin.
Bake for approximately 20 minutes, until a toothpick inserted into the center of the muffins comes out clean.
Place the pan on a wire rack to cool for 10 minutes, then remove the muffins from the pan and place on the rack to cool completely.
FOR THE ICING:
Whisk all ingredients until smooth.
Adjust the consistency by adding more powdered sugar (to thicken) or more milk (to thin). Use a small spoon to drizzle icing over the tops of the cooled muffins.
I had to update this post to let you know that as much as I loved this recipe the first time I made it, with a “traditional” pumpkin that cropped up in my son’s garden totally by accident (a so-called “volunteer” plant), I made it again for my book group with a purchased “cheese pumpkin,” and it was a game changer. The squat, tan-colored cheese pumpkin doesn’t taste anything like cheese, but is named that because of its resemblance to a wheel of cheese.
The interior is brightly colored orange, and is related to butternut squash. It has a sweet flesh that tastes much like butternut squash and is superior over traditional pumpkins for both savory or sweet dishes, including pumpkin pie.
I filled it with the same recipe I used in the original post, even though the cheese pumpkin weighed twice as much as the pumpkin in the original post. The filling came only about 2/3 of the way up the pumpkin rather than all the way up to the top. No matter, the filling rises somewhat after baking because of the eggs. It’s actually better not to fill the pumpkin all the way to the top anyway, since otherwise, there won’t be room for the lid to fit securely.Here’s what the pumpkin looked like about about 2 1/2 hours in the oven. Be sure to remove the lid after about two hours of cooking because the pumpkin contained a lot of water. I actually drained away the water from the pan after removing the lid, then placed it back in the oven without the lid to “brown” the stuffing.
Another tip is to cube the bread and toss with the melted butter in a cookie sheet, rather than brown the bread cubes in a skillet as I did originally. Toast the bread cubes with melted butter in a 375 degree oven for about 15 minutes, stirring them a few times to brown them evenly. Also, after the pumpkin has been roasting for a couple of hours, you may want to cover the sides so that they don’t burn (but keep the top uncovered in order to promote browning of the stuffing).
ORIGINAL POST:
I just love it when Mother Nature gives you some of her bounty without your even trying. It happened recently when a butternut squash grew in my garden as a “volunteer” plant among my rose bushes, and again when my son discovered a long vine with several pumpkins he hadn’t planted growing in his front yard. Either the birds or the wind carried seeds to these new places that provided fertile ground for the welcome plants.
We weren’t sure at first what kind of squash or pumpkin we were dealing with, since it was green for so long.
But as the cold weather progressed, the pumpkin started to turn orange on the bottom.
And the interior certainly looked like the typical orange jack o’lantern. I decided to use my lagniappe in a recipe I’d read about long ago in a memoir called “A Thousand Days in Venice” by Marlena De Blasi. I made several adjustments however, since I felt the amount of cheese in it was excessive (believe me, there’s still a lot of cheese in it). It would also make a spectacular showstopper dish at the Thanksgiving table.
Start by carving out the lid, and scooping out all the stringy stuff and seeds from inside.
Take some good bread (I used ciabatta) and cube it, tossing it in butter until browned.
Saute some mushrooms and onions in butter, adding some fresh sage leaves to give a bit more flavor.
Mix the mushrooms and onions with eggs and three different kinds of cheese – mascarpone, Emmanthaler and Parmesan. Marlena’s recipe calls for three cups of mascarpone, but I cut that way back to one cup and it was just fine. I cut back the amounts on the other cheeses too, and the dish was still plenty cheese flavored.
Layer the cheese mixture into the pumpkin with the bread, making several layers and ending with the cheese mixture.
Place the lid on top and bake in the oven for about 1 1/2 – 2 hours, removing the lid for the final 20 minutes to brown the top. Pierce the flesh with a knife to see if it’s soft and if it’s not, leave it in the oven a bit longer.
Remove from the oven and bring to the table amid oohs and aahs. Scoop out some of the flesh and some of the pumpkin for each person. We had lots of leftover pumpkin after the stuffing was all gone, and it was great for leftovers one night. But I blitzed the rest in a food processor and used it to make the best pumpkin muffins I’ve ever eaten. Stay tuned in the next blog post for that recipe.
By the way, if your pumpkin was too small to hold all the stuffing, place the rest in small buttered ramekins and bake them another night. They make a great side dish — a kind of mushroom bread pudding.
Click here to connect with me on Instagram and find out what Ciao Chow Linda is up to in the kitchen (and other places too.)
Are you a fan of the Great British Baking Show? It’s a competition show, but not at all like the American baking shows, where the participants can be cutthroat and nasty. Instead, everyone is so supportive of the fellow bakers, and you feel genuinely sorry when someone gets eliminated. The show is my antidote to when the bad news cycle gets me down. It’s a feel-good show that always makes me want to rush to the kitchen and bake something.
Recently, I was searching for a recipe to use some of the lemons that had ripened on my indoor lemon tree. I almost hate picking them, but the one year I left them on the tree to admire them longer than I should have, they were dried out by the time I harvested them. So this year, I made haste to pick two lemons as soon as they turned completely yellow. They were bursting with juice and I was bursting with a desire to bake something with them.I turned to a recipe from the “Classic” cookbook by Mary Berry, former host of The Great British Baking Show, and a noted British food writer. I was gifted the cookbook last year by my daughter’s boyfriend, when the two of them came from London for Christmas. The ingredients are posted in metric, and since I use a kitchen scale, it was easy to proceed as written. However, I made a few adjustments — substituting butter for the “cold baking spread” called for in the recipe, adding some limoncello to get more lemony flavor and a couple of other changes. While I was weighing the ingredients, I also measured them in cups, so I could write the recipe for American readers who might not use a kitchen scale. However if you don’t have a kitchen scale, I highly recommend you get one. They’re infinitely useful, and so much more accurate for baking than using measuring cups.
I also made twice the amount of icing and decorated with colorful pistachios I had stashed in the freezer from a trip to Sicily last year. Toasted slivered almonds would be great here too, or just use the lemon zest called for in the recipe. Either way, the cake is delicious with its strong lemony flavor and tender, delicate crumb. It also feeds a crowd, so keep that in mind next time you’re invited to bring something to an event.
Incidentally, the winner of the copper water pitcher giveaway (chosen by a random number computer-driven generator) is Karen, of Karen Cooks.
Click here to connect with me on Instagram and find out what Ciao Chow Linda is up to in the kitchen (and other places too.
Lemon Sheet Cake
Author: Ciao Chow Linda
Adapted from Double Lemon Traybake from “Classic” by Mary Berry
This post contains original content by me and is sponsored by La Cucina Italiana
When most Americans think of gnocchi, they think of those soft little cushions of dough made with flour, potatoes and eggs and served with a tomato or pesto sauce. But there’s an entirely different type of gnocchi made with semolina flour called gnocchi alla Romana.
As you can guess, it’s a Roman dish that is served in a casserole hot from the oven, golden and crunchy on top. Talk about comfort food — these just melt in your mouth. They make a great primo piatto, or first course, but I frequently serve them as a starchy side dish with a roast, or even some meatballs or braciole. I decided to give the traditional gnocchi alla Romana a little twist and added some small cubes of roasted butternut squash. But they’re equally delicious without the squash if you prefer them plain.
Detailed instructions are in the recipe below, but you start by mixing the semolina flour with milk and butter until it’s very stiff. Many people recommend warming the milk first, but in my experience, you’re less likely to get lumps if you start out with cold milk. Keep stirring so it doesn’t burn on the bottom, and when it’s thick enough to hold a wooden spoon upright, you’re there.
You need eggs to make the gnocchi “puff up” in the oven, but if you stir the eggs directly into the pan with the hot gnocchi mixture, you’re going to wind up with scrambled eggs. So you need to temper the eggs first. To do this, place the eggs in a measuring cup and whisk them together. Then add a bit of the hot gnocchi mixture to the measuring cup, whisking all the time. Keep adding a few more tablespoons at a time, whisking vigorously each time, until the temperature of the mixture has warmed slightly and become a little thick. Now it’s safe to add this mixture into the large pot with the rest of the semolina gnocchi mixture, stirring all the while to blend everything together well.Stir in the cooked bits of squash.Then spread it out on a cookie sheet that you first moisten with a little water. Let it cool in the refrigerator several hours or overnight (covered with plastic wrap if overnight.)
Use a cookie or biscuit cutter (or even the rim of a glass) to cut circles about two to three inches in diameter. Arrange in a buttered pan. Generously sprinkle parmesan cheese on top. Bake in the oven until golden and crispy on top. Make extra, because they are always a hit and you’ll want leftovers. They’re easy to reheat in the oven or microwave the next day.
Connect with me on Instagram and find out what Ciao Chow Linda is up to in the kitchen (and other places too.)
Peel the butternut squash and dice into small pieces.
Toss with the olive oil, salt and pepper.
(I use herbed salt that I make from fresh herbs.)
Roast the squash in a 400 degree oven for about 15 minutes, turning once.
Remove squash from oven and set aside.
Place the milk and the semolina in a saucepan.
Many people tell you to heat the milk first, then add the semolina, but I find it gets lumpy that way, so I start with cold milk and add the semolina directly.
Whisk it constantly, adding half the stick of butter (4 tablespoons), the salt, the white pepper and the nutmeg.
After about five minutes, it will thicken quite a bit, and you can switch from stirring with the whisk to a wooden spoon.
Keep stirring another ten minutes until the mixture is very thick.
Remove from the heat and add half the parmesan cheese.
Whisk the eggs in a glass measuring cup or bowl.
Don’t add the eggs directly into the hot gnocchi mixture or you might wind up with scrambled eggs.
Instead, add a small amount – maybe a few tablespoons – of the gnocchi mixture to the eggs, stirring quickly with a whisk to incorporate.
Do this a few times until the mixture is thickened and homogenized.
Add the egg mixture back to the gnocchi mixture and stir in the reserved squash.
Wet a cookie sheet (one with raised edges) with a little water.
Spread the gnocchi mixture on the cookie sheet, to an even thickness of about 3/4 inch.
Place the cookie sheet in the refrigerator and let it cool for at least four hours or overnight.
Take a round cookie cutter, or biscuit cutter, or even the edge of a glass, and cut out circles, about two to three inches in diameter.
Grease an oven proof casserole, and place the rounds inside, overlapping slightly.
Make a second layer, but don’t completely cover up the first layer around the edges, since you want them to get some browning too.
Melt 4 tablespoons of butter and drizzle over the gnocchi, then sprinkle with the remaining 1/2 cup parmesan cheese.
Bake uncovered, at 400 degrees, for about 30 minutes, or until golden brown.
Please don’t tell me you’re one of those people who buys Swiss chard and throws away the stalks. They’re equally as delicious as the leaves, but many people are in a quandry knowing what to do with them. They make great fritters, something my mom made when we were growing up, (recipe here), but another way to use them is in a vegetable soup — perfect for the fall weather that is descending on us here in the Northeastern U.S.
These are the stalks from some multi-colored Swiss chard my father grew in his garden. Just chop them up into small bits, along with the leaves and follow the recipe below.
After you’ve sautéed the onion and garlic, add all the rest of the ingredients to the pot and let it simmer for about a 1/2 hour to 45 minutes. I also added in some fresh corn, since it was summer when I took these photos and corn flavor was at its peak. Add more liquid (water or chicken stock) to the pot if necessary.
Grate some parmesan cheese over the top and serve with some hearty toasted bread that’s been drizzled with olive oil and salt. Enjoy a healthy and delicious bowl of soup.
Click here to connect with me on Instagram and find out what Ciao Chow Linda is up to in the kitchen (and other places too.
1 large bunch of Swiss chard, stalks diced and leaves roughly chopped
1 large onion, diced
2 cloves garlic, minced
1/4 cup olive oil
1 cup of fresh tomatoes, diced (or one small can diced tomatoes)
1 small can cannellini beans
1 cup of green beans, cut into small pieces
kernels from two ears of corn (optional)
6 cups either water or chicken broth, or a combination of both
a parmesan cheese rind
a nice handful of parsley, minced
salt, pepper to taste
Instructions
Pour the olive oil into a large pot and saute the onion and garlic until soft on low temperature. Do not let them brown. Add the rest of the ingredients, except the green beans and the parsley, and let everything cook together for about 1/2 hour. If you have fresh corn, add the kernels from that too. Add more water or chicken broth if the soup is too thick.
Add the green beans and cook until they are tender, about ten minutes.
Stir the parsley at the last minute before serving, to get a fresher taste.
Remove the parmesan cheese rind, and serve with grated parmesan and Italian bread that’s been toasted and smeared with olive oil and salt.
Please forgive me if I seem a little star struck, but it’s not often that I get to meet Massimo Bottura, who has been named number one chef in the world. You may have seen him in an episode of Netflix’s “Chef’s Table,” where he explains the evolution of some of his iconic dishes such as “Oops, I Dropped the Lemon Tart,” or “An Eel Swimming up the Po River.” His three-star Michelin restaurant in Modena, Italy – Osteria Francescana – has also taken top honors for best restaurant in the world, and is consistently on the top five list. I still haven’t been to his restaurant on any of my trips to Italy, since snagging a reservation is harder than getting a private audience with the pope. So when I read that he’d be in New York, I jumped at the chance to experience some of his food.
He was in town recently for several reasons — one of which was to lecture and host a lunch at Eataly’s birreria. It was a perfect fall day to sit outdoors on the rooftop terrace (with about 50 other lucky people) and enjoy a sampling of Massimo’s food, accompanied by perfect wine pairings.Massimo’s passion for people and food were evident during the lecture, as he described the various dishes and reasons why he came up with some of his creations. He never stood still, pacing back and forth, gesticulating all the time he spoke, even imploring one of the day’s sponsors who was present, to shift away from its plastic bottles into more environmentally friendly packaging,
He brought many of his staff with him from Italy, and they were kept busy cooking, while Massimo regaled us with stories – some about his food, and some about his employees love life!
After some prosecco and foccaccia to whet our appetites, the first course arrived – a simple halved fig roasted in a wood oven, topped with some aged parmigiano cheese and a drizzle of cherry balsamic vinegar. Never have three simple ingredients tasted so perfect together.
Massimo is a lover of contemporary art, and his culinary philosophy toward cooking incorporates many ideas from artists who veer away from tradition while embracing its roots. “It’s looking at centuries of history, but filtered by contemporary minds,” he said, citing Ai Wei Wei, an iconoclastic Chinese artist who took ancient Han Dynasty earthenware vases and dipped them in industrial paint.
The first course was a perfect example of that philosophy, and an homage to the region of Emilia Romagna, where Massimo’s restaurant (and my mother’s home town) is located. The innovative chef gave a traditional dish his modern interpretation. The metamorphosis started with two classic Renaissance dishes – sbrisolona, (recipe here) a buttery, almond shortbread-like cake normally served as dessert, and cotechino, a large pork sausage typically eaten on New Year’s eve. Massimo transformed the sbrisolona into a savory base for this first course, reducing the sugar and adding some salt. Above the sbrisolona was a disc of cotechino, not prepared in the typical way of boiling, but instead, first cooked sous vide (slowly under vacuum in a very low temperature water bath), then browned in a wood oven and finished in ashes. Enveloping it all was an eggy, foamy zabaglione sauce, drizzled with an aged balsamic vinegar, also a product of his home region. Massimo likes to call this a “breakfast dish” that evokes bacon and eggs, but I’d be glad to eat this any time of the day.
For the main course, Massimo broke with tradition again to conjure the ancestral flavors of a typical pollo alla cacciatore made by families throughout Italy. He combined it with trout in an unexpected, but delicious way. “The best part is the sauce, not the chicken,” he said, noting that the cacciatore is slowly cooked in a copper pot, and the flavors are extracted by steam, then dehydrated to make a powder. The trout is seasoned with the powder, and a pesto with those flavors is used to sandwich the two pieces of trout together. A light flavorful broth is poured all around it. “Cooking is like art,” he said, “You have to pay respect to the flavors from grandmother, but use it in ways to break borders, to evolve.”
Dessert was also a tour de force. A edible bright red wafer-like disc resembling a piece of origami was made using flavors extracted from the unusual combination of oak trees, strawberry grapes, roses and bay leaves.
The fragile disc broke away in shards to reveal a small portion of rosemary and olive oil flavored gelato. I could have easily quaffed three more of these.
Osteria Francescana may be the mothership, but he has since branched out to other locales, including a partnership with fashion house Gucci in Florence and a restaurant in Istanbul, Turkey. In the last year, he opened a high end guesthouse in Modena – Casa Maria Luigia – with its own dining venue.
While eating at his restaurant doesn’t come cheap, Massimo is not deaf to those less fortunate. After Milan’s world fair “Expo” in 2015, whose theme was “Feeding the Planet,” Massimo took that project to heart, starting a nonprofit with his American-born wife Lara Gilmore called “Food for Soul.” They opened what they call a “refettorio” (the Italian word for a dining space where monks eat) in a poor neighborhood on the outskirts of Milan and set out to provide nourishing meals for the underprivileged, using donated food that would otherwise have been thrown away. Since then, they have opened rifettorios around the world, in an effort to reduce food waste and provide multi-course meals to the needy. His visit to New York also included a talk to the United Nations on food and sustainability, and a collaboration with Sotheby’s auction house for its “Contemporary Curated” sale.
As if my afternoon with Massimo and his food weren’t enough, the cherry on the cake was meeting tv personality Phil Rosenthal and restauranteur Nancy Silverton, who are friends of Massimo’s and were in town coincidentally. Phil was a writer on TV’s “Everybody Loves Raymond” and is the host of the show “Somebody Feed Phil,” where he travels around the world exploring local cuisines, including an episode where he visits Massimo in Modena. If you haven’t yet caught this feel-good show, check it out on Netflix. Nancy founded Los Angeles’ La Brea bakery and Campanile restaurant in Los Angeles, and is co-owner of Pizzeria Mozza in two California locations, and has also been profiled on Netflix.
Click here to connect with me on Instagram and find out what Ciao Chow Linda is up to in the kitchen (and other places too.
Have you ever eaten kataifi? It’s a shredded phyllo dough that’s available frozen in Greek or specialty food stores. Admittedly, it’s not easy to find, so if you can’t locate it near you, use regular phyllo dough instead.
I’ve been wanting to cook with kataifi for a long time and I finally took the plunge when a friend let me pick figs from her tree. The tartlet is stuffed with an almond flavored pastry cream and I served these as dessert at a dinner we attended last night. You could also switch things up and make this a savory appetizer, using a whipped, herbed ricotta or goat cheese instead of the pastry cream.
Kataifi is really simple to use, but slightly messy. Don’t worry about trying to be neat, because they have a certain charm with their little tendrils sticking every which way. Push the dough down into the tartlet tin, then drizzle with melted butter and bake.They come out a nice golden color and look like pale bird nestsBefore the tartlets went into the oven.
I cut the figs in half, drizzled with a little honey and roasted them on parchment paper for about 15-20 minutes, letting the flavors intensify.
The dessert is a cinch to put together before serving. Just place a dollop of the cream into each tartlet and top with a roasted fig. Drizzle a little more honey over each tartlet. You can make everything ahead of time and assemble before serving.They pop in the mouth like candy, and deliver a great combination of flavors and textures – crunchy and soft. You’ll want to make a big platter of these because they disappear in a flash, if last night’s dinner party was any indication. There were two lonely tartlets left on the platter that nobody had the courage to grab. But the hostess assured me she was going to enjoy them after we had all left.
Click here to connect with me on Instagram and find out what’s cooking in Ciao Chow Linda’s kitchen each day (and more)
Quick, before fresh corn is no longer available, you must try making this risotto with sweet corn and roasted cherry tomatoes. I know it sounds a little crazy to add carbs to carbs, but it really is a great combination of flavors and textures. The roasted cherry tomatoes on the side add another level of sweetness that you can’t stop eating. I debated whether to add the tomatoes directly into the risotto while cooking it, but decided I didn’t want a pink or red risotto. Besides, they look so pretty whole, clustered on the vine atop the dish.
I grilled the corn, not so much to cook it, but to get grill marks that look nice as garnish. It’s a step you can skip if you want, since the corn will be stripped off the cob and cooked with the rice. But if you’d like to dress up your finished dish, just smear the cob with a little butter and grill for a couple of minutes, on an outdoor grill, or a grill pan.
Strip the corn off the cob, setting aside some of the pieces that have the best grill marks on them. You’ll use them on the top of the finished dish.Don’t throw out the cobs. Add them to the broth or cooking water. Even if it’s only for a few minutes, any little time simmering with the water helps to impart some flavor.
Meanwhile, drizzle the cherry tomatoes with olive oil, then sprinkle with salt and pepper. Roast at 400 degrees for 15-20 minutes or until the skins start to split open.
While the tomatoes are roasting, make the risotto. I’ve blogged about many different types of risottos before, so I won’t detail it here, except to say that you need the broth to be hot when adding it, ladleful by ladleful. Directions for this risotto are in the recipe below.
Serve with the roasted cherry tomatoes on top, and enjoy this taste of summer on a plate.
Click here to connect with me on Instagram and find out what’s cooking in Ciao Chow Linda’s kitchen each day (and more)


 Having been sick all through Christmas (and still not recovered), I was grateful to be able to pull this out from the freezer and serve while we were opening our gifts.


