Sunday, July 6, 2025

Making Pasteis De Nata In Lisbon

If you've never eaten a pastel de nata (pastéis is the plural), a signature dessert of Portugal, you are really missing out on one of life's great treats. We have a large population of Portuguese people living in and around Newark, so they're easy to find here in New Jersey. But eating and making them where they were first created was like finding the mother lode. Pastéis de nata tarts are pastries inspired by an original recipe called Pastéis de Belém, which were created before the 18th century by Catholic monks at the Jerónimos Monastery in Belem (a Lisbon neighborhood). 

In the aftermath of the liberal revolution of 1820, following the dissolution of religious orders and in the face of the impending closure of many convents and monasteries, the monks started selling pastéis de nata at a nearby sugar refinery to bring in revenue. In 1834, the monastery was closed and the recipe sold to the sugar refinery, whose owners opened the Fábrica de Pastéis de Belém in 1837. The descendants own the business to this day.

Naturally, we had to try them at the source (where I was also inspired to paint the scene).

Cradled in a crispy, buttery pastry, and filled with a silky, custard interior, you'll find it hard to resist eating more than one of these luscious confections.

My husband, my daughter-in-law and I signed up for a class in Belem on our recent trip, to learn to make these treats. It was lots of fun, and they were easier to make than they look. First you need to make the pastry. Yes, you could buy puff pastry, but there's nothing like homemade and it really wasn't that difficult at all. The most important thing was to refrigerate the dough before shaping it into the tart tins. There's a lot of butter in the dough and you don't want it oozing out because it starts out too warm.

Our chef and teacher Miguel showed us that we needed to put the block of butter in the center of the two layers of dough.
Keep pounding it down, (don't roll it) into a rectangle.
Then moisten the rectangle with water. It will help the dough stick to itself when you roll it into a "log."
Roll it tightly into a log shape. You should be able to get about 12 cuts in the log.
Cut it in pieces a little more than 1/4" thick.

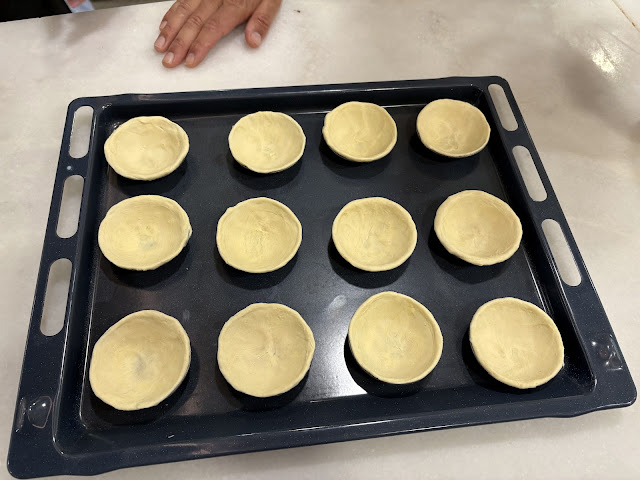
Then using your thumbs, spread each piece wider to fit the individual tart pans, going all the way to the rim of the pan. P.S. You can easily find the tart pans online by searching "pastel de nata tins."

They should look like this:


Then pour the filling into the molds, about 3/4 of the way to the top and place them in the oven.

They'll puff up when they're in the oven, and will deflate after a couple of minutes when you remove them.
Here are the results of our labors. Optional: dust with powdered confectioner's sugar and/or cinnamon.

And here are our fellow classmates, who were visiting from Boston and from London.

Miguel, our teacher, offered us our choice of Portuguese dessert wines to accompany the tarts -- muscatel or ginja, a cherry-based liqueur.

If you find yourself in Lisbon and are interested in a fun way to spend a few hours, here is the info to contact Miguel.


In 2009, The Guardian listed pastéis de Belém as one of the 50 "best things to eat" in the world.  I think I have to agree with that. In 2011, following the result of a public vote, the pastry was announced as one of Portugal's Seven Wonders of Gastronomy, further cementing it as one of the country's most popular national dishes.

Click here to connect with me on Instagram and find out what’s cooking in Ciao Chow Linda’s kitchen each day (and more)

Pastéis de Nata

For the Puff Pastry
230 grams (1 3/4 cups) of low protein flour
120 grams (1/2 cup) of cold water
4 grams (3/4 teaspoon) of fine salt
160 grams (2/3 cup)  of a square of butter proper for puff pastry (high fat, like French or Irish butter)

1. In a large bowl combine the flour, water and salt until you get a dough
consistency.
2. Change for a working surface and knead for 3 minutes. Wrap in cling
film and let it rest in the fridge for 10 minutes
3. With a rolling pin extend the dough creating 4 wings with a lump in
the middle. The wings should have size to cover the square of butter.
4. Place the butter in the center of the dough, close with the wings and press.
5. With a rolling pin extend the dough until get a rectangle shape
with 5mm thick (a little over 3/16 inch)
6. Fold in the pastry in three parts.
7. Repeat steps 5 and 6 one time
8. For the final fold divide the dough in 4 parts instead of 3.
9. Sprinkle the surface of the dough with water. Roll and press a bit
to form a roll. Refrigerate for 20 minutes.
10. Cut 8 mm (a teeny bit more than 1/4") thick slices of puff pastry. You should get 12 or a little more slices.
11. Place a disc of dough on the bottom of the tins and with your
thumbs press and stretch the dough until it completely covers the tin
interior.

For the Custard
200 ml of whole milk (3/4 cup plus two tablespoons)
200 ml of cream (35% fat content) (3/4 cup plus two tablespoons)
120 gr of sugar (1/2 cup)
1 tablespoon of cornstarch
2 egg yolks
Cinnamon stick
Lemon zest

1. Dissolve the cornstarch with a part of milk.
2. In a pot, combine everything, except the egg yolks. Bring to a low
simmering just to infuse the aromatics and thicken it up to a double
cream texture (6 minutes)
3. Let it cool to room temperature, before adding the beating egg yolks.
4. Fill up the tins up to ¾.
5. Bake at maximum heat (250ºC or 500 degrees Fahrenheit). Place the tray in
the middle of the oven, fan off with heat coming from top and bottom
either.
6. Should bake for 12/15 minutes. First the puff pastry will start to
flake. After a few minutes the custard will rise and form a dome. When
the black dots appear on top, Pastéis de Nata are done.
Optional: Dust with powdered sugar and/or cinnamon.


Friday, June 13, 2025

Spring Salad with Mint Pesto

Temperatures here in New Jersey have already reached 90 degrees, and that makes me crave salads. I recently ate something similar to this at Thompson Italian in Alexandria, Va., recommended by my friend Domenica Marchetti, who lives there. I split it with my husband as an appetizer, but could easily have eaten it all myself. I liked it so much, I had to try to recreate it when I got home. It's not exactly like the restaurant's version, but it's close enough, and so delicious and refreshing. Start by making the mint pesto. You need a heaping cup of well-packed mint leaves. That will give you more than you'll need for this recipe, unless you're serving more than two people. In that case, just double everything in the recipe except the pesto ingredients. The pesto recipe will give you plenty for four servings, maybe even for six, depending on how generous you are in applying to the salad. Freeze the leftover pesto, which would be terrific with lamb or fish.
Next you'll need some fresh snap peas. I was lucky enough to get these from my friend Karla, who invited me to pick these beauties from her garden, along with some truly delicious strawberries and lettuces. I took some of her tarragon too, for another use.

Just trim off the hard end of the snap peas, and any stringy bit that comes with it. After trimming them, I left these whole for the salad.

You'll need asparagus too, which I always peel to avoid the tough outer layer. Cut them into pieces about 2- 2 1/2 inches long, then cook the snap peas and asparagus in boiling water for only 3 to 4 minutes. I didn't want them to be raw, but I didn't want them soft and limp either, so cook them just a short bit, remove from the boiling water and drop them immediately into ice water to stop the cooking, then drain and pat dry. They'll still have a slight crunch to them.


The restaurant menu said the dish contained preserved lemons, and I didn't have any more homemade from my own lemon tree, but I found some at my local supermarket, McCaffrey's, which seems to carry almost everything I want. If you can't find preserved lemons, I would suggest washing a fresh lemon, cutting it into small pieces then chopping roughly it in a food processor with a little salt and water before adding to this recipe.


Here's what one preserved lemon looks like straight from the jar. I cut it in small pieces before adding it to the food processor to make the pesto.

And here's what the pesto looks like after everything is all blended. Give it a taste to decide whether it needs more salt. Unlike a lot of pestos, this one doesn't use any parmesan cheese. There's already feta in the dish, so parmesan would only compete with it. Even without cheese, the pesto was so delicious, I found it hard to resist digging in with a spoon (ok, so maybe I dipped a finger in -- quality control and all that.).


Add a good dollop of the pesto - maybe 3 or 4 tablespoons - to a bowl with the cooked (and cooled) asparagus, snap peas, toasted walnuts (again cooled) and feta. Mix everything well with a spoon.


Serve on a plate surrounded by radicchio or salad greens of your choice. I dressed the radicchio first with a simple addition of salt and pepper, olive oil and vinegar, then placed the green salad in the center.


I've made this salad twice in the last two days, and decorated it the first time with some yellow calendula leaves (also from Karla's garden). If you've got nasturtiums blooming, they'd be lovely too -- totally optional, but it does add a nice pop of color to the mostly green salad.


Click here to connect with me on Instagram and find out what’s cooking in Ciao Chow Linda’s kitchen each day (and more)


Spring Salad with Mint Pesto

(makes two servings but extra pesto for another meal or the freezer)

For the Mint Pesto

1 cup packed mint leaves

1/2 cup toasted walnuts

1 small clove garlic

1 of a preserved lemon 

1/2 cup olive oil

2 tablespoons water

salt, pepper to taste

Put everything in a food processor and blend, scraping down sides of bowl occasionally. Taste to see if it needs more lemon or salt and pepper. 

Salad Ingredients:

6 or 8 spears of thicker asparagus, peeled and sliced at an angle about 2 inches-3 inches long each.

snap peas trimmed and in the shell (I used about a dozen for this recipe)

1/4 cup (about 2-3 ounces) feta cheese, diced

1/4 cup toasted walnuts, chopped roughly

the pesto from above recipe

lettuce for the base, plus vinegar and oil to drizzle on the lettuce

calendula petals (or nasturtium flowers or other edible flowers) - optional

Procedure:

Make the mint pesto and set aside. Cook the asparagus pieces and the snap peas in boiling water for only about four minutes. You don't want the vegetables to be mushy, they should have a slight bite to them. Remove the vegetables with a "spider" and drop immediately into a bowl of ice water to stop the cooking, then pat dry to eliminate any water that still clings.

To a bowl, add the barely cooked vegetables, the feta cheese, the walnuts and some of the pesto. (The above recipes makes more pesto than you'll need for this recipe, but you can freeze the leftover. Mint pesto is delicious with fish, lamb or even pasta.) Mix everything together. Place some lettuce leaves on a plate and season them with salt and pepper, then drizzle a little olive oil and vinegar over the leaves. Arrange the asparagus, peas and feta salad over the lettuce leaves and scatter the edible flowers on top.


Friday, May 23, 2025

Shrimp Salad Sliders


The unofficial start of summer -- Memorial Day -- is almost here and with it comes weekends of barbecues and picnics with family and friends. If you're looking for something a little different from the traditional hamburgers and grilled foods, try these shrimp salad sliders. You can mix them ahead of time, then portion onto buttered and toasted buns when you're ready to serve. I was inspired to try these after seeing Philly Food Girl make them on her Instagram page. She doesn't give quantities, so I had to come up with the recipe for you. You cook the shrimp first, let them cool, then mix all the ingredients together.  
Serve on toasted potato rolls (if you can't find potato rolls, regular rolls will do just fine.)
Top with some shredded celery leaves for freshness and extra texture. 
It's hard to eat just one, so make sure you're prepared with extras. We figured on two per person.

Click here to connect with me on Instagram and find out what’s cooking in Ciao Chow Linda’s kitchen each day (and more)

Shrimp Salad Sliders

(Makes enough for four sliders)

To cook the shrimp:

3/4 lb. shrimp, deveined, cooked and cooled

1/2 lemon, squeezed and dropped whole into the boiling water

1 teaspoon kosher salt

1 teaspoon Old Bay seasoning

Put some water to a boil in a medium pot -- enough to cover the shrimp. Add the lemon juice, the lemon, salt and Old Bay seasoning to the pot. Let it come to a rapid boil, then add the shrimp. Cook for five minutes or less, until just cooked through. Drain, cool and chop into coarse pieces.

For the dressing:

3/4 cup minced celery, plus celery leaves

juice of 1/2 of a lemon plus the grated rind of 1/2 lemon

1/4 cup mayonnaise

1/2 cup sour cream

1/2 teaspoon Old Bay seasoning

salt, pepper to taste

1/2 teaspoon celery salt

buttered and grilled small potato rolls, if they're available where you live

Mix all the dressing ingredients together well, keeping aside some of the chopped celery leaves. Then add the cooled and chopped shrimp. Place in refrigerator and let flavors blend for at least a half hour before serving on buttered, grilled potato rolls, if you can find them where you live. Otherwise, use  buttered and grilled hot dog rolls.


Thursday, May 15, 2025

Marcella Hazan's Lasagne Verdi


I know that this recipe might never be made by the majority of readers, but if you are up for a bit of a challenge, you will be rewarded with one of the most delicate, delicious and dazzling pastas ever to pass your lips and make its way to your stomach. Every bite is a sublime ode to Marcella Hazan, the doyenne of Italian cuisine, who published this recipe in "The Classic Italian Cookbook." It all starts with her ragù Bolognese, which I've made in the past and served with rigatoni or over polenta. It's a long-simmering ragù that confounds what most Americans think of as spaghetti sauce since it contains no garlic, no basil, no oregano, no sausage. What it does have is milk (yes milk), white wine, nutmeg, tomatoes, olive oil, butter, onion, celery, carrots and ground meat of course. I posted the recipe before, with step-by-step photos here. But the recipe is also printed below. You can't ask for a tastier foundation for the lasagne. 


You also can't make lasagne verdi without green pasta, so bring out your pasta machine, or put some elbow grease into rolling the pasta by hand. Yes, you can use store-bought pasta sheets, but I doubt you'll find green ones, and even if you do, there is nothing comparable to the silky toothiness of home-made lasagne noodles. Once you've tasted them, you'll see it's a game changer. To make the recipe less onerous, I made the ragù and pasta dough one day and refrigerated them, then rolled out the dough and assembled everything the next day.


You start out by spreading a little of the ragù in the pan, and then placing a layer of the pasta dough (which has been boiled for about 30 seconds) over the ragù. If necessary, cut the pasta strips to fit your pan.

Add more ragù, some of the béchamel sauce (sorry I didn't photograph making it), and spread it over the dough. Sprinkle with parmesan cheese (not pictured here).


Continue this procedure (pasta, ragù, béchamel, parmesan) until you run out of dough, ragù or béchamel (I was able to get six layers of pasta in the pan.)
Finish with a layer of pasta, béchamel, more parmesan cheese and a few pats of butter.
What emerges from the oven is what I can only describe as divine. And just in case I don't end up inside the Pearly Gates in my next life, I'm going to request this as part of my last meal on earth. It really doesn't get better than this.


Click here to connect with me on Instagram and find out what’s cooking in Ciao Chow Linda’s kitchen each day (and more)

Marcella Hazan’s Bolognese Ragù


Ingredients

Instructions

For the spinach pasta:

1/2 ten-ounce package frozen leaf spinach, thawed, or 1/2 pound fresh spinach  (I misread the ingredients and used an entire 12-ounce bag of frozen spinach which worked out fine after I added more flour)
1/4 teaspoon salt
2 eggs
1 1/2 cups flour (because I goofed on adding more spinach than called for, I needed to add more flour to get the right consistency) 

If using frozen spinach, cook it with 1/4 tsp. salt in a covered pan over medium heat for 5 minutes. Drain and let cool. If using fresh spinach, try to choose young, tender spinach. Remove all stems and discard any leaves that aren't perfectly green and crisp. Wash in a basin of cold water, changing the water several times until it shows no traces of soil. Cook with 1/4 teaspoon of salt in a covered pan over medium heat with just the water that clings to the leaves. Cook until tender, 15 minutes or more, then drain and allow to cool. 
Squeeze the cook spinach with your hands as dry as you can, then chop it very fine. (I put it in a food processor to chop it).
You can make the pasta the traditional way by putting flour on a work surface, making a well in the center and lightly beating the eggs and spinach in the well, gradually adding the flour, but I placed the flour and eggs into the processor and mixed it all together in the machine until it gathered itself into a ball. I removed it from the food processor and added more flour by hand, kneading it until smooth. At this point, I wrapped it in plastic wrap and kept it in the refrigerator overnight. But you can let it rest for about 20 minutes and then proceed with the rest of the recipe.

For The Béchamel Sauce:
3 cups milk
6 tablespoons butter
4 1/2 tablespoons all-purpose flour
1/4 teaspoon salt 

Melt the butter in a saucepan and add in the flour, stirring constantly with a wooden spoon. Let the flour and butter bubble for 2 minutes without ceasing to stir. Do not let the flour become colored.
Add the milk slowly over low heat, 1/4 cup at a time, stirring constantly with a whisk until it starts to thicken. Remove from heat and add the salt. It will thicken as it cools and will form a "skin," so it's best to make it right before you use it. If you have to reheat it, stir it vigorously over low heat and add more milk if necessary.

Other Ingredients:
2/3 cup parmesan cheese (I used about a cup)
2 tablespoons butter

Directions for Assembly:

Prepare the meat sauce.
Make the pasta:
Roll out sheets of pasta until not quite paper thin.
Boil the sheets in salted water for 30 seconds only and lay out to drain on clean dish cloths. (I boiled one sheet at a time to make it easier to manage)
Make the béchamel sauce.
Preheat oven to 450 degrees.
Smear the bottom of a lasagna pan with a bit of the meat sauce. Place a layer of the pasta over the sauce, cutting and overlapping strips slightly if necessary. Spread enough sauce on the pasta to dot it with meat, then spread bechamel over the meat sauce. sprinkle with grated parmesan cheese. Continue with more layers of pasta, ragù, béchamel and parmesan, ending with a layer of pasta. Coat the top layer with some béchamel, sprinkle with cheese and dot lightly with butter.
Bake on the uppermost rack of the oven for 10-15 minutes, until a light, golden crust forms on top. (If you made it ahead of time and refrigerated it, remove from refrigerator about 1 - 1/2 hour before baking to bring it to room temperature. I did that and still kept it in for about 25 minutes to make sure it was cooked through and had that golden crust and it was perfect)
Allow lasagne to settle 5-10 minutes before serving.


Friday, May 9, 2025

Whipped Feta, Ricotta and Spicy Honey


Here's a quick, easy and delicious appetizer recipe I found on Chef Mimi's Blog. It was perfect this week since I found myself with a small amount of feta and ricotta in the fridge and my Italian chit-chat group was on its way to my house. The whole thing takes ten minutes to make, start to finish. I didn't have the sour cream called for in the recipe but used cream cheese instead, since that's what I had on hand. I also didn't follow the exact quantities of feta and ricotta either, since I had less feta and more ricotta than the recipe called for. It doesn't really matter though, whether you have more or less of one or the other. It all works out as the perfect foil for the spicy honey. I served only with crackers, but you could also serve with some crunchy vegetables too.

Whipped Feta, Ricotta and Spicy Honey

From Chef Mimi Blog

Whipped feta:
7 ounces feta, room temperature (I had half than this)
3.5 ounces ricotta, room temperature (I had double this amount)
1.7 ounces sour cream, room temperature (I used cream cheese)

salt and black pepper

Spicy honey:

1 tablespoon olive oil
1 garlic clove, minced
5 tablespoons honey
2 tablespoons lemon juice
1 teaspoon crushed red chili flakes, more for serving
salt and black pepper

Feta, ricotta and sour cream should be at room temperature. Add feta, ricotta and sour cream (or cream cheese) to a food processor. Season with salt and pepper. Blend on high until smooth, about 2-3 minutes. Taste, add salt and pepper if needed.

In a saucepan, heat olive oil. Add garlic, sauté on very low heat until soft. Turn off the heat. Stir in honey, lemon juice and chili flakes. Season with salt and pepper.

Serve the whipped feta drizzled with spicy honey.

Click here to connect with me on Instagram and find out what’s cooking in Ciao Chow Linda’s kitchen each day (and more)