Thursday, May 31, 2018

Cannoli with ricotta

Among other things, Sicily is famous for cannoli, those crunchy, ricotta filled delicacies that are ubiquitous in Palermo and throughout the island. So it was only natural that we would be making them in one of our classes at the Anna Tasca Lanza cooking school.

I have a real weakness for cannoli and there are plenty of good ones to be had near where I live in the Northeast U.S., but I never buy a cannolo (singular of cannoli) that’s already filled, unless it’s done right in front of me. There’s nothing worse than a soggy cannolo shell. (Well, actually there are plenty of worse things, but you get the point.) Eating a soggy cannolo is just not worth the calories.

But eating them in Sicily with sweet, creamy fresh sheep’s milk ricotta that was just made, and shells that were crunchy yet tender,  well, that’s a whole different ball game.

Don’t be afraid to make them at home. I made them for the first time decades ago, when I was a neophyte in the kitchen, and they’re not hard at all. If you can make pasta, you can make cannoli. It’s a similar procedure. You do need metal tubes to shape them, however, or if you’re handy with a saw, you can make your own forms from wooden dowels.

By the way, for the word nerds out there, the word cannolo is a diminutive of the Italian word “canna,” which means “reed” or “tube.” There’s a famous Italian book called “Canne Al Vento,” (“Reeds in the Wind”) written by the only Italian woman to win a Nobel prize in literature —  Grazia Deledda.

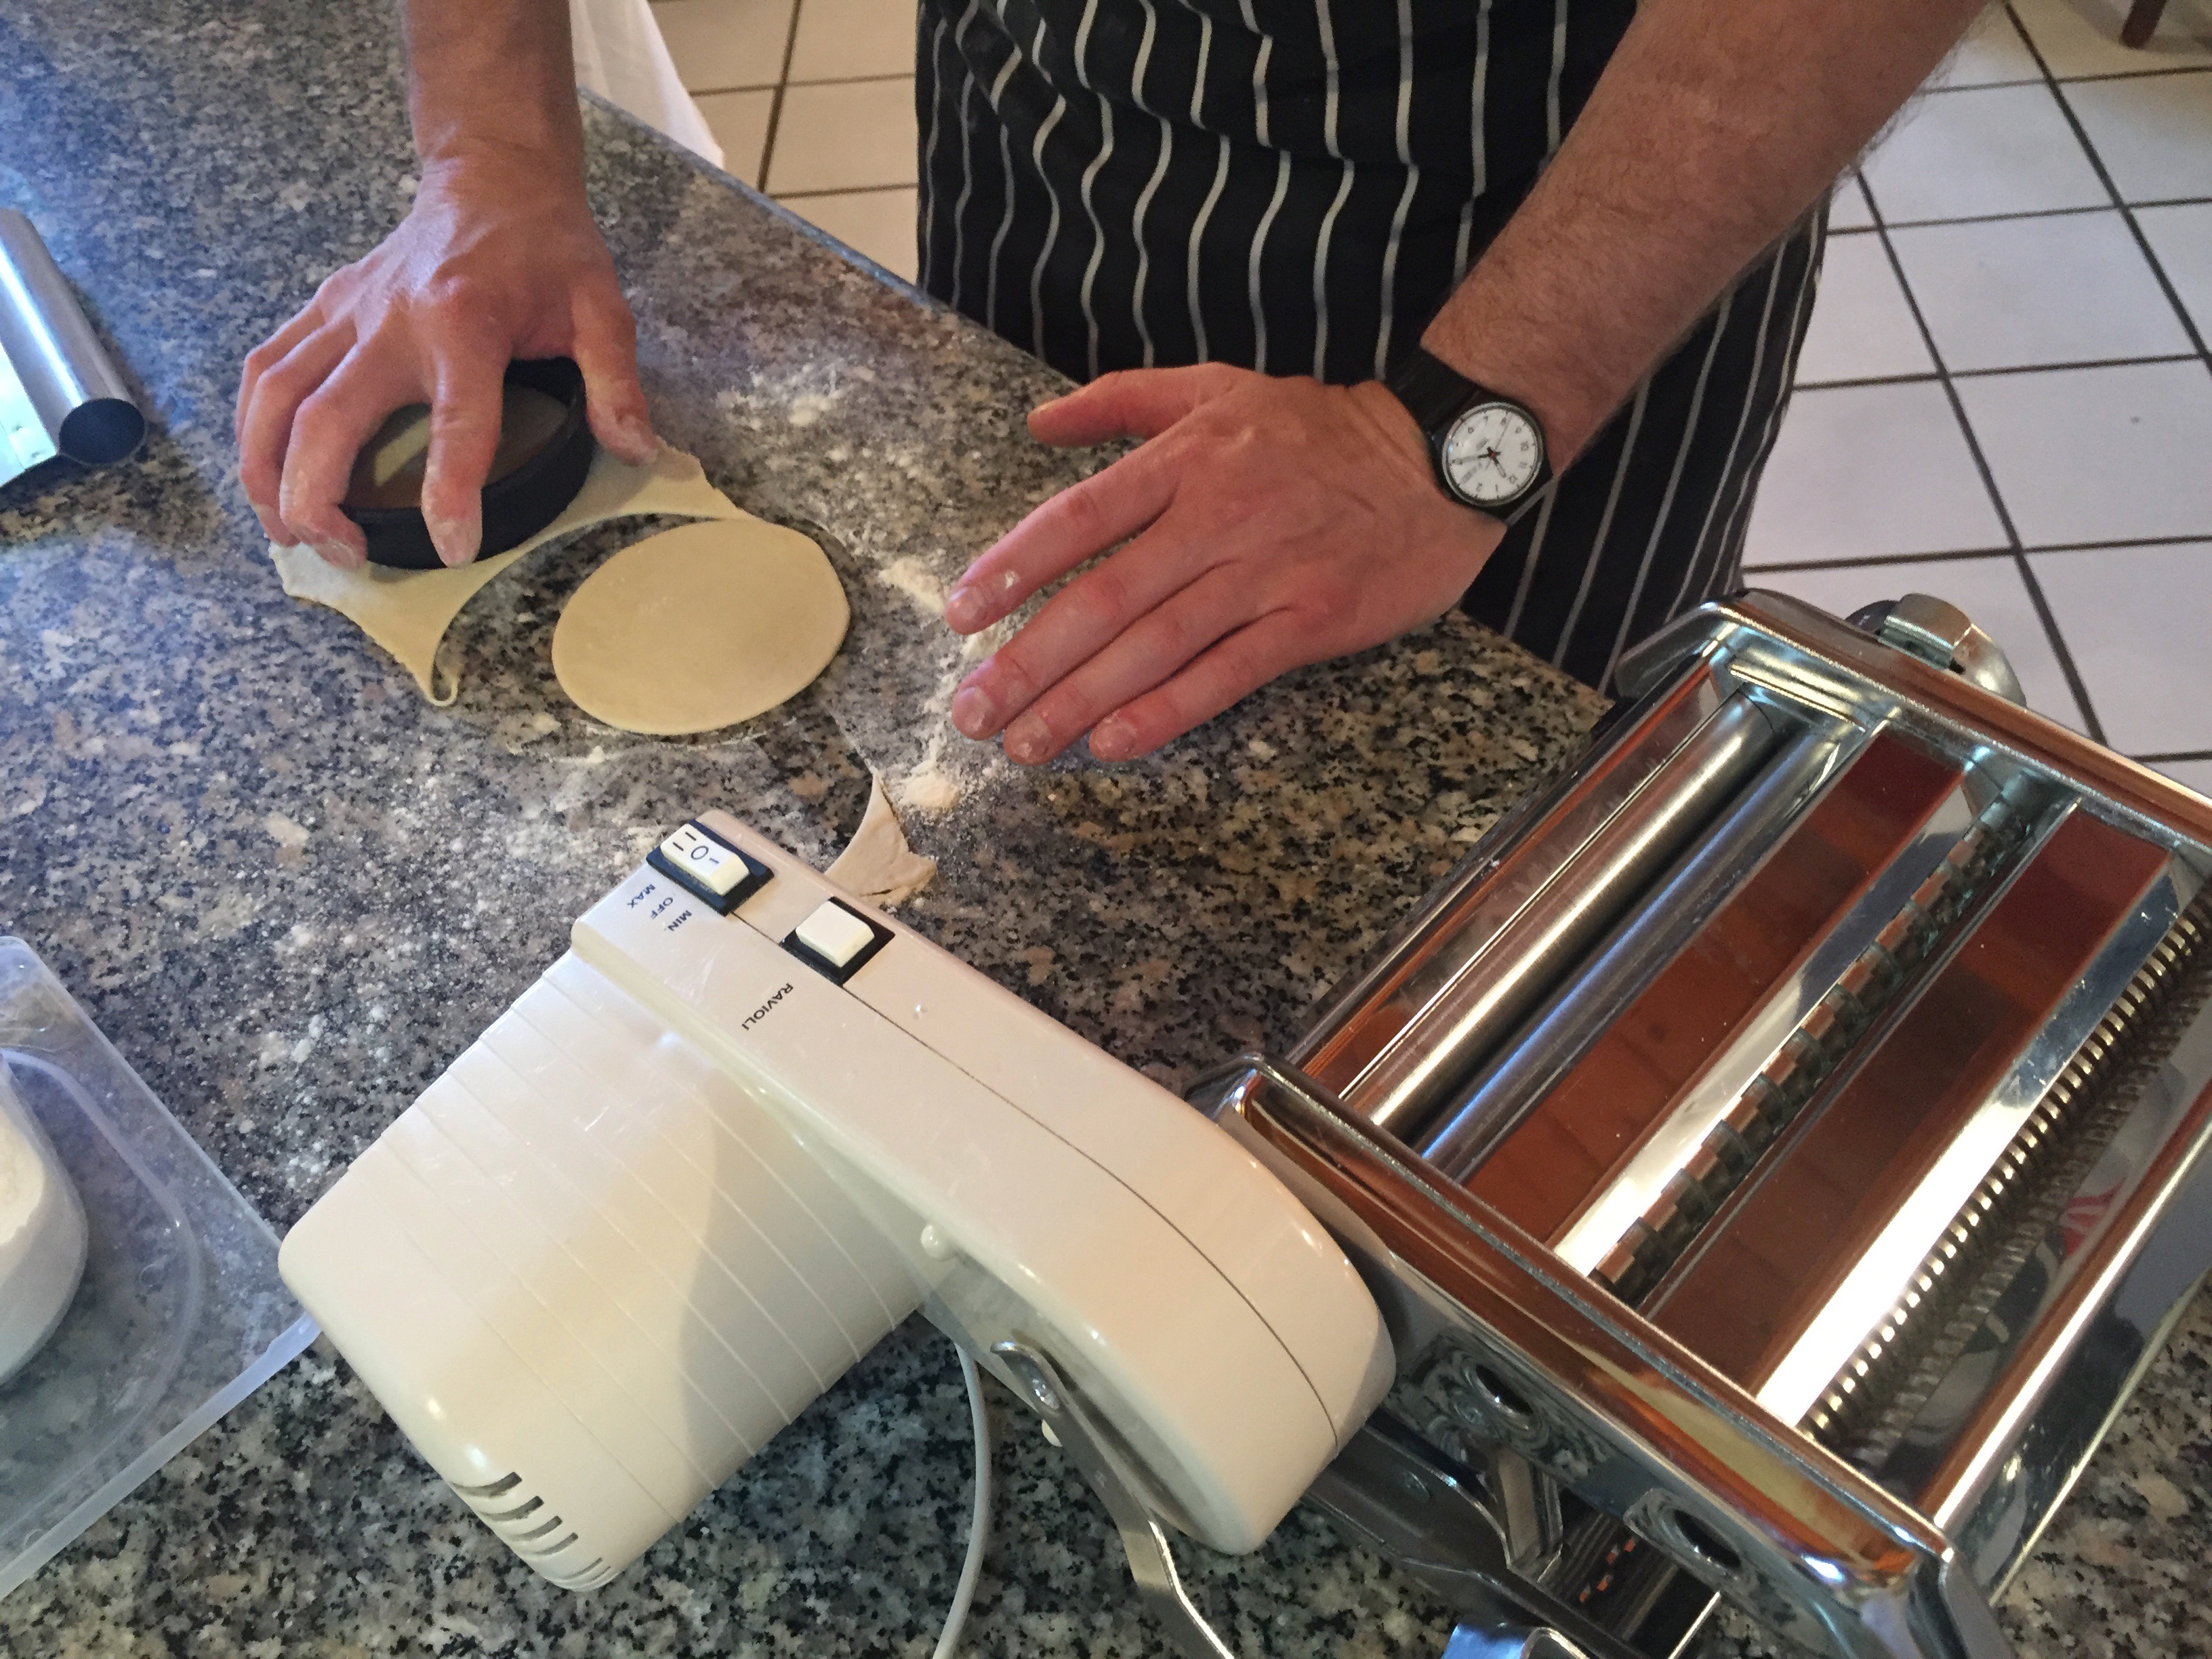
But back to the cannoli directions. The first thing to do is mix the dough, then knead it, and run it through a pasta machine at increasingly thin settings. If you’re a real purist and you’ve got strong arms, you can roll it by hand with a rolling pin.

Then cut it into circle shapes, using either a large circle cutter, or use a small plate as a template and cut around the perimeter with a knife. Then roll around the metal or wooden form, sealing with some water, overlapping slightly.


Fry them in hot oil until golden brown, using an oil with little flavor, like peanut or canola oil.

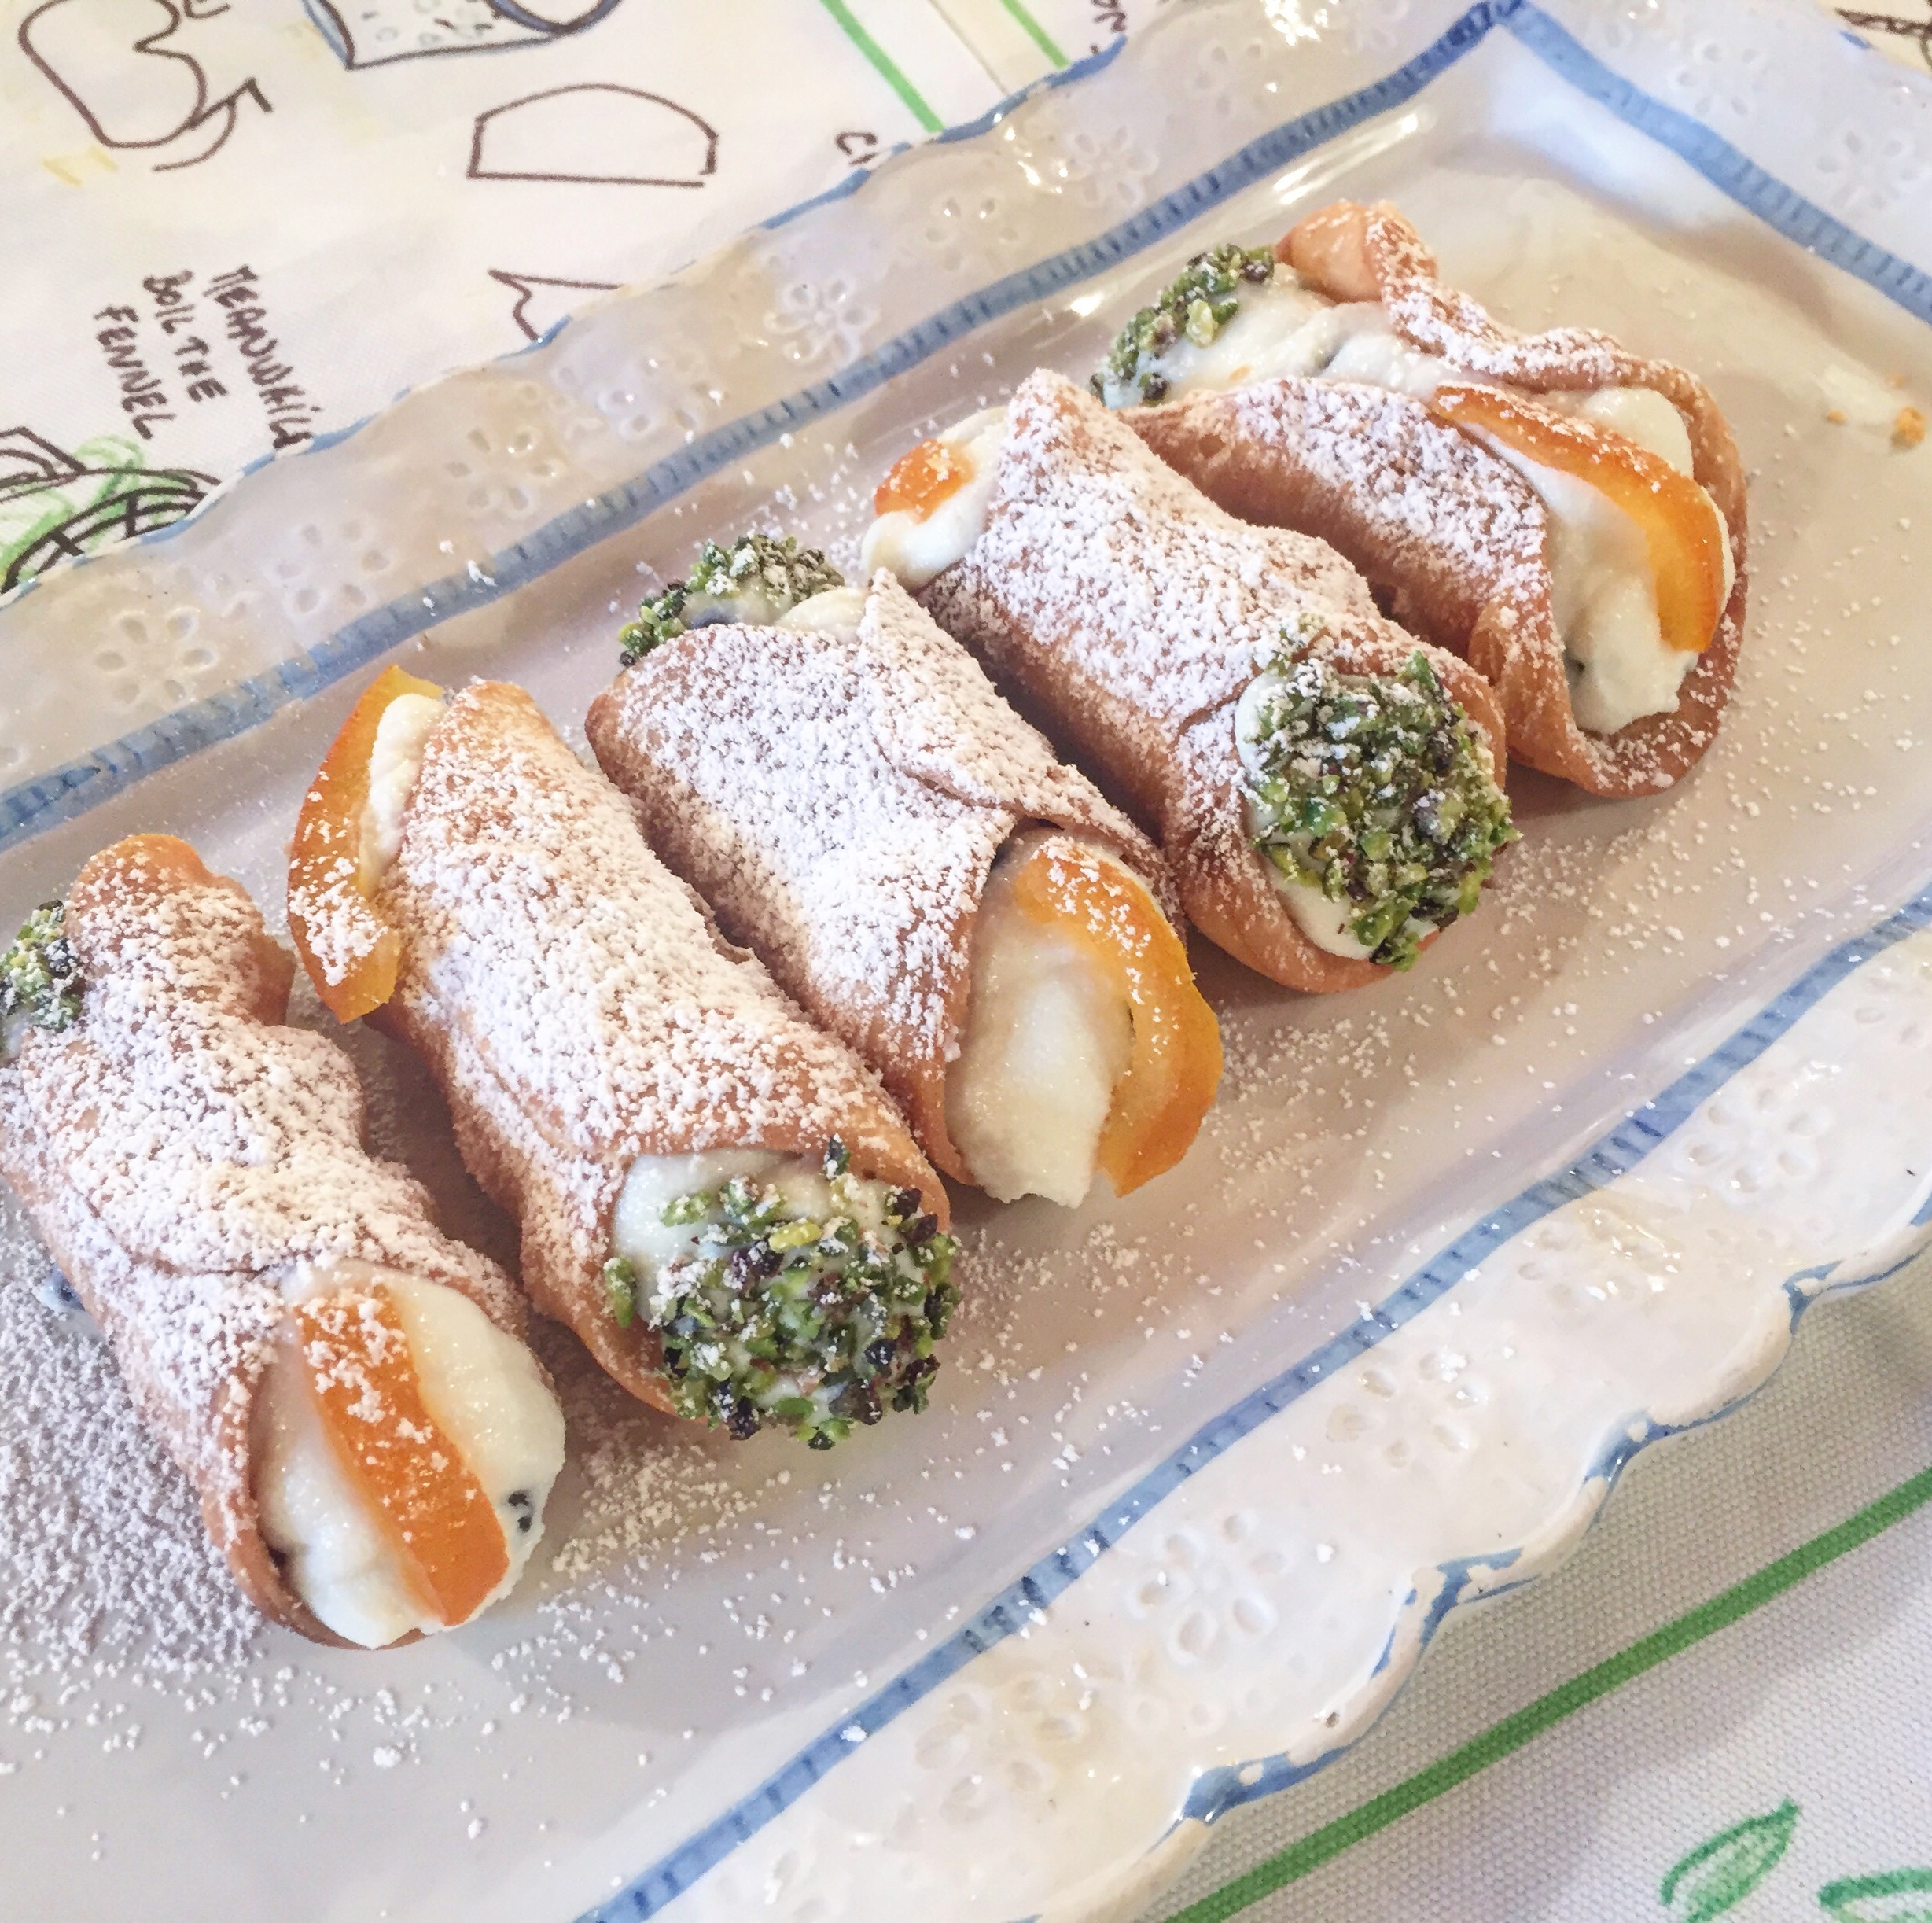
Drain and cool them, then fill with the ricotta and chocolate chip mixture. You can use a small spoon to do this, but if you have a large quantity, a pastry bag speeds things along.


Serve with a sprinkle of powdered sugar, and bits of candied orange peel and/or chopped pistachios, and watch them disappear.

Cannoli con Ricotta

Author: Fabrizia Lanza
Ingredients
  • 2 cups all-purpose flour
  • 4 tsp. lard
  • 2 tsp. sugar
  • 2 tsp. unsweetened cocoa powder
  • pinch of fine sea salt
  • 1/4 cup vinegar or wine, or as needed
  • 1 egg, lighten beaten, for egg wash
  • vegetable oil, for flying
  • Ricotta Cream
  • 1 1/2 cups whole-milk ricotta, preferably sheep’s milk
  • 1/2 cup sugar, or to taste
  • chocolate chips, optional
  • candied orange peel, chopped pistachios, to garnish
Instructions
  1. Make the cannoli shells:
  2. Combine the flour, lard, sugar, sauce and slat in a bowl and mix together with your hands.
  3. Add the vinegar, bit by bit, and knead until the dough comes together. The dough should be quite stiff.
  4. Set a pasta machine to the widest setting.
  5. Take a piece of dough and run it through the machine 7 to 10 times at that setting, folding the dough in half each time before rolling it again.
  6. When the dough is very even, continue to roll it through the machine, once at each setting without folding, until you reach the next to last setting. (The dough should be very even and silky).
  7. Lay the dough out onto a lightly floured work surface and with a lightly floured 4 inch cookie cutter, cut out rounds (use a small plate as a template if you don’t have a cookie cutter)
  8. Wrap the dough rounds around metal or wooden cannoli molds, dab the edge with egg, and press to seal.
  9. Repeat with the remaining dough, retooling the scraps.
  10. Heat 2 inches of oil in a wide, heavy pot over medium high heat.
  11. Add the cannoli shells in batches and fry until the shells have become bubbly, crisp, and browned, 4 to 5 minutes.
  12. With tongs, transfer to paper towels to drain.
  13. Cool and remove the molds carefully.
  14. To Make the ricotta cream:
  15. Beat together the ricotta and sugar until smooth and creamy. Add the chocolate chips, if desired. With a small spoon, fill the cannoli shells, then decorate with the candied orange peel and pistachios, and dust with powdered sugar.


Wednesday, May 23, 2018

Ricotta cheesecake with rhubarb raspberry topping

I’ve got plenty more recipes and posts coming to you from my time in Sicily at the Anna Tasca Lanza Cooking School, but since rhubarb season here in the Northeast U.S. is so brief, I’m posting another rhubarb recipe first.

Besides, it was my husband’s birthday recently and one of his favorite desserts is a ricotta cheesecake. Pairing the cheesecake with a rhubarb raspberry topping seemed a natural.

In order to minimize our indulgence, I made it in a small pan – a 6″ cake pan with a removable bottom. This will easily serve four people, but if you want to make it in a larger, springform pan that’s traditionally used for cheesecakes, just double the recipe below.

I made an almond flavored crust, and followed through with the almond flavoring in the cheesecake too.

Having recently returned from Sicily, where we cooked with sheep’s milk ricotta still warm from our visit to a cheesemaker in Vallelunga, I went on the hunt to find some here.

I did track some down at Valley Shepherd Farms Creamery in Long Valley, New Jersey, more than an hour’s distance from where I live. Fortunately, I didn’t have to make the drive, since they come to the farmer’s market in my town, as well as many other places in New Jersey and New York. It is a bit pricey, another reason to make a small cheesecake. But you could also use cow’s milk ricotta, as long as you drain it thoroughly to eliminate a lot of the moisture.

I first pressed it through a sieve to eliminate any clumps. After baking the crust, and mixing the cheesecake, I wrapped the pan in aluminum foil and baked it in a bain marie (water bath). I find that baking a cheesecake with a bain marie makes for a more even bake and eliminates the hard, brown edges that sometimes rise higher than the center of the cheesecake.

However, whether due to the water bath or something else, you need to bake the crust until it’s really well cooked, or you could end up with a softer crust than you might like.

After baking let it cool completely before adding the topping. In fact, wait to add the topping until just before serving. I used a combination of rhubarb and raspberries cooked in orange juice and sugar, but you could add strawberries instead of the raspberries, or use only rhubarb. The sauce is also delicious mixed in with yogurt for breakfast (or over ice cream).

Slice and spoon more of the sauce on top if you like. (And of course, I like. Wouldn’t you?)


Ricotta cheesecake with rhubarb raspberry topping

Ingredients
  • Uses a 6″ removable bottom cake pan. Serves four
  • Double quantities if using a larger springform pan
  • For the Crust:
  • 1/2 cup slivered almonds
  • 2 T. flour
  • 2 T. sugar
  • 1 T. melted butter, cooled
  • 1/2 large egg yolk
  • 1/4 tsp. vanilla extract
  • 1/4 tsp. almond extract
  • For the Cheesecake:
  • 3 eggs (actually a half of one of the egg yolks I used for the crust, above)
  • 3/4 tsp. vanilla extract
  • 1/4 tsp. almond extract
  • 1 lb. ricotta (sheep’s or cow’s milk)
  • 1 T. orange zest
  • For the Topping (this is enough for the cheesecake plus extra for using on ice cream or yogurt):
  • 4 large stalks rhubarb
  • 1 cup raspberries
  • juice of one orange
  • 1/2 cup sugar
Instructions
  1. Make the crust by placing the almonds, flour and sugar in a food processor and processing until it looks like grainy sand.
  2. Add the melted butter, 1/2 egg yolk, vanilla and almond extracts.
  3. Press into the bottom and sides of the cake pan, which has been buttered ahead of time.
  4. Bake at 325 degrees for 20-30 minutes or until browned.
  5. Let it cool.
  6. For the cheesecake:
  7. Put the ricotta through a sieve and drain overnight if it’s very moist.
  8. In a food processor, add the ricotta, eggs, sugar, vanilla, almond extract and orange zest.
  9. Blend for a few minutes until everything is well mixed.
  10. Pour the filling into the crust, then wrap the pan in aluminum foil.
  11. Place the pan into another pan and pour water around the cheesecake pan, making sure not to spill any into the cheesecake.
  12. Bake at 325 degrees for one hour and 15 minutes, longer if using a larger pan.
  13. It does not need to be “brown” on top. It should retain its pale color.
  14. For the topping:
  15. Slice the rhubarb into small pieces.
  16. Place the orange juice and sugar into a pan with the rhubarb pieces and raspberries.
  17. Cook at high heat until it reaches a boil, then lower and cook for about five minutes, or until the rhubarb pieces just start to break down.
  18. Let cool, then pour over the cheesecake just before serving.


SaveSave

SaveSave

SaveSave

SaveSaveSaveSave

SaveSave

SaveSave

Tuesday, May 15, 2018

Eggplant Involtini

Eggplant wrapped around mozzarella or ricotta cheese is what I used to think of whenever I made eggplant involtini. But after my week of cooking at the Anna Tasca Lanza cooking school in Sicily, where I learned to make this unusual and delicious dish of pasta snuggled inside eggplant slices, you can bet that this version will be in regular rotation in our house.

It’s one of those dishes that wows with its unusual looks, tastes fabulous and can be made in advance. Who could ask for more?

Start by frying some sliced eggplant in oil, until golden brown. Drain on paper towels.

Cook some angel hair pasta and toss with tomato sauce and grated parmesan cheese. Make sure it’s very al dente, since it will cook further in the oven.

Now place some of that pasta on top of an eggplant slice.
Then roll the slice of eggplant around the pasta. Don’t worry if the pasta peeks through holes in the eggplant. It’s all going to get covered in sauce.
Place the rolls seamside down into an ovenproof pan. Cover with tomato sauce and parmesan cheese.

Bake in the oven and top with more parmesan cheese (or ricotta salata) before serving. Serve one involtino as a first course, or two as a main course.

The eggplant involtini were just one of four courses we ate each night, after prepping and cooking everything under chef Michael’s guidance. Some things were already prepared, like the cured olives and artichokes sott’olio we enjoyed with some bubbly from the nearby winery one night.
The ingredients for nearly everything we consumed were grown on the property, or nearby, including the olives, artichokes, lemons, bergamot, almonds, pistachios, lettuces and fennel.
lentil plants
Wild fennel was in season, so it was abundant at this time of year and we ate it raw in salads and cooked in frittatas.
Bergamot was sliced thinly into salad and tasted nothing like a lemon, which it resembles, but was much sweeter, even the fleshy white part.
Pamela (a charming young woman from England, and the only other participant the week I was there) and I sat down to dinner each night at the large kitchen table to share the fruits of our labors with owner Fabrizia, her husband, chef Michael, gardener Hans, office manager Henna and others who were passing through.
Together with the delicious food, conversation flowed along with the perfectly paired wines from Tenuta Regaleali, the winery on the property. Stay tuned for more about that in further posts.


Eggplant Involtini

Author: Fabrizia Lanza
Serves: Serves 10 (2 per person)
Ingredients
  • 5 large eggplants
  • vegetable oil for frying
  • 2-3 cups (500-750 ml) good quality well-seasoned tomato sauce (not tomato puree)
  • 12 oz. (300 grams) angel hair pasta
  • parmesan cheese, finely grated
  • ricotta salata (optional)
  • fresh basil, mint, or oregano
  • olive oil
Instructions
  1. Slice eggplants about 1/2 inch think.
  2. Deep fry in a large pan of oil, flipping halfway through, until deep golden.
  3. Drain on paper towels.
  4. Cook angel hair pasta in well salted boiling water for 1 minute (must be very al dente because if will cook further in the oven).
  5. Toss with plenty of tomato sauce and grated Parmesan.
  6. Preheat oven to 350 degrees.
  7. Cover the bottom of a large, ceramic baking pan with more tomato sauce and some olive oil.
  8. Take one eggplant slice and place a small bunch of pasta in the middle and roll up.
  9. Place in pan seaside down and repeat with remaining eggplants and pasta, packing rolls snugly into pan.
  10. Cover with more tomato sauce and Parmesan.
  11. Tuck leaves of fresh herbs between the rolls
  12. Bake for 20 to 25 minutes, until cheese is melted and everything is warm.
  13. Optional: Top with more grated Parmesan or ricotta salata cheese.


Tuesday, May 8, 2018

Rhubarb Tart

We interrupt our Sicily posting for a detour to “rhubarbia.” Since rhubarb is at its peak right now in the Northeast U.S. and disappears for the rest of the year,  you’ve got to take advantage of this short season.

This tart is made with a shortbread crust and a frangipane filling (almond flour, eggs, etc.) from a recipe I found here.  But what sets it apart is the lattice top. Caveat – it’s a bit tricky to get the strips right. I tried making this last year but made the mistake of buying rhubarb that wasn’t wide enough and the strips were just too flimsy and hard to handle after poaching. Numerous strips also meant more weaving, and each time you move the strips, you run the risk of ripping them, so the fewer strips you have, the easier this is to make.

You can also make this in a round tart pan, but I recommend this long, thin one that measures about 13″ x 4.” You only need three strips lengthwise, if they’re hefty strips. The short ones aren’t a problem, it’s the long ones that will need to be raised over and over again to make the lattice, risking a tear each time you lift one.

You also risk cutting yourself if you use a mandolin and you’re not careful (guilty as charged). The strips were sliced to about 1/16 of an inch, which is thick enough to hold together while it softens in the poaching liquid, but not so thick that it’s hard to bite through a piece.

Measure your strips against your tart pan to be sure you have the right length and enough strips for the width too. My long pieces were just a little too short, but that gap can be covered up with a short strip at each end.You’ll poach the strips in a sugar/water liquid for about five minutes or until soft enough to poke a fork through. If you let it poach too long, the strips will disintegrate.

Carefully remove them with a long spatula (I used a fish spatula that has slots to let the water drain). Don’t throw away the water. You’re going to reduce it to form a glaze. Lay the strips on paper towels to drain.
 
This is the tart pastry (that was “blind-baked” using beans on aluminum foil to weigh down the shell) and the frangipane filling after it’s baked.
Now comes the fun part (also the part where you can easily break a strip – remember, I did warn you it was tricky).  The recipe tells you to weave it on parchment paper and transfer to the tart, but with only three long strips, I decided to do it right on the frangipane filling. Lay the lengthwise pieces in first.
Then lift each lengthwise strip and weave the short pieces over and under the long strips.
After you’ve reduced the liquid  to form a glaze, spread it over the top with a spoon or a pastry brush.
This photo was taken the morning after we had already eaten the rest of the tart, so the glaze has sunk in and it doesn’t appear as glossy. But it didn’t affect the taste one bit.

Rhubarb Tart

Author: Adapted from Allie of “Baking a Moment”
Ingredients
  • For the Tart Crust:
  • 1 1/4 cups all-purpose flour
  • 2/3 cup powdered sugar
  • 1/4 teaspoon kosher salt
  • 1/2 cup (1 stick) cold unsalted butter, cut into cubes
  • 1 egg yolk
  • 1 tablespoon heavy cream
  • 1/2 teaspoon vanilla bean paste (extract can be substituted)
  • For The Filling:
  • 1 tablespoon unsalted butter
  • 3/4 cups almond meal
  • 1/3 cup granulated sugar
  • 1 large egg
  • 1 tablespoon dark rum
  • 1/2 teaspoon vanilla bean paste (extract can be substituted)
  • 1/2 teaspoon lemon zest
  • 1/4 teaspoon almond extract
  • a pinch of kosher salt
  • For the Rhubarb Lattice Topping:
  • 8-10 stalks fresh rhubarb
  • 1 cup water
  • 1/2 cup granulated sugar
Instructions
  1. To make the Shortbread Crust:
  2. Place the flour, powdered sugar, and salt in the bowl of a food processor and pulse to combine.
  3. Add the butter, and process until the mixture resembles coarse meal.
  4. Combine the egg, cream, and vanilla in a small bowl and add to the flour/butter mixture, while running the machine.
  5. Continue to process until the dough comes together into a ball.
  6. Wrap the dough in plastic wrap and chill in the refrigerator for a minimum of 30 minutes.
  7. Preheat the oven to 375 degrees F.
  8. Roll the dough to a thickness of about 3/16-inch.
  9. Place it in the tart pan, trimming away any excess.
  10. Line with foil and ceramic pie weights or dried beans.
  11. Bake for 15 minutes or until just beginning to turn golden.
  12. To make the Frangipane Filling:
  13. Place the butter in a small pan and cook over medium heat until nutty-brown. Set aside to cool slightly.
  14. Place the almond meal, sugar, egg, rum, vanilla, zest, almond extract, and salt in a bowl and stir to combine.
  15. Mix in the browned butter, and transfer the mixture to the partially baked tart shell. Bake for an additional 30 minutes, or until golden brown and set.
  16. Cool completely and top with rhubarb lattice.
  17. To make the Rhubarb Lattice Topping:
  18. Using a mandolin slicer or vegetable peeler, slice the rhubarb long-ways to a thickness of about 1/16-inch.
  19. Place the water and sugar in a pot and bring to a boil.
  20. Reduce to a bare simmer, and add 4 or 5 slices of rhubarb.
  21. Cook until slightly softened, then drain on paper towels.
  22. Repeat, until all the rhubarb is cooked. Reserve the remaining syrup.
  23. Line up slices of cooked rhubarb side-by-side on a sheet of parchment.
  24. Fold alternating slices up, and place perpendicular slices over, in a lattice pattern.
  25. Repeat until the sheet of lattice is big enough to cover the entire top of the tart.
  26. Flip the sheet onto the top of the cooled tart, and peel the parchment away.
  27. Trim off any overhang with kitchen shears.
  28. Using a silicone pastry brush, dab the remaining poaching liquid over the lattice to glaze.


Friday, May 4, 2018

Panelle at Case Vecchie

Move over potato chips. There’s a new kid on the block — panelle. Actually panelle aren’t new. They’re a Sicilian street food that you’ll find all around Palermo. But eating them freshly made at home – crispy and crunchy on the outside, and creamy in the center – well, that’s a whole new experience. Stay with me for a recipe at the end of this post.Making and eating panelle is just one of the wonderful opportunities I had during my week at Case Vecchie, at the Anna Tasca Lanza Cooking School, run by Fabrizia Lanza, shown here with her beloved dog, Macchia. Fabrizia, who lived and worked in Bologna in the field of art history, moved back to Sicily to take over the cooking school founded by her late mother, Anna Tasca Lanza. The school offers lots of different programs from food writing to sketching, and even a ten week intensive course called “Cook The Farm.” Click here for more information.

The drive through the countryside approaching the farm – located near the center of the island of Sicily – was a visual delight (albeit a challenge to navigate and drive simultaneously, but fear not, there’s a train that runs nearby). Lush green fields and acre upon acre of vineyards were spread out before me, welcoming me as Springtime in Sicily laid out its thick green carpet.

Arriving at the farm, one is struck not only by the landscape, but also by the beauty of all the doors and woodwork painted in a vivid royal blue.


I was led to my room and threw open the shutters to enjoy this glorious view. Oh, what a joy to wake up to this each morning.
I learned so much and have so much to share with you from my week at Case Vecchie, including some of my favorite things:

Sheep (if you’ve read this, you know how much I love sheep) and cheese we ate from the milk of these animals.

Eating freshly made yogurt and preserved amarene cherries for breakfast:
pizza making using a wood-fired brick oven:
Cooking with the freshest vegetables, including wild fennel (finochietto).
A visit to Regaleali Winery, adjacent to Case Vecchie and part of the original family holdings, to discover and taste a whole world of Sicilian wines beyond nero d’avola:
I even had time to paint and take a pisolino (nap) now and then — a truly relaxing week.
There’s so much more to tell, that I’ll reveal in subsequent posts, but for now, let’s return to those panelle and let me show you how they’re made. First, you stir the chickpea flour with water. It’s not that different from making polenta. Michael, the chef at the cooking school, and our very personable and knowledgable instructor for the week, led us through the steps. He likes to add fennel seeds, not usually included in panelle recipes, but they were a delicious addition. Incidentally, if you’re a cook and/or teacher looking for a job, Michael’s leaving this summer and the hunt is on for a replacement.
Spread the mixture out thinly and evenly on some plates, then let it sit and cool.


At that point, it will be easy to peel the solidified mixture off the plate. Stack them one on top of the other and slice into triangles.

Then fry them until they pop up and are golden brown.

Drain on paper towels, sprinkle a little salt over the top, and watch them disappear.Do follow me down the road for future posts about this magical place and the some of the dishes I cooked and ate there, including cavatelli, cannoli, cassata and a most unusual eggplant rolatini. All the ingredients we ate and cooked with (including the almonds, pistachios and citrus fruits) were either grown on the farm or nearby.

And I promise to post more frequently. I’ve had computer glitches since returning. But all those frustrating hours spent with tech support on the phone are forgotten when I look at this serene path leading from Case Vecchie, a never ending source of inspiration.

Panelle from Case Vecchie

Cuisine: Sicilian
Author: Fabrizia Lanza
Ingredients
  • 4 cups (250 grams) chick pea flour
  • 3 cups (750 ml) cold water
  • pinch of salt
  • pinch of freshly ground black pepper
  • 1 Tablespoon fennel seeds (optional)
Instructions
  1. Combine the flour, water, salt, pepper and fennel seeds in a medium sized pan and whisk until smooth.
  2. Cook over medium high heat, whisking constantly, until mixture is like a very stiff polenta.
  3. Lower the heat if necessary to keep from burning.
  4. Cook for a few more minutes, stirring with a wooden spoon, until the mixture pulls away from the sides of the pan.
  5. Working quickly, spread the mixture with a wooden spatula onto plates so that it is about 1/4 inch (0,5 mm) thick.
  6. Let sit until cool, 15 to 20 minutes.
  7. when dough is cool, loosen the edges with a knife and peel the “crepes” off the plates and place on a work surface, stacking one on top of the other.
  8. Cut stack into 16 wedges.
  9. In a large frying pan, heat 2 inches (5 cm) of oil until hot.
  10. Place wedges of chick pea mixture into hot oil and fry, flipping occasionally, until golden and crisp, about three minutes.
  11. Dry on paper towels and sprinkle with salt.
  12. Continue frying remaining wedges and serve hot.


SaveSave

SaveSave

SaveSaveSaveSave

SaveSave

SaveSave

SaveSave

SaveSave