Saturday, June 27, 2020

Mozzarella In Carrozza

If you like grilled cheese, then you’ll love mozzarella in carrozza, Italy’s version of the iconic American sandwich. The dish — melted mozzarella cheese hugged by two slices of crunchy deep-fried bread — comes from the Campania region and is frequently found as street food in Naples. Mozzarella in carrozza translates to “mozzarella in a carriage” and the origins of the dish vary, depending on your source.

Some say it’s called that because the bread originally used was round, like the wheels of a carriage. Others say it’s because the  strands of melted mozzarella that pull from the sandwich resemble the reins of a horse and carriage. Still others claim that it was invented by housewives in Southern Italy as a means to use up leftover mozzarella and stale bread. Whichever version is true doesn’t matter. What matters is that it’s delicious and that you try it. Lots of people use a loaf of square white bread, with the crusts removed, but for this recipe, I used a loaf of Italian bread that produced slices more oval than square.

I trimmed the crusts and placed a piece of mozzarella in the center, with enough room to seal the edges using a paste made with milk and flour. It helps in keeping the melted mozzarella from escaping when you’re frying it. Don’t worry about using the finest quality mozzarella either. Most bufala mozzarella will be almost too liquid, even though you can pat it dry it with paper towels first if that’s what you have or want to use. Regular fior di latte mozzarella is perfect for this recipe, whether freshly made by an Italian deli or purchased from a supermarket. Just don’t use that yellowish industrial stuff that’s been injected with additives that belong in a chemistry lab. I used a slice of cheese about 1/4″ thick. A little bit of anchovy inside the sandwich would be a perfect marriage too, if you like anchovies, but alas I didn’t have any when I was making this.

Generally when I deep fry foods, I use a three-step process – flour, egg wash, then bread crumbs. But for this recipe, you really need only the egg wash and bread crumbs. Use the coarse Japanese bread crumbs called panko if you have them. They’ll give even more crunch. I added some grated parmesan cheese to the bread crumbs and a little minced parsley and black pepper

After you’ve sealed the edges of the bread with a little flour and milk mixture (use your fingers dipped in the slurry and spread it around the rim, then press the edges together), dip the sandwiches into the beaten eggs and then the bread crumbs. Coat all around the sides too, not just the front and back.

Deep fry in plenty of hot oil. You don’t need to use olive oil unless you don’t mind spending the extra money. Peanut oil works very well for deep frying.

Flip them over carefully when they get golden brown. Be careful not to have the temperature of the oil too hot, or they’ll likely brown before the cheese melts. But you don’t want the temperature of the oil to be too low either, or the bread will be greasy.

If you’ve got a bit of tomato sauce on hand, serve it on the side.

It makes a great dinner, served along with a salad on the side. It’s also addictive, and once you try it, you’ll find out why.

Click here to connect with me on Instagram and find out what Ciao Chow Linda is up to in the kitchen (and other places too.)

Mozzarella In Carrozza
Author: Ciao Chow Linda
Ingredients
  • 4 slices of mozzarella cheese (1/4″ thick each)
  • 8 slices of sturdy white bread, crusts removed
  • 3/4 cup panko bread crumbs
  • 1/4 cup grated parmesan or pecorino cheese
  • 1 tablespoon minced parsley
  • 2 eggs, beaten with 1 tablespoon milk
  • 1 tablespoon flour mixed with a little water
  • tomato sauce of preference
  • peanut oil or another vegetable oil for deep frying
Instructions
  1. Cut the slices of bread from a sturdy loaf and trim the crusts.
  2. Take one slice of mozzarella and place on each slice of bread.
  3. Cover with a second slice of bread.
  4. Mix the flour with the water until you have a loose slurry.
  5. Using your finger, spread a thin layer of the flour mixture all around the edges of the bread.
  6. This will help seal it when it fries.
  7. Press down on the sandwich with the palm of your hand.
  8. Beat the eggs with the milk.
  9. Dip the sandwiches in the eggs and coat thoroughly.
  10. Mix the panko with the parmesan or pecorino cheese and minced parsley.
  11. Dip the sandwiches into the panko mixture and press the coating firmly into the bread.
  12. Heat the oil in a cast iron skillet or heavy frying pan to a medium temperature, and sample the temperature using a small piece of bread dropped into the oil.
  13. When the piece of bread sizzles, the oil is hot enough.
  14. Carefully place the sandwiches in the hot oil, cooking long enough to brown each side.
  15. If the heat is too high, it could brown the bread without melting the cheese inside.
  16. Remove from the oil and drain on paper towels.
  17. Serve with tomato sauce on the side.

Friday, June 12, 2020

Ricotta and Chocolate Crostata


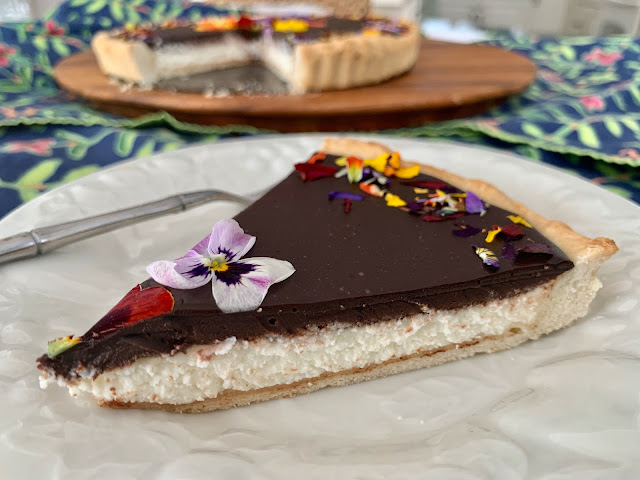
As soon as I saw this recipe by Domenica Marchetti in Italy Magazine, I knew I had to make it. Domenica’s recipes are always sure-fire winners, from soups to stews to desserts. That chocolate topping! That ricotta base! It’s a seemingly simple recipe, with basic flavors that complement each other perfectly — from the slightly lemony tang of the crust to the sweetened ricotta and dark, bittersweet chocolate.

Yes, you can buy your own crust, and I sometimes do, but in this case, homemade is infinitely better. The recipe makes enough for two tarts — one of which went into the freezer — and with the trimmings, I eeked out enough for two mini tart tins as well. Follow the directions exactly to make sure you don’t have a soggy bottom. That involves resting the dough in the refrigerator for a bit, then pricking the dough and “blind-baking” it for ten minutes or so. Fill it with the ricotta/sugar mixture and bake some more.

Then cover it with a ganache of dark chocolate and heavy cream. It will be hard to resist cutting into this one right away, but refrigerate for an hour or two to firm up the chocolate. Serve as is, with some strawberries on the side, or if you’ve got any growing in your yard, mince some pansy flowers for a confetti of edible color. 


Click here to connect with me on Instagram and find out what Ciao Chow Linda is up to in the kitchen (and other places too.)

Ricotta and Chocolate Crostata
Ingredients
  • 2 1/2 cups (390g) unbleached all-purpose flour, plus more for dusting
  • 1/2 cup (100g) granulated sugar
  • Finely grated zest of 1 small lemon
  • 1 teaspoon baking powder
  • 1/8 teaspoon fine salt
  • 1/2 cup (115g) cold unsalted butter, cut into dice
  • 2 large eggs
  • 1 pound (500g) fresh sheep’s milk or well-drained cow’s milk ricotta
  • 1/4 cup (30g) confectioners’ sugar
  • 1/2 teaspoon pure vanilla extract
  • 1 cup (250ml) plus 2 tablespoons heavy cream
  • 8 ounces (250g) bittersweet chocolate, coarsely chopped
  • 2 tablespoons unsweetened cocoa powder
Instructions
  1. In a food processor, combine the flour, granulated sugar, lemon zest, baking powder, and salt and pulse to mix. Add the butter and pulse until the mixture is crumbly. Add the eggs and process just until the dough comes together. Turn the dough out onto a lightly floured surface, divide it in half, and pat it into two disks. Wrap one half in plastic wrap and freeze for another use. Wrap the second piece and refrigerate it for 1 hour.
  2. Remove the pastry disk from the refrigerator. On a lightly floured surface, roll the disk into a 12-inch (30-cm) circle. Carefully transfer the dough to a 10-inch (25-cm) round tart pan with a removable bottom. Gently press the dough into the bottom and up the sides of the pan. Trim the overhang. Refrigerate for 1 hour (or up to overnight).
  3. Preheat the oven to 350° F (180° C). Remove the tart shell from the refrigerator. Prick the bottom of the crust with a fork. Bake until the edges are just beginning to turn golden, about 10 minutes. Transfer to a wire rack and let cool for 10 minutes. Leave the oven on.
  4. In a large bowl, combine the ricotta, confectioners’ sugar, vanilla, and 2 tablespoons heavy cream and mix well. Spoon the mixture into the crust. Bake until the filling is set, 20 to 25 minutes. Transfer to a wire rack and let cool to room temperature.
  5. In a heatproof bowl, combine the chocolate and cocoa powder. Pour the remaining 1 cup cream into a small saucepan and heat on medium until small bubbles form around the edges of the pan. Pour the hot cream over the chocolate and cocoa and stir until the mixture id dark, glossy, and smooth and all the chocolate has melted. Carefully spread the chocolate ganache over the cooled filling, starting in the middle and creating a thick layer that stops just short of the crust.
  6. Refrigerate the crostata until thoroughly chilled, about 2 hours. Remove the sides from the pan and set the crostata on a serving plate. Let stand a few minutes, then cut into wedges and serve


Thursday, June 4, 2020

Green Goddess Roasted Spatchcock Chicken

Ready for a succulent, flavorful roast chicken with crispy skin that’s ready in less than an hour? You’ll need to marinate it for six hours or overnight in this green goddess recipe, but it cooks in just a half hour to 45 minutes. The recipe was created by Melissa Clark for the New York Times and calls for a chicken cut in half and roasted at 500 degrees F.  Rather than cut it in half, I spatchcocked it, which is easily done in five minutes if you’ve got a good sturdy knife or kitchen shears. Cut down one side of the backbone.

Then cut down the other side of the backbone, flip the chicken over and press down hard to flatten the breastbone. Place it in a pan (I used a disposable aluminum pan to make cleanup easy) and pour about 3/4 of the marinade all around the chicken. Save the rest of the marinade to serve with the chicken. The marinade is also delicious as a salad dressing or used as a sandwich spread (if you use yogurt rather than buttermilk). Let the chicken marinate in the refrigerator for a minimum of six hours or overnight. 

When you’re ready to roast it, pour out the marinade, rinse out the pan and wipe all the marinade off the chicken. Then drizzle with some olive oil and place skin back in the pan side up. Roast the chicken at 500 degrees (F.) for a half hour to 45 minutes, until juices come out clear and the skin is crispy. Serve at once with the remaining green goddess dressing. 

Click here to connect with me on Instagram and find out what Ciao Chow Linda is up to in the kitchen (and other places too.)

Green Goddess Roasted Spatchcock Chicken
Author: Ciao Chow Linda via Melissa Clark and The New York Times
Ingredients
  • 1 ½ cups buttermilk or plain yogurt
  • 1 cup packed basil leaves (I used lemon balm and parsley)
  • ¼ cup packed chives
  • 2 garlic cloves, peeled
  • 2 anchovy fillets (optional, but highly recommended to use)
  • 1 scallion, white and green parts
  • Finely grated zest and juice of 1 lime
  • 2 teaspoons coarse kosher salt
  • 1 teaspoon black pepper
  • 1 (4- to 5-pound) chicken, halved through the breast and back bones, patted dry with paper towels (I spatchcocked it – follow photos in blog post to show you how to do it – or ask your butcher to do it.)
  • 1 to 2 tablespoons extra-virgin olive oil, for drizzling
Instructions
  1. In a blender, purée buttermilk, herbs, garlic, anchovies, scallion, lime zest and juice, salt and pepper until smooth.
  2. Put chicken halves (or the spatchcocked chicken) in a bowl or large heavy-duty resealable plastic bag and cover with three-quarters of the Green Goddess marinade.
  3. (Save the rest to serve as a sauce.)
  4. I used a disposable aluminum foil pan and roasted it in the same pan, after I drained out the marinade and washed the pan.
  5. Refrigerate for at least 6 hours or up to overnight.
  6. Heat oven to 500 degrees.
  7. Remove chicken from the marinade, shaking off as much liquid as possible, and lay the halves (or the spatchcocked chicken) on a rimmed baking sheet.
  8. (Discard the used marinade.)
  9. Pat chicken dry with paper towels and drizzle with oil.
  10. Roast until cooked through, about 30 to 45 minutes.
  11. Let rest for 10 minutes before serving, with some of the reserved sauce if you like.