Showing posts with label peppers. Show all posts

Monday, January 27, 2025

Chicken with mushrooms and peppers


How about a quick, easy and healthy dish for dinner? It starts with chicken "tenders." I thought I was buying larger pieces of boneless, skinless chicken but when I unwrapped the package, there they were -- "smallish" pieces of chicken. I knew they'd cook quickly, and I'd need to give them a flavor boost to avoid a bland dish. So I rubbed on a little olive oil, seasoned them generously, and gave them a quick saute on high heat.
I removed them from the pan before they were cooked through, then cooked the vegetables and added the chicken back, with some stock and a little cornstarch to thicken.
Sit down to a delicious dinner in a half hour start to finish.


Click here to connect with me on Instagram and find out what’s cooking in Ciao Chow Linda’s kitchen each day (and more)

Chicken With Mushrooms And Peppers

1 lb. chicken "tenders"

2 tablespoons olive oil to coat the chicken

1/2 teaspoon seasoned salt (I make my own in the summer with dried homegrown herbs and sea salt)

dash of black pepper

1/8 teaspoon garlic powder

2 more tablespoons olive oil to saute the chicken and vegetables

1 red pepper, sliced thinly

8 ounces mushrooms, sliced

1/4 cup sliced onions

1 large garlic clove

1/4 cup chicken stock

1 teaspoon cornstarch

parsley, minced (to garnish)

Smear the olive oil over the chicken pieces, then sprinkle with the seasonings. Saute the pieces on high heat in olive oil until lightly browned. Remove chicken pieces and add vegetables and garlic to the pan, cooking on medium heat until softened. Mix the chicken stock with the cornstarch. Add the chicken back to the pan and pour in the chicken stock/cornstarch mixture. If too thick, add a little more stock or water. Mix everything together until coated. Sprinkle with minced parsley. Serve over rice or noodles, if desired.

Saturday, August 12, 2023

Gratinéed Peppers, And a Blogiversary Giveawaay

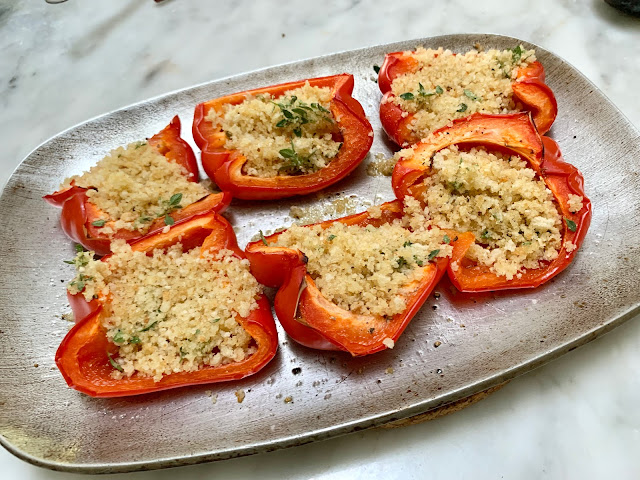
In this summer of bounteous corn, peaches and tomatoes here in the Garden State (that would be New Jersey, of course), let's not forget about peppers. Red peppers are starting to come in strong, and if you grow peppers, you know that if you leave them on the plant longer, they'll turn from green to red -- that's when they're sweetest and so delicious to eat in so many ways. One of my favorites is this gratinéed recipe. Just take out the core and inner white ribs, then cut the peppers in thirds -- quarter them if they're large. 
Mix the bread crumbs, parmesan cheese, olive oil and seasonings. Cook the peppers without the gratinéed mixture first for half an hour, then remove from the oven and fill with the bread crumb mixture.
Place the pan back in the oven for another 15 minutes, or until the crumbs start to turn golden. 
These are delicious as a side dish, or even as a first course. 
Now for the giveaway and the reason -- I'm celebrating 15 years of blogging!! Woohoo! It's hard to believe I've been at this so long, but initially I started it as a way to archive family recipes. But it's become a whole lot more through the years. Yes, most of the recipes are Italian-influenced, but there are plenty of other recipes too. And through the blog, I've made friends from across the U.S. and the world -- a real bonus. Though I don't post as frequently as I used to (life has a way of interfering), I'm planning to get back to posting once every week or so when the summer fun with family and friends tapers off.
You'll be more likely to see what I'm up to on a daily basis on my Instagram account, where it's so quick and easy to post.
I sometimes wonder whether anybody still reads my blog on a regular basis. Are we food bloggers relevant any more, now that so many other platforms have emerged? 
In any event, I thought I'd gift one faithful reader with a thank you for staying with me through the years. Some of you know I like to paint, and I've been focusing more on watercolors this summer. I haven't had a chance to get back to my oil painting in the last couple of months with so much travel and visitors taking priority.
But I painted a series of peppers a while ago, and I'm happy to part with this 8" x 8" framed, original oil painting of a red pepper, to one of you.
All you have to do is subscribe to my blog (if you haven't already - it's easy - just enter your email address in the "subscribe" box. ) Then leave a comment on the blog with an email address for me to contact you if you're chosen. (by the random computer-generated method). Follow Ciao Chow Linda on Instagram too (click here) for an extra chance to win. And for three chances to win, follow my art page on Instagram here. Buona fortuna.

Click here to connect with me on Instagram and find out what’s cooking in Ciao Chow Linda’s kitchen each day (and more)

Gratinéed Red Peppers


Ingredients
3 medium size red peppers
1/4 cup bread crumbs
3 tablespoons parmesan cheese
4 tablespoons olive oil
salt, pepper to taste

Directions
Core the peppers and remove the white ribs.
Cut the peppers into thirds (or quarters if large) and place on a pan smeared with olive oil.
Drizzle a little olive oil over the peppers, then sprinkle with salt and pepper.
Bake the peppers at 375 degrees for 1/2 hour.
Meanwhile, prepare the filling by mixing together the bread crumbs, parmesan cheese, olive oil, salt, pepper and thyme.
Divide the filling among the peppers and bake for another 15 minutes or until lightly browned.


Monday, January 25, 2021

Easy Sheet Pan Sausage Dinner

Some days you just don’t feel like fussing too much but want a good, home-cooked meal. This one, that takes just a half hour’s time from start to finish, fits the bill perfectly. In addition to Italian sausage, I choose to add fennel, one of my favorite vegetables, plus small Yukon gold potatoes, red peppers and onions. Everything gets tossed into a sheet pan, drizzled with olive oil, salt and pepper and roasted at 450 for 30 minutes. I was inspired to make this after seeing a post from my friend Stacey, who used cabbage with the sausage, which also works really well.  Feel free to use cabbage, fennel, peppers, mushroom chunks or even Brussels sprouts. They would all taste great with the sausage.

Stacey also made a mustard sauce that paired well with the sausages, so I followed her lead. I didn’t use the soy sauce the recipe called for, but it was delicious anyway with just the other ingredients. Even though we’re just two people at dinner these days, I always cook at least five or six sausages. We normally finish all the vegetables, but there are always a couple of sausages left over that make great lunch sandwiches the next day. Forget corned beef and cabbage that’s boiled to death — this is so much better – and a dish you’ll want to make again and again. Beer optional, but highly recommended.

Click here to connect with me on Instagram and find out what’s cooking in Ciao Chow Linda’s kitchen each day (and more)

Easy Sheet Pan Sausage Dinner

Ingredients
  • Five or six large links of Italian sausage
  • vegetables of your choosing:
  • small Yukon gold potatoes
  • onions
  • fennel
  • red peppers
  • cabbage
  • Brussels sprouts
  • olive oil
  • seasoned salt (I make this every year by drying my fresh herbs and mixing with Kosher salt)
  • freshly ground black pepper
  • FOR THE SAUCE:
  • 1 tbsp apple cider vinegar
  • 1 tbsp grainy mustard
  • 1 tbsp Dijon mustard
  • 1 tbsp honey
  • 1 tsp soy sauce
  • 3 tbsp olive oil
  • sea salt & pepper
Instructions
  1. Preheat oven to 450 degrees Fahrenheit
  2. Place the sausage in a large pan.
  3. Slice the potatoes in half and place them cut side down on the pan so they will brown well.
  4. Slice the red peppers in large pieces and scatter around.
  5. Cut the fennel into large chunks an place on the pan.
  6. Cut the cabbage into quarters and place on the pan.
  7. Drizzle a little olive oil on everything (not too much because the sausage will release some oil too).
  8. Sprinkle some seasoned salt and pepper over everything.
  9. Roast in the oven for 30 minutes, flipping everything after 15 minutes.
  10. Meanwhile, while the dinner cooks, make the sauce by combining all the ingredients and whisking together.
  11. Serve separately on the side, or drizzle over everything if you prefer.


Monday, October 9, 2017

Stuffed Peppers

When your garden gives you a bounty of peppers, it’s time to get stuffing.
We left most of this year’s peppers on the plant until they turned from green to red, imparting more sweetness as they ripened.
With these four peppers, you can feed eight people, provided you have another side vegetable, like corn, as I did, or a salad.
Of course, that’s assuming you have a normal appetite.
But if eating a whole pizza by yourself is normal for you, then you’ll want two halves per person.
The stuffing is mostly ground beef, but with a bit of brown rice and some tomato sauce mixed in to give it a little more flavor. The peppers release a lot of water after they’ve been cooking a while, but I give it a head start by pouring in a small bit of water on the bottom before covering the whole thing with aluminum foil. It also means you don’t need to grease the pan.
Bake covered for a half hour, then remove the cover and bake for another half hour. If there’s too much water on the bottom, remove the peppers and drain most of the water.
Near the last ten minutes of cooking, top with more sauce and slices of fontina cheese and place back in the oven to melt.
Serve with another vegetable, like corn on the cob, green beans, or a salad, for a complete meal.
Want more Ciao Chow Linda? Check out my Instagram page here to see more of what I’m cooking up each day.
You can also connect with Ciao Chow Linda here on Facebook, here for Pinterest or  here for Twitter.
Stuffed Peppers
Cuisine: Italian
Author: Ciao Chow Linda
Ingredients
  • Stuffed Peppers
  • 4 large red (or green) peppers
  • 1/2 cup raw brown rice, cooked in 1 1/2 cups water (I use short grain brown rice)
  • 1 egg
  • 1 large shallot
  • 1 large clove garlic
  • 2 T. olive oil
  • 1 1/2 pounds ground beef
  • 1/4 tsp. salt
  • pinch black pepper
  • 2 T. minced parsley
  • 3/4 cup grated parmesan cheese
  • 1 1/2 cups shredded fontina cheese, plus a little more to place on top
  • 1 cup tomato sauce, plus another cup for pouring on top
Instructions
  1. Cut the peppers in half.
  2. Remove the ribs, drizzle a little olive oil on the inside and season with salt and pepper.
  3. Make the stuffing mixing all the ingredients, including 1 cup tomato sauce.
  4. Stuff the mixture into the peppers, and place in a casserole.
  5. Put a shallow amount of water on the bottom of the casserole and cover tightly with aluminum foil. Bake at 400 degrees for 1/2 hour.
  6. Remove the foil, and most of the water that will have accumulated on the bottom since the peppers will release a good amount in the cooking.
  7. Be careful not to burn yourself.
  8. Cover the peppers with tomato sauce and place back in the oven for another 1/2 hour.
  9. Remove from the oven and place a slice of fontina cheese on top.
  10. Place in the oven again for another five minutes or so until the cheese has melted.


Saturday, September 13, 2008

Ratatouille

Anyone who's ever eaten or made ratatouille has an opinion on what the dish should taste like and how it should be prepared. Let me just say there is no definitive version. There's only the version you like. The version I like? It spoke to me at a Provencal restaurant along the Mediterranean Sea nearly 25 years ago. "Use more olive oil," it said. "Use more red peppers," it said. So I listened. And I made it. But it wasn't the same. So I made it again. And again. And again. After years of trial and error, I finally figured out why I so loved that particular ratatouille in a little French village near the Italian border on that particular night. Yes, I liked the heavy hand the chef had taken with the olive oil, and yes I liked the abundance of red peppers. But it was technique as much as ingredients that made the dish special. The key to this particular recipe is layering. Don't just throw all the vegetables into the pot and expect it to transport you to St. Tropez. Read the instructions and you'll see what I mean.
This makes a great side dish, particularly with sausages or pork as a main course. But it's wonderful as a main course too, in individual casseroles topped with grated parmesan cheese and placed under the broiler for a few minutes. It's the next best thing to being in Les Baux.

Ratatouille

Serves six as a side dish or four as a main course.

I prefer more red peppers (a lot more) and zucchini and fewer eggplants than most ratatouille recipes, but you can substitute anything you like.

1 medium size yellow onion, chopped into small pieces
3 medium size zucchini, cut into chunks
1 medium size eggplant, partly peeled (I make "stripes" down the eggplant with a vegetable peeler) and cut into chunks
6 large red peppers, cut into chunks
8 cloves of garlic, minced
6 fresh plum tomatoes, or 1 28-ounce can tomatoes
3/4 cup extra virgin olive oil
1 tsp. freshly ground sea or kosher salt
1/2 tsp. freshly ground black pepper
1 1/2 tsp. herbs de provence

Saute the onions in part of the olive oil for about 10 minutes, or until translucent and golden. Remove the sauteed onions to a plate or bowl.
Add more of the olive oil and the zucchini. Saute for five minutes or just until the pieces begin to soften. Remove and place on a separate plate.
Add the peppers and saute for five minutes. Then add the onions and zucchini back into the pot with the peppers. Add the garlic and let it saute a few minutes.
Add the remaining olive oil and eggplant pieces. Saute all the vegetables together another five minutes at medium heat. (The eggplant should be added last since it will disintegrate into unrecognizable pieces if given the same cooking time as the other vegetables.)
If using fresh tomatoes, peel the skin ahead of time by placing in a pot of boiling water for a few minutes, then cut in half, clean out the seeds and dice the flesh. Add the tomatoes to the pot. If using canned tomatoes, do not use the liquid in the can at first. You can add it later if the mixture looks too dry.
Add the salt, pepper and herbs de provence and simmer at medium heat for 20 minutes with the lid off, to help evaporate some of the liquid.