Sunday, December 30, 2018

Polenta Breakfast Bake

I don’t know about you, but when I have overnight guests, I don’t generally leave them to fend for themselves when they wake up. At a minimum, if they’re early risers, I’ll show them where to find the coffee and cereal, of course, and have bagels and cream cheese, muffins or croissants available. More often than not, however, I’ll be up earlier than my guests, preparing pancakes, French toast, or eggs and toast for them.

But for special occasions, like Christmas Eve morning, when we knew we’d be eating only one other meal in the day, (albeit a Lucullan feast), I splurge and make a casserole like this polenta breakfast bake recipe from The New York Times. It’s hearty enough to hold everyone until the big meal later on and much of it can be ahead of time. The bacon can be cooked and polenta can be made on the stove top the day before, leaving only the assembly and final baking to be done in the morning while guests are pouring coffee or tea.

To make it easy for yourself,  buy instant polenta (please – NOT the already made polenta in a roll), and cook the bacon on a baking sheet in the oven. You can cook both of these the night before (or even two days before.) Just lay out the bacon strips on a baking sheet and cook at 400 degrees F. for about 10-15 minutes, or until it reaches the crispness you like. After you’ve made the polenta and added the cheese, pour it into a buttered casserole, and using a spoon or the bottom of a small bowl, carve out indentations for the eggs that you’ll crack into the spaces the next morning. Cover with plastic wrap or foil, and put everything in the refrigerator overnight. Just before you’re ready to bake the casserole, scatter some spinach leaves and bacon pieces here and there, and drop the eggs into the little spaces you created in the polenta. Sprinkle it all with parmesan cheese and bake until the desired level of doneness you prefer your eggs. I prefer the yolks to be slightly runny, but it’s difficult (at least for me) to get the whites thoroughly cooked without nearly overcooking the yolks. If you have a solution to that, let me know.

When you remove the casserole from the oven, scatter a few fresh basil leaves all around, and enjoy. We loved this as a breakfast treat, but I wouldn’t mind sitting down to this for lunch or dinner either.
I hope all my readers had a wonderful Christmas, Hanukkah, Kwanza or whatever holiday you celebrate. All my best wishes to you all for a healthy and delicious 2019.

Click here to find out what’s cooking in Ciao Chow Linda’s kitchen each day (and more).

Polenta Breakfast Bake
 
Author: The New York Times via Ciao Chow Linda
Prep time:
Cook time:
Total time:
Serves: serves 6-8
Easy and delicious, make-ahead, cheese polenta breakfast bake
Ingredients
  • 2 T. unsalted butter, plus more for greasing the casserole
  • 1 cup quick cooking polenta (NOT the kind already made in a tube)
  • 1/2 t. sea salt
  • 1 cup whole milk
  • 1/2 cup/2 ounces fontina or mozzarella cheese (I used about 3 oz. of a herbal Boursin cheese)
  • 5 ounces cooked bacon (or sausage, salami or ham) – optional
  • 1 cup spinach leaves
  • 6 large eggs (or 8 if your casserole is large enough)
  • 1/2 cup/2 ounces parmesan cheese
  • ground black pepper
  • 1/4 cup basil leaves to scatter
Instructions
  1. Heat oven to 400 degrees.
  2. Generously butter a 9 x 13 inch casserole and set aside.
  3. Cook the bacon in the oven on a baking sheet at 400 degrees for about 15 minutes or until crisp. (This can be done the day before.)
  4. Pour 4 cups of water in a large pot and gradually whisk in the polenta and salt.
  5. Cook, switching from a whisk to a wooden spoon, stirring constantly until the polenta bubbles and pulls away from the pan, about 3 minutes.
  6. Vigorously stir in the milk, butter and cheese until smooth and creamy. (It will seem loose.)
  7. Spread the polenta onto the bottom of the prepared pan.
  8. Using the back of a spoon, or a small bowl, make indentations in the polenta for the eggs.
  9. (The polenta can be cooked the day before.)
  10. When ready to bake, scatter some of the spinach over the polenta and crack the eggs into the wells.
  11. Sprinkle with parmesan cheese and bake until the eggs have reached the doneness you prefer.
  12. After 20 minutes, my whites were just cooked and the yolks appeared a bit runny. I would have preferred them runnier, but the whites took longer to set than the yolks.
  13. Sprinkle with black pepper, scatter some basil leaves over everything, and serve, with buttered toast made from good, sturdy bread.


Saturday, December 22, 2018

Sugar Cookie Christmas Tree

I know you’re all frantically trying to get everything done before Christmas, and may not have time to make this cookie Christmas tree, but you might want to tuck away this idea for next year, especially if there are kids in the family. This “Christmas tree” is composed of delicious sugar cookies, covered in royal icing, which acts as a sweet “glue” keeping the tower from toppling over.

I made a similar tree last year with the grandkids, cutting out templates for each size of the cookie layers with scissors and paper templates. Even though it was a little tedious to cut using a knife around pieces of paper instead of real cookie cutters, it all came together, and they were eager to dig into it, decorated with green frosting and red candies.

This year, however, I ordered cookie cutters online made just for such a project,  and it sure made things a whole lot easier. I decorated it only in white, using royal icing, and sparkly edible crystals to simulate the feeling of snow. I made the cookie cake in steps, so the job wasn’t so onerous, baking the cookies ahead of time and freezing them, then frosting and assembling the towering tree weeks later
Here’s a closer look at the layers, which you swivel to alternate the points, as you’re building the tree. The royal icing, made of egg whites and sugar, dries as hard as cement, but you might need to just steady each layer for a moment before moving to the next. Start by “glueing” the bottom layer to the plate so it doesn’t slip.
Before you know it, you’ll have a towering edible tree, that adults and kids alike will love. It may be hard to dig in and break up this beauty, but hey, you’ll be making a lot of people happy, and you can always make another one next year. 
I’m so fortunate to have so many family members sharing in the joy with me at Christmas time, including my 97-year-old father,  who still enjoys a good glass of wine (and still plays golf!),
and the newest and youngest member of our family – my two month old granddaughter, Aurelia. And we have another new granddaughter coming any day now, from my husband’s side of the family!! Our family has really grown in the last couple of years. I count my lucky stars every day!I hope you all have a wonderful Christmas holiday too, surrounded by good friends and family. Thank you to all my readers who followed me this year. I really appreciate your support. See you in 2019!


Buon Natale e felice anno nuovo!

Cookie Christmas Tree Recipe

5 cups flour

1 1/4 tsp. salt

3 sticks butter, softened

1 1/2 cups sugar

2 large eggs

2 tsps. vanilla

Beat the butter and sugar together at a medium high speed until pale and light, then beat in the eggs and vanilla. Reduce speed to low, then add the flour, mixing until well combined.

Form dough into four balls and flatten into disks. Keep each disk wrapped for about 1/2 hour or so.

Roll out a disk of dough onto a well-floured surface, about 1/4 inch thick. I found it easiest to roll onto parchment paper, especially for the large shapes, so I could easily transfer the parchment paper to the baking sheet without risk of ripping the dough. Cut the largest shapes first, and remove the excess dough from the parchment paper. Set that dough aside to reuse with other pieces later.

Keep cutting out the stars, using the largest shape cutters two or three times each, and some of the smaller shape cutters two or three times each, until you run out of fresh dough. Make more cookies, gathering the remaining scraps and reroll them, but try not to reroll more than once, or you’ll get a tougher cookie. 

Bake in a 350 degree oven about 10 to 12 minutes.

Royal Icing

3 egg whites

1 tsp. vanilla

4 cups confectioner’s sugar

Whip egg whites until frothy and add the vanilla, then the confectioner’s sugar, 1/2 cup at a time. Beat on high speed until the mixture is glossy and thick.

Pipe or spread some of the icing on the plate to secure the first star. Then pipe or frost some of the royal icing on the tips of each layer, sprinkling with decorations immediately. Once the icing dries, you won’t be able to sprinkle anything on top. Pivot the next cookie “star” so that the tips are in a different alignment than the layer below, frosting each tip and decorating with sprinkles. Continue doing the same until you reach the top, saving the smallest star for the top. You may have to hold the cookie tree at various levels for a few minutes if it feels like it’s going to topple, until the icing sets a bit. Once the royal icing sets, it is very secure.


Tuesday, December 4, 2018

Easy and Delicious Pandoro Christmas Tree

If you follow this blog, you know I’ve posted a recipe for a Pandoro Christmas tree dessert in the past, filled with either a chocolate mousse filling, or a lemon curd/mascarpone filling. You can view it here. They’re as easy as can be, since the cake itself –  a traditional rich, buttery Italian Christmas treat – is purchased. All you have to do is slice it, drizzle it with some liqueur (or a simple syrup), make the fillings, and assemble the cake.

Making the filling is the hardest part. But this year, I’m making it really easy on myself with a filling made from whipped cream and a boxed vanilla pudding mix. That’s right, I’m taking a shortcut, and I have to confess, I think it’s my favorite of all the ones I’ve made in the past. After all the work that’s required for the Lucullan fish feast we enjoy on Christmas Eve, this easily prepared dessert is a much needed way to present a delicious showstopper without too much fuss.

And while we’re talking about Christmas Eve, I was recently contacted by a local newspaper, whose reporter interviewed me for a feature on holiday food traditions. As a former journalist, I’m used to being the one doing the interviewing, but this time the tables were turned and the reporter asked me lots of questions. He wrote a really nice article about my family, that includes my recipe for stuffed squid, and a photo of my dad and husband, that you can read here. But little did I know that my photo would be plastered on the front page – bad hair day, wrinkles and all! Where’s Photoshop when you need it?

Anyway, back to regularly scheduled programming – and the easy Pandoro Christmas tree. Slice the cake into about seven even layers. If you’re serving it right away, dust the cake first with powdered sugar. It’s easiest to sprinkle on the sugar before you layer it and add the filling, so you can roll it on its side and get better coverage. But if you’re holding it to serve it a day or two later, it won’t matter because the sugar will dissolve into the cake.

Make the simple syrup and add the liqueur. I divided the simple syrup solution and in one I added rum. In the other I added Sambuca. I alternated flavors with different layers. If you don’t want to add liqueur, you can just the simple syrup without alcohol. The cake isn’t particularly dry, but I think it really benefits from some moistening, so don’t skip this step.

Make the instant pudding mix by mixing milk with the mix (using less milk than the box calls for, since you’ll be adding whipped cream. You don’t want it so soft that it pours out of the cake layers.) Fold in the whipped cream.

Spread some of the filling on each layer, placing each layer at a different angle from the prior one, so the tips are in different orientations.

Decorate the edges with berries and slice.

You can see, it holds together very well, even after it’s sliced. Naturally, the bottom slices will be larger portions than the top, so you’ll want to split those in half (or maybe not!)

I’m getting hungry for some again. Time to make another one.

Check out Ciao Chow Linda on Instagram here to find out what’s cooking in my kitchen each day (and more).

Easy and Delicious Pandoro Tree
Author: Ciao Chow Linda
Serves: at least 12 servings
Ingredients
  • 1 large pandoro cake
  • 1/2 cup sugar
  • 1 cup water
  • 2 Tablespoons sambuca or anisette
  • 2 Tablespoons rum
  • 1 5.1 oz. box instant vanilla pudding
  • 1 cup whipping cream
  • berries to decorate
Instructions
  1. Slice the pandora cake horizontally, in six or seven layers.
  2. Make a simple syrup by heating the water and sugar together until the sugar dissolves.
  3. Let the syrup cool, then divide in two and put the sambuca in one half, and the rum in the second half.
  4. Make the box of instant, mixing it with only 2 cups of milk instead of the 3 cups per instructions on the box.
  5. Whip the 1 cup of cream until soft peaks, then fold the whipping cream into the instant pudding.
  6. Drizzle some of the simple syrup on each layer of the cake, following by some of the pudding/whipped cream mixture.
  7. Continue with the rest of the layers, pivoting each slice so that the points are arranged in a star-like fashion.
  8. Finish by sprinkling with powdered sugar, and decorating the tips with berries.
  9. Optional, find a nice star at a craft shop for the very top.

Monday, November 26, 2018

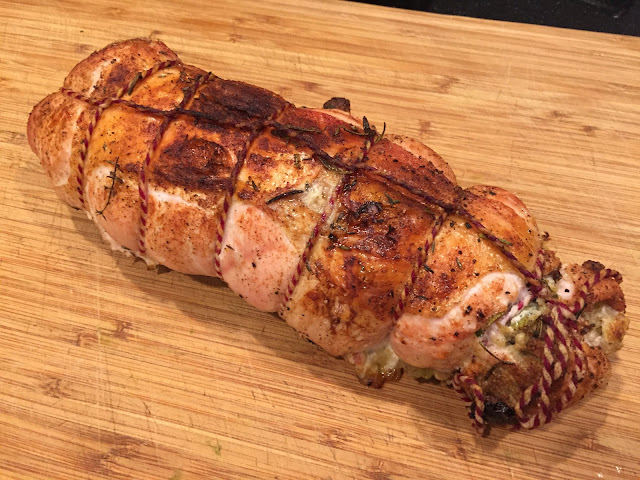
Turkey Roulade

Maybe you’re “turkeyed-out” after the Thanksgiving holiday, but not me. I didn’t have the traditional bird on the big day. Instead, I was tempted by too many other offerings at Commander’s Palace, a landmark restaurant in New Orleans. My husband and I spent a few days in New Orleans during the holiday week, visiting relatives and expanding our waistlines. (Those of you who follow me on Instagram saw photos of lots of the food we ate, plus the wacky hats and costumes people wore at the racetrack on turkey day).  We ate so many delicious meals at so many wonderful restaurants each day, recommended by my husband’s son and wife, who moved there from New York a couple of years ago.

As much as I love dining out, I also missed the smells and tastes of a good old-fashioned turkey dinner. So after returning home, I restocked at the grocery store yesterday and made a scaled-down version of a Thanksgiving meal for the two of us last night. Instead of a full turkey, I bought a boneless turkey breast and stuffed it with a sausage/dried cherry/pecan stuffing. It was a lot easier to prepare than you’d think (and way easier than cooking a whole turkey) and would make a great meal for company around the Christmas holiday too.

Start out by preparing the stuffing. I used a mixture of bread cubes, cooked and crumbled Italian sausage, dried cherries soaked in rum, toasted pecans, eggs, plus some fresh herbs and spices. If you don’t like dried cherries, use whatever dried fruit you like – cranberries, apricots, or figs for instance.) Don’t like pecans? Then use walnuts, pine nuts or hazelnuts instead.

I bought a turkey breast that weighed 1 1/2 pounds and when stuffed, could easily serve four people (maybe five, depending on appetites). Make sure you buy a breast with the skin still attached.

The breast is too thick to stuff, so you have to do a little prep work. It’ll take you only five minutes to complete.

Slice the breast parallel to the counter surface, so that the meat opens like a book. It’s still too thick at this point, so use a mallet (first cover the meat with plastic wrap) and pound it flatter.This is how mine looked after pounding, and sprinkled with salt and pepper. Be mindful that the skin that was on the meat before you started pounding it, will now be on only a small part of the meat after you’ve pounded it. Here you can see it sticking out at the bottom of the meat. So when you start rolling it up, start from the side that doesn’t have the skin. Spread the filling around the surface and dot with a little bit of butter. Roll it up, starting with the length of meat that doesn’t have any skin attached to it. You’ll want the skin to end up on the outside, so if you started with rolling up where the skin is, you’ll have the skin inside the meat, which you don’t want. I hope that’s not too confusing. The skin is right where it should be when you flip it over. Tie it up well with butcher’s string so that it stays together when roasting.

Then season with with salt, pepper, paprika, some thyme and rosemary (the fresh herbs actually burned midway through the roasting, so I’m not sure I’d do that again). Scatter some onions all around, then pour in some white wine (I would have added some chicken broth too, but I didn’t have any). 

Drizzle some olive oil over the onions and the meat and roast at 400 degrees for about 50 minutes, or until a meat thermometer registers 150 degrees. Actually, when the thermometer reads 140-145 degrees, take it out, since it needs to rest about ten minutes and the temperature will continue to rise a bit when it’s resting. Remove the twine and slice.

Enjoy! Happy Belated Thanksgiving. Hope you had a wonderful time with family and friends.

Check out Ciao Chow Linda on Instagram here to find out what’s cooking in my kitchen each day (and more).

Turkey Roulade
Author: Ciao Chow Linda
Serves: serves 4-5
A boneless turkey breast, rolled and stuffed with sausage, pecans and dried cherries.
Ingredients
  • 1 boneless turkey breast, with skin on (about 1 1/2 pounds)
  • 1/4 cup dried cherries
  • rum, to cover the cherries
  • 1/2 cup toasted pecans
  • 1 link of Italian sausage
  • about 1/2 cup diced onion
  • 1/4 cup diced celery
  • 2 eggs, lightly beaten
  • 3 cups bread cubes
  • about 4 tablespoons melted butter
  • salt, pepper
  • fresh sage and parsley, minced
  • 2 onions, cut in large chunks
  • olive oil to drizzle
  • 1 cup white wine, or chicken broth, or a combination of the two
Instructions
  1. Start by soaking the dried cherries in rum.
  2. Melt one tablespoon butter in a sauce pan and add the onions and celery.
  3. Sauté until wilted, then add the sausage and crumble with a spoon.
  4. When sausage is fully cooked, add it and the onions to a bowl.
  5. Drain the cherries from the rum and discard the liquid.
  6. To the bowl with the sausage, onions and celery, add the cherries, the bread cubes, the eggs, the toasted pecans and seasonings.
  7. Melt the remaining butter and add to the bowl and mix well.
  8. Slice the turkey breast open like a “book.”
  9. Using a mallet, pound it flatter, using plastic wrap to protect the meat.
  10. Spread the stuffing over the meat , adding a couple of pats of butter.
  11. Roll up the meat, making sure you end up with the skin on the outside.
  12. Tied it with butcher’s string to hold everything in place.
  13. Place in a roasting pan and roast at 400 degrees for 50 minutes to one hour, or until a thermometer reads about 140 – 145 degrees.
  14. The temperature will continue to rise for a short while and should reach 150 degrees.
  15. Let the meat rest, covered with aluminum foil, for at least ten minutes.
  16. Slice and serve.


Monday, November 19, 2018

Eggplant Parmigiana

I’ve been making eggplant parmigiana for decades, and if you’re like me, you’re making it the way most people (and cookbooks) instruct you to do, that is, frying the eggplant after coating the slices separately in flour, beaten eggs and then bread crumbs. The eggplant tastes great when it comes out of the fryer, with its crunchy coating and makes a delicious side dish as is.  But why fry it crispy, only to coat it in layers of tomato sauce and cheese, that will in essence, render the crispy eggplant completely soggy?

It’s only in the last couple of years that I’ve said “arrivederci” to the three step process of coating eggplant slices for parmigiana in favor of grilling eggplant for this classic casserole instead. You don’t have to  use an outdoor grill – a stovetop grill pan works just fine.

This method of making eggplant parmigiana is easier, and much lighter, and closer to the way it’s served in Italy. I recently made a couple of casseroles of this for a party, and everyone went back for seconds. I don’t think I’ll go back to the triple coating and frying method again – unless it’s to serve them straight out of the fryer as a side dish. 

Place some tomato sauce on the bottom of an ovenproof dish (I use a very basic marinara – no meat, and it’s better if it’s a little on the thin, or runny side since it thickens up when it bakes with the eggplant and cheeses). 

Layer with slices of eggplant, shredded mozzarella and parmigiana cheese. Continue for two or three more layers, depending on how much eggplant, sauce and cheese you have. When you’ve used the last of your eggplant slices, cover them with more tomato sauce and cheese and place in the oven.

Bake at 375 degrees until bubbly hot and browned on top. If needed, crank the oven temperature to 425 degrees for the last five minutes, but keep a close watch on it because it can easily burn,

Check out Ciao Chow Linda on Instagram here to find out what’s cooking in my kitchen each day (and more).

Eggplant Parmigiana
Cuisine: Italian
Author: Ciao Chow Linda
Grilling eggplant, instead of breading and frying, leads to a much lighter eggplant parmigiana.
Ingredients
  • Two large eggplant
  • about 1 – 2 cups tomato sauce (on the thin side because it will thicken in the oven)
  • olive oil to coat the eggplant slices
  • salt, pepper
  • seasoned salt
  • dried basil
  • 1 cup grated mozzarella cheese
  • 1 cup grated parmesan cheese
Instructions
  1. Peel the eggplant, but not entirely.
  2. Peel “stripes” in the eggplant, so some peel remains.
  3. Drizzle olive oil over the slices, and season with salt pepper, (herbed salt if you have it) and dried basil.
  4. Use an indoor grill pan to grill the eggplant slices (I don’t like using an outdoor grill for this recipe since I don’t want a “smoky” flavor).
  5. Remove the eggplant slices when cooked through, and set aside.
  6. Spread some tomato sauce in a casserole and place a layer of eggplant slices over the sauce.
  7. Spread with a layer of the mozzarella cheese, then a layer of the parmesan.
  8. Repeat with more sauce, another layer of the eggplant and cheeses
  9. If you have enough eggplant, make a third layer, even if it’s only a partial layer, in order to use up the rest of the eggplant.
  10. Bake at 375 degrees for 25-30 minutes, or until the cheese is golden.
  11. If the top is still not golden, turn the heat up higher to 425 degrees, but keep a close watch so it doesn’t burn.


Monday, November 12, 2018

Upside Down Apple Cake

What? Another apple cake recipe, when there seem to be a plethora of them at this time of year? Well yes, because A) Like cheesecake, you can never have enough apple cake recipes and B) This one is an upside-down apple cake, a cake oozing with sticky, buttery and sugary goodness that I can’t get enough of.

If you’ve followed my blog over the years, you know I’ve made upside-down cakes using lots of different fruits, including the classic pineapple, but also pears, figs, blood oranges, plums, cranberries, peaches, and there are still more to try.

This cake would make a nice addition to the traditional pumpkin pie on your Thanksgiving table, too. I made it twice in the last week or so, once with walnuts added (top photo) and the second time without walnuts, (photos below) but with an extra caramel sauce drizzled on top. It doesn’t really need either item, but the caramel sauce helped disguise a crack in the center of the cake after I flipped it too vigorously onto the plate.

And speaking of the plate, isn’t she a beauty? That two-toned blue and beige platter was made by a friend of mine – a gifted potter named Jacalynn McCord. I hadn’t seen her since we graduated from high school eons ago, but we recently reconnected at a reunion and had a blast catching up. Back when Cher was still not allowed to show her naval on TV,  Jackie and I (along with some other classmates) were members of a folk-singing group. We played the world-famous nursing home/bar mitzvah circuit, singing covers of Joan Baez and Bob Dylan songs – and even cut a record! But that was two or three lifetimes ago.

Jackie went on to study art and become a talented potter and runs a business called Lion Paw Pottery. The name derives from her alma mater, Penn State University, whose mascot is the Nittany Lion. Many, but not all, of her designs feature lion paw prints (for those diehard PSU fans) and she’ll custom-make an item too. You can peruse her website here.  I think her platter shows off this cake beautifully, and I’m sure you readers will be seeing it on future posts featuring other foods as wellJust a word about the cake – It’s delicious at any temperature, but best the day it’s made, and when it’s warm from the oven, it’s irresistible.

Upside Down Apple Cake

Author: From Delish.com
Ingredients
  • FOR THE APPLES:
  • 3/4 cup lightly packed brown sugar
  • 1/4 cup butter
  • 1 tsp. vanilla extract
  • 1/2 tsp. cinnamon
  • pinch kosher salt
  • 2 apples, peeled, cored and sliced 1/2″ thick
  • FOR THE CAKE:
  • 1 3/4 cup all-purpose flour
  • 3/4 tsp. baking powder
  • 2 tsp. ground cinnamon
  • 1/2 tsp. kosher salt
  • 1/4 tsp. ground nutmeg
  • 1/2 cup (1 stick) butter softened
  • 1 cup sugar
  • 1/2 cup lightly packed brown sugar
  • 2 large eggs
  • 1 tsp. vanilla extract
  • 3/4 cup milk
Instructions
  1. Preheat oven to 350 degrees and grease with butter and dust with flour an 8″ round cake pan. (I used a springform pan, but some of the butter leaked causing spillage in the oven. If you use a springform pan, place it on a cookie sheet with a sheet of aluminum foil, or parchment paper underneath it.)
  2. In a small saucepan over medium heat melt brown sugar, butter, vanilla, cinnamon, and salt.
  3. Cook until slightly thickened, about two minutes.
  4. In a large bowl, whisk together flour, baking powder cinnamon, salt and nutmeg.
  5. In another large bowl, using a mixer, beat together butter and sugars until softened.
  6. Add eggs one at a time. then add vanilla.
  7. Add half the dry ingredients to wet ingredients, beating until just combined.
  8. Pour in milk and mix until fully incorporated.
  9. Add remaining dry ingredients and stir until just combined.
  10. Pour batter over apples and bake until a toothpick inserted into the middle comes out clean 1 hour.
  11. Let cool in pan 15 minutes, then invert onto a cooling rack and let cool completely before slicing.


SaveSave

Monday, November 5, 2018

Chicken Involtini in Lemon/Wine Sauce

Tired of boring, dried out chicken breasts? Here’s a way to pack some flavor into these bland cuts of meat and keep them moist at the same time. Start out with a couple of skinless, boneless chicken breasts and cut each one in half, then pound them with a meat mallet between sheets of waxed paper, to make them as even as possible.
Next, spread some seasoned bread crumb filling on each one, topping with small bits of butter, less than one tablespoon for all four pieces.
Secure with toothpicks and mix the ingredients for the liquid – chicken broth, white wine, lemon juice and spices and herbs. Season with salt and pepper, and place a small pat of butter on each chicken piece – about one tablespoon divided among the four pieces. Cook for only about ten minutes.

Doesn’t look like much yet. But just wait. 

Top it with the reserved bread crumb mixture and place back in the oven for another five minutes, or until the topping is browned.

Reduce the sauce on the stove top if it’s too liquidy, but the bread crumbs do get absorbed and thicken the sauce. Serve the involtini with some of the sauce and enjoy!

Chicken Involtini

Author: adapted from “Lidia’s Italian American Kitchen”
Ingredients
  • 2 boneless, skinless chicken breast halves (about 5 ounces each)
  • 1/4 cup fine, dry bread crumbs
  • 1/8 cup extra-virgin olive oil
  • 2 Tablespoons chopped fresh Italian parsley
  • 1 teaspoon dried oregano, preferably the Sicilian or Greek type, dried on the branch, crumbled
  • salt, pepper to taste
  • 2 tablespoons butter
  • 1/2 cup dry white wine
  • 1/4 cup chicken stock
  • 1/8 cup fresh lemon juice
  • a sprinkle of crushed hot red pepper
  • 2 cloves garlic, peeled
Instructions
  1. Cut each chicken breast half in half crosswise to yield two pieces of roughly equal size.
  2. Place a piece of waxed paper over each piece , and pound with a meat pounder or mallet to flatten slightly.
  3. Toss the bread crumbs, 2 tablespoons of the olive oil, 1/2 teaspoon of the oregano and salt, in a bowl until blended.
  4. Sprinkle each chicken breast with salt and pepper to taste, and spread with a bit of the bread crumb mixture, reserving half the crumbs.
  5. Roll each chicken piece, securing them with a toothpick.
  6. Preheat the oven to 475 degrees.
  7. Arrange the filled chicken breasts in an ovenproof baking dish.
  8. Stir the wine, stock, lemon juice, hot pepper, the remaining olive oil and oregano and some salt and pepper to taste in a small bowl.
  9. Pour into the baking dish. whack the garlic cloves with the flat side of a knife and scatter them along the chicken pieces.
  10. Bake 10 minutes.
  11. Top the chicken with the butter, the remaining bread crumb mixture.
  12. Return to the oven and bake until the bread crumb topping is golden brown, about 5 minutes more or so.
  13. Remove the casserole from the oven, and if it is flameproof, put it over a medium high heat on the range to thicken and reduce the pan juices, adding more parsley.
  14. If the casserole is not flameproof, remove the chicken pieces and keep warm.
  15. Place the liquid in a pot, then reduce over a medium high flame.
  16. Serve the chicken pieces, removing the toothpicks and spreading the sauce around the chicken, in order to keep the topping crunchy.


Tuesday, October 23, 2018

Chocolate Coconut Tart

Whenever I’m in Italy and the mood for gelato strikes (ok, let’s get real – when doesn’t the mood for gelato strike?), I’m likely to get a flavor that’s called “Bounty” –  coconut ice cream punctuated with small chocolate bits. It’s named for the eponymous candy bar available there, but here in the states, there is a similar candy bar called “Mounds.”

A few years ago I ate a slice of cake in Bellagio that had the same flavor profile, and I was determined to duplicate it at home.

I finally got around to it recently, and while I’m not sure it’s exactly the same, it’s really, really good, especially if you’re a dark chocolate and coconut lover, as I am.

I made two of the cakes, one half the size of the original one, since I was serving the larger one to my Italian chit-chat group and wanted a second, small one to serve guests after dinner the following night. A bit of gold leaf on top makes a nice decoration, but so would a simple dollop of whipped cream.

If you’re making just one tart according to the recipe below, the coconut layer will be thicker than in the photos above, since I made 1 1/2 times the amount of the chocolate cake part, but I spread the coconut quantity over the two cakes (the larger and the smaller version.) I hope that makes sense to you. If you’re still confused, send me an email and I’ll try to explain it better.

Just a word of caution – the chocolate ganache will not stay this glossy if you refrigerate the cake. So if you want to serve it with that sheen but want to make the cake ahead of time — just make the cake without the ganache and place it in the refrigerator (still in the springform pan), then a few hours before you want to serve it, remove from the refrigerator and top it with the ganache while in the springform pan. Let it sit for 5-10 minutes for the ganache to solidify, then release the side of the springform pan. Don’t refrigerate it again or you’ll lose the sheen.

Enjoy! It’s almost like eating a chocolate covered, coconut-cream Easter egg.

Chocolate Coconut Tart (Bounty Torta)

Recipe Type: dessert
Author: Ciao Chow Linda
A rich, brownie-like cake, with a coconut layer and a topping of chocolate ganache.
Ingredients
  • FOR THE CHOCOLATE CAKE LAYER:
  • 1/2 cup unsalted butter melted.
  • 3/4 cup white sugar.
  • 2 eggs lightly beaten.
  • 1/2 tsp. vanilla extract
  • 2 Tablespoons espresso coffee
  • 1/3 cup unsweetened cocoa powder.
  • 1/2 cup flour.
  • 1/4 teaspoon salt.
  • 1/4 teaspoon baking powder.
  • FOR THE COCONUT LAYER:
  • 12 oz sweetened condensed milk (I think the can was closer to 14 ounces)
  • 2 1/2 cups unsweetened coconut flakes
  • FOR THE CHOCOLATE GANACHE:
  • 1/2 cup whipping cream
  • 4 oz semisweet chocolate
Instructions
  1. FOR THE CHOCOLATE CAKE LAYER:
  2. Mix sugar and melted butter, with a wooden spoon. Add the rest of the ingredients and mix well. Pour into a greased 9 inch springform pan and bake for 25 minutes at 350 degrees.
  3. FOR THE COCONUT LAYER:
  4. Put the coconut in a food processor and shred into small bits.
  5. Add the condensed milk and combine.
  6. When cake is cooled, spread coconut layer on top.
  7. It will be very dense.
  8. FOR THE CHOCOLATE GANACHE:
  9. Heat cream and remove from heat.
  10. Add chocolate.
  11. Let sit for a few minutes then stir to blend.
  12. Pour chocolate over coconut layer a couple of hours before you serve it and leave it out at room temperature in order to keep the chocolate glossy.
  13. You can refrigerate it if you want, but it will lose some of its gloss.
  14. Remove the ring from the springform pan, and serve.


SaveSave

SaveSave

SaveSave

SaveSave

SaveSave

SaveSave

SaveSave

SaveSave

SaveSave

SaveSave

Thursday, October 11, 2018

Lemon Sole in Browned Butter

When I feel like having fish for dinner, I never know what I’ll choose until I get to the store and see what looks freshest. On this particular day, the lemon sole at the fish market was particularly appealing – good size filets that were white as snow and looking quite firm and fresh.

Flounder or fluke, caught in the Atlantic Ocean, are also delicious in this recipe, although they’re not as delicate as sole. However, on my first ever deep sea fishing trip recently, I caught a large fluke that also turned out to be the biggest catch on board that day. So I not only hauled in a great meal, but also the cash prize (the pool) for the largest fish caught. I don’t know how much it weighed, but it was big, as you can see from the photo, and we enjoyed two meals from it.

I didn’t get good photos of our meal that night, so when I saw the beautiful lemon sole for sale at the fish market, I knew I wanted to try to capture better photos and write a blog post about this recipe. Incidentally, if you’re puzzled as to what’s the difference between flounder and fluke, click here to decipher it. I’m still confused, but as long as they both taste good, who cares?

If you’re looking for a quick and delicious way to enjoy fish filets, with this recipe, you can be eating diner in ten minutes from start to finish. Start by seasoning the filets with salt and pepper, then dredging them (and shaking off the excess) then sautéing them in some olive oil and butter. Brown on one side, then carefully flip over and do the same on the other side.

Meanwhile, sauté the slivered almonds until they’re a toasty golden brown, and make the brown butter sauce, keeping a close watch on it so it doesn’t burn.Place the filets on a platter, then pour the sauce onto the fish through a sieve, so you don’t get any of the dark solid bits that settled on the bottom of the saucepan. Scatter the toasted almonds on top, and a little parsley. If you’ve got lemon balm, try it instead of parsley in recipes like this one. It grows like a weed in my garden and comes back each year with a vengeance. I’m forever finding it springing up in beds all over the yard, where I yank it out, but I try to keep a little patch going for culinary use.
And now — for what in the journalism business is called “burying the lede,” here’s the biggest news of the week.. the month… the year! –  the birth of my granddaughter, Aurelia Jean. Welcome to the world, amore.


Lemon Sole in Browned Butter
Author: Ciao Chow Linda
Ingredients
  • 2 pieces of filet of sole, or flounder, or fluke
  • flour for dredging
  • salt, pepper
  • 1 tablespoon olive oil
  • 1 tablespoon butter
  • 1/4 cup slivered almonds
  • FOR THE BROWN BUTTER SAUCE;
  • 3 tablespoons butter
  • juice of half a lemon
Instructions
  1. Make the toasted almonds first:
  2. Take the slivered almonds and put them in a saucepan on medium high heat without any butter or oil.
  3. (If you use butter, the solids will turn brown and make the almonds look “dirty.”
  4. Toss the almonds in the pan until they are light golden brown. They will burn quickly so don’t leave the pan for a second.
  5. Remove the almonds to a clean plate, while you cook the fish and make the brown butter sauce.
  6. Sprinkle the filets with salt and pepper, and dredge them in flour, shaking to remove the excess.
  7. There should be just a light coating of flour.
  8. In a frying pan, melt the butter and add the olive oil.
  9. When they have reached a sizzle, turn up the heat to medium high, and add the filets.
  10. Cook for just 2-3 minutes until the bottom has turned a light golden brown.
  11. Carefully flip and repeat on the other side.
  12. To make the brown butter sauce, place the butter in a saucepan and turn up the heat to medium. Melt the butter and let it continue to sizzle in the pan. Be careful to keep a close watch on it, because it can go from yellow to dark brown in an instant.
  13. When it is a golden brown color, turn off the heat and add the lemon juice.
  14. Pour over the cooked fish, using a strainer to eliminate any dark solid bits.
  15. Sprinkle the almonds over the cooked fish, and some parsley (or lemon balm) and serve.


SaveSave

SaveSave

SaveSave

SaveSave

SaveSave

SaveSave

SaveSave

SaveSave

SaveSave