Tuesday, May 26, 2020

Very Berry Crostata

With all sorts of berries coming into season right now in the Eastern U.S., it’s time to make this tart. Two extra containers of blackberries were unexpectedly included in my last food delivery, so I had plenty to make this tart. I actually made it twice — the first time with a purchased puff pastry shell, and the second time with this dough recipe, from Domenica Marchetti. We liked the crostata made with puff pastry well enough, but the texture of the crust with Domenica’s recipe was so far superior, retaining its crispness on the bottom after baking, that I doubt I’ll use the puff pastry again for a crostata. Plus the flavor, with its touch of lemon, is better with Domenica’s recipe. Her recipe makes enough for two crostate, tarts or pies, so keep one tucked away in the freezer. By the way, a crostata in Italy is generally presented as a tart with a lattice crust, as in this recipe for fig crostata, but many recipe writers use the term interchangeably with galette, the French word for a rustic, open-faced tart. If you’re inclined to call it a galette, go right ahead, but I gravitate to the Italian word whenever given the choice.

Roll out one half of the dough to a diameter of about 16 inches. Don’t worry if it’s not a perfect circle, just get it close enough, then slide it onto a Silpat- or parchment paper-lined cookie sheet. I put the cookie sheet in the refrigerator in the 15 minutes it took to prepare the fruit, to help the butter bits chill and solidify, making for a flakier crust.

Sprinkle the toasted almonds over the center of the pastry. It helps as a barrier to keep the crust from getting soggy, but also adds more flavor and texture.  Mix the berries with sugar, lemon juice and cornstarch. Carefully place the fruit in the center of the crust, over the almonds, leaving a border of about two inches all around. Flip up the border, pinching it together all around the perimeter. Brush it with a liquid like beaten egg yolk or milk. I had buttermilk in the house, so I used that. Press some almonds all around the edges. Placement in the oven is very important in order not to have a soggy bottom. Place the crostata on the bottom rack of  a 375 fahrenheit degree oven for a half hour. Then remove it to the highest rack for another 15 minutes. You may get some spillage of the liquid, as I did, if any of the edges had a split, as happened when I poked my nail through the crust. Don’t worry about it though, there will be plenty of other juice within the crostata. After it has cooled, carefully slide it off the Silpat or parchment paper onto a serving dish. The fruit has a “dull” appearance when it comes out of the oven, but to give it a “glistening look,” melt a bit of quince or apple jelly and spread it on top of the fruit.

Sprinkle the edges with some confectioner’s sugar and dig in.

Click here to connect with me on Instagram and find out what Ciao Chow Linda is up to in the kitchen (and other places too.)

Very Berry Crostata
Author: Ciao Chow Linda
Ingredients
  • FOR THE PASTRY (Domenica Marchetti’s recipe makes enough for two crostate)
  • 2 1/2 cups unbleached all-purpose flour, plus more for dusting
  • 1/2 cup granulated sugar
  • Finely grated zest of 1 small lemon
  • 1 teaspoon baking powder
  • 1/8 teaspoon fine salt
  • 1/2 cup cold unsalted butter, cut into dice
  • 2 large eggs
  • FOR THE BERRY FILLING:
  • 4 cups fruit (I used two cups strawberries, and the rest a mix of blueberries and blackberries)
  • 1/4 cup slivered almonds, toasted, plus more for the top
  • 1/4 cup sugar
  • 1/2 teaspoon grated lemon peel
  • 2 tablespoons cornstarch
  • 1 tablespoon lemon juice
  • FOR THE TOP:
  • 1 tablespoon buttermilk, milk or beaten egg
  • slivered almonds
  • powdered sugar
Instructions
  1. In a food processor, combine the flour, granulated sugar, lemon zest, baking powder, and salt and pulse to mix.
  2. Add the butter and pulse until the mixture is crumbly.
  3. Add the eggs and process just until the dough comes together.
  4. Turn the dough out onto a lightly floured surface, divide it in half, and pat it into two disks.
  5. Wrap one half in plastic wrap and freeze for another use.
  6. Wrap the second piece and refrigerate it for 1 hour.
  7. Remove it from the refrigerator and roll it out to a diameter of about 15-16 inches.
  8. Carefully transfer the pastry to a Silpat- or parchment paper lined cookie sheet.
  9. Sprinkle the toasted almonds on the dough.
  10. Mix the ingredients for the filling and pile on top of the slivered almonds inside the dough, leaving a border of about 2 inches all around.
  11. Gather the border and crimp to encase the fruit.
  12. Spread some of the milk, buttermilk or beaten egg on the edges of the crostata.
  13. Sprinkle with slivered almonds.
  14. Bake on the lowest oven rack at 375 degrees for 30 minutes, then remove it and place on an upper rack for another 15 minutes.
  15. When it cools, spread a little quince or apple jelly over the fruit to make it glisten.
  16. Sprinkle the edges with a little powdered sugar.


Tuesday, May 19, 2020

Flank Steak with Chimichurri Sauce and Potato Salad

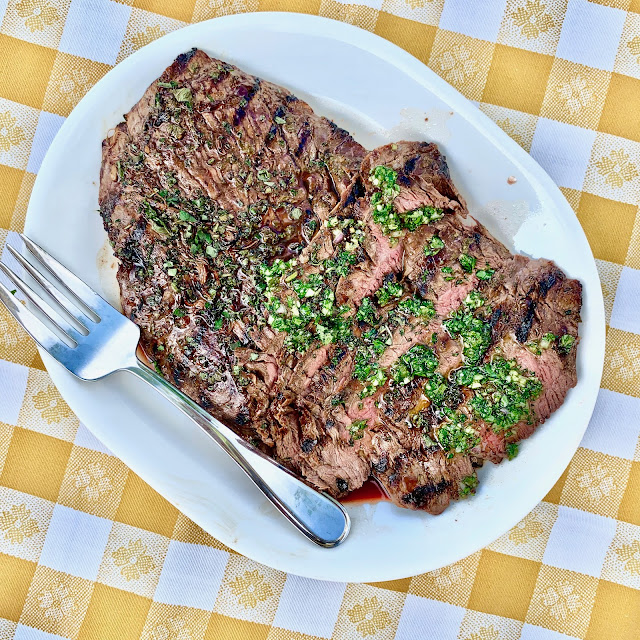
Grilling season is right around the corner, and while most of us aren’t likely to host a big gathering due to the Covid-19 pandemic, you can still enjoy a backyard barbecue with the friends and/or family who are in your bubble. If you haven’t got an outdoor grill, it’s just as easy to cook this on the stovetop, using a grill pan to get those characteristic marks and flavor. Flank steak is not a tender piece of meat, so you’ll need to marinate it first, for a minimum of a few hours, or overnight. Use a thermometer to test for the level of doneness you prefer — taking it off the heat about five degrees before the meat reaches the temperature you’re looking for. The meat in this post was cooked to about 125 degrees, then rested for a few minutes before slicing. While the meat rests, the temperature will rise a few degrees. Slice it thinly against the grain, on the diagonal.

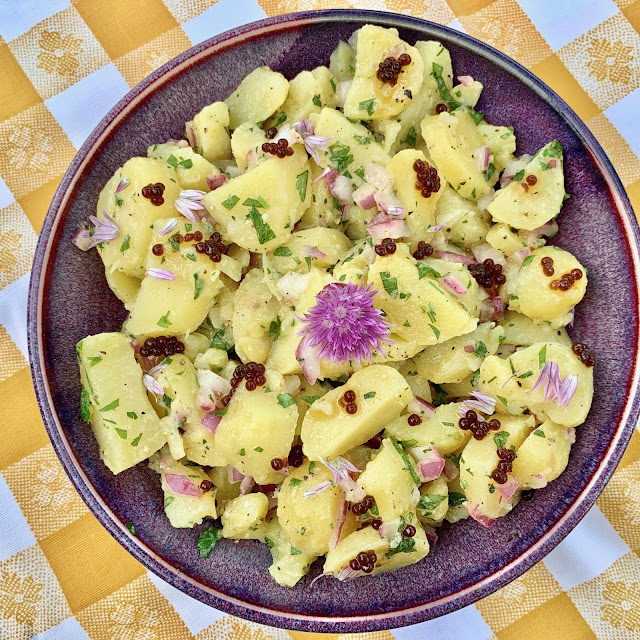
What’s the perfect side dish for your meat? Well, potato salad, of course. While I love potato salads of all kinds, I am partial to the ones with an oil and vinegar base, the way my mother used to make them when I was growing up. But inspired by my friend Marie, whose food is always tempting, I took a cue from her and made a dressing with lemon juice instead of vinegar, and using some “balsamic pearls” that were included in a food basket I won at a charity event. They are totally optional, and may be hard to find, but worth seeking for the unique look they add to the salad. Since chives are in full bloom right now, I added some chive flowers to the bowl too. For best results, use small yellow potatoes, like Yukon Gold, or fingerling potatoes, rather than the large starchy, baking potatoes.

Drizzle the chimichurri sauce over the meat for even more flavor, serve with the potato salad and a green vegetable and you’ve got a meal fit for company or a family backyard barbecue. The only thing missing is a bottle of good red wine. The recipes below will serve about six people, but if it’s just two of you, the leftovers are good the next day too. The meat is great served cold in a sandwich with the chimichurri sauce smeared on the bread, or made into a cold beef salad. If you get bored eating the potato salad a couple of days in a row, add it to some leftover vegetables and beaten eggs and turn it into a frittata. Leftovers never tasted so good.

Click here to connect with me on Instagram and find out what Ciao Chow Linda is up to in the kitchen (and other places too.)

Flank Steak with Chimichurri Sauce and Potato Salad
Author: Ciao Chow Linda
Serves: serves 6-8 people
Ingredients
  • FOR THE MEAT and MARINADE:
  • 2 lbs. flank steak
  • 2 limes, juiced
  • 1/2 cup orange juice
  • 4 cloves garlic
  • 1/4 cup fresh herbs, chopped (I used parsley and lemon balm, but have also used cilantro, which not everyone loves)
  • 1 teaspoon kosher salt
  • 1/4 teaspoon black pepper
  • 2 teaspoons chili powder
  • 1 teaspoon ground cumin
  • 1 teaspoon fresh oregano
  • 1/3 cup vegetable oil (I used olive oil)
  • 1 jalapeno pepper (I used some homemade candied jalapenos)
  • 2 tablespoons white vinegar
  • 2 tablespoons soy sauce
  • 2 tablespoons honey
  • FOR THE CHIMICHURRI SAUCE:
  • 1 shallot, finely chopped
  • 1 jalapeno pepper (I used some homemade candied jalapeƱos)
  • 4 garlic cloves, minced
  • 1/4 cup Italian parsley, minced
  • 1 teaspon kosher salt
  • 1/4 cup fresh oregano,( or if you prefer, cilantro)
  • 3/4 cup olive oil
  • FOR THE POTATO SALAD:
  • 2 pounds small yellow potatoes, like Yukon Gold
  • 1/4 cup minced red onion
  • 1/4 cup olive oil
  • 2 tablespoons lemon juice
  • 1 tablespoon Dijon mustard
  • about 1/4 cup parsley, minced
  • about 4 tablespoons chives, minced
  • chive flowers, optional
  • dark balsamic pearls, optional
Instructions
  1. Mix all the marinade ingredients for the meat and place in a container at least four hours ahead of grilling..
  2. Cook over an outdoor grill, or an indoor grill pan until the interior of the meat registers about 120-125 degrees F. for rare, 125-130 for medium rare and 130-135 for medium.
  3. Take it off the heat a few degrees before the desired temperature because it will continue to cook slightly as it rests.
  4. Let it rest for 5-10 minutes, then slice it thinly, against the grain, on the diagonal.
  5. Serve with the chimichurri sauce.
  6. FOR THE CHIMICHURRI SAUCE:
  7. Mix all the ingredients together and stir, then drizzle over the cooked meat.
  8. FOR THE POTATO SALAD:
  9. Boil the potatoes until tender, then drain and let cool to room temperature.
  10. Peel if desired, or leave skin on.
  11. Mix the dressing ingredients together with a fork or whisk, except for the chive flowers and the balsamic pearls.
  12. Toss the potatoes with the dressing.
  13. Place the salad in a serving bowl, and scatter the chive flowers and balsamic pearls on top.


Monday, May 11, 2020

Sausage, Potato and Cheese Savory Tart

A few weeks ago, my friend Lilli dropped off a piece of this savory tart in a “quarantine package” that also contained some of her biscotti — a recipe I posted more than a decade ago in the early days of my blog. It’s my favorite biscotti recipe of all time. Lilli hails from Salerno and is one of the best home cooks I know. Anytime she makes something, it’s always a hit, including this delicious tart. I made it myself over the weekend and my husband and I loved it. I can’t wait to make it for my Italian chit-chat group, when we can once again meet face-to-face for a “chiacchierata.”

The tart is easy to make, especially if you use a packaged pastry as I did. I chose to use puff pastry, but a regular pie pastry would also work just fine. Start by boiling a couple of large potatoes. Peel them, mash them with a fork and add some parmesan cheese and a beaten egg. Remove the skin from some Italian sausage and fry, then drain of any residual oil.

Crumble the sausage into the unbaked shell. You could choose a round tin, or pie plate if you prefer. Cover with shredded mozzarella cheese. Then take the potato mixture and using two teaspoons, place dollops on top of the mozzarella cheese. Bake at 350 degrees for 45 minutes, on the bottom rack of your oven, then turn on the broiler for a couple of minutes until the top is nicely browned.

Slice and serve with a salad for a complete meal. Or cut into smaller slices and serve as an appetizer.

 Click here to connect with me on Instagram and find out what Ciao Chow Linda is up to in the kitchen (and other places too.)

Sausage, Potato and Cheese Savory Tart
Author: Ciao Chow Linda
Ingredients
  • 1 sheet of puff pastry (or pie pastry)
  • 2 large potatoes, boiled and peeled
  • 1 egg
  • 1 1/2 cups parmesan cheese
  • 3/4 lb. – 1 lb. Italian sausage
  • 2 cups mozzarella cheese
Instructions
  1. Line a standard tart pan or pie tin with the pastry.
  2. Chill in the refrigerator while making the rest of the recipe.
  3. Boil the potatoes until tender and peel. Cut into chunks and place in a bowl, then mash with a fork. Beat the egg and when the potatoes have cooled a bit, add the beaten egg and the parmesan.
  4. Remove the casing from the sausage and break into pieces and fry in a bit of olive oil, cooking thoroughly.
  5. Drain the cooked sausage.
  6. Crumble the sausage into the pastry shell, then cover with the mozzzarella cheese.,
  7. Using two spoons, place dollops of the potato mixture over the sausage and cheese until the whole pan is covered.
  8. Bake at 350 degrees Fahrenheit for 45 minutes, then place until the broiler for a couple of minutes until nicely browned.
  9. Be careful not to stray and check on the broiler in a couple of minutes or you may burn the top of the tart.


Saturday, May 2, 2020

Orange Chiffon Cake

Mother’s Day is coming up soon and I can’t think of a nicer treat to bake and decorate for your mamma (or for yourself) than this fluffy orange chiffon cake. This cake makes me think of my own mother, who used to bake angel food and chiffon cakes when I was a little girl (back when dinosaurs roamed the earth). By the way, if you’re wondering if a chiffon cake is the same as a sponge cake, it’s related, but not the same. Sponge cakes have lots of separated and beaten eggs, as do chiffon cakes, but no added fat or baking powder, while chiffon cakes do contain both oil and a leavening agent. I haven’t made a chiffon cake in decades, but I pulled out my ancient tube pan for this and it was well worth it. The cake was light and with a soft texture that provides a perfect foil for the glaze and pressed flower decoration. You can choose to simply dust the cake with powdered sugar, but the orange glaze really adds a pretty finishing touch. I picked edible flowers and leaves for the decoration – pansies, lemon balm leaves and the flowers of wild winter cress — and pressed them for a couple of days until they were dried and flattened. You could use fresh flowers or omit them entirely. If you do use fresh flowers, do an internet search to make sure they’re edible, since so many have toxic qualities (like buttercups).
The preparation takes a bit of time, but if you follow the directions carefully, you’ll have no trouble. I found a lot of recipes for chiffon cakes online, and ultimately culled what I thought to be the best of a few recipes, cutting out some of the excess sugar and adding a bit of orange blossom water I had bought in Italy a few years ago to give it a little extra orange umph.

Make sure you DO NOT grease the pan. This is to allow the cake batter to grip the sides of the pan and allow for a higher rise. I did place a piece of parchment paper on the bottom portion of the cake and it allowed for an easy release.

This is how it looked as it came from the oven.

You need to immediately flip it over onto something like an inverted funnel to let it cool upside down. Otherwise, the cake might sink in the center.After it is completely cooled, run a long knife around the sides and along the inner tube of the cake, then flip it onto a rack, releasing the metal piece and removing the parchment paper from the base.

I poured the glaze over the top and spread it on the sides. The sides will be quite bumpy, but if you let the glaze dry slightly (an hour or two should do it), you can spread another layer of glaze on the sides to get a smoother look. Or you could just pour the glaze on the top and let it fall down in large “drips” on the side, another way to get a decorative look. But since I wanted to use the dried flowers on the sides, I added the second layer of glaze. It’s not as smooth as glass, but much smoother than just leaving the one layer of glaze (and it sure tastes good.)

Decorate with the pressed, dried flowers.You don’t even have to use pressed flowers. You could just choose freshly picked, unpressed flowers instead.

The cake serves a lot of people, so if you’re not having a crowd anytime soon (and who is, in this Covid-19 environment?),spread a bit of good cheer and leave some at your neighbors’ or friends’ front porch. Happy Mother’s Day!

Click here to connect with me on Instagram and find out what Ciao Chow Linda is up to in the kitchen (and other places too.)

Orange Chiffon Cake
Author: Ciao Chow Linda
Ingredients
  • FOR THE CAKE:
  • 2 1/4 cups cake flour
  • 1 1/4 cups sugar
  • 1 tablespoon baking powder
  • 1/2 teaspoon salt
  • 1/2 cup vegetable oil
  • 7 large egg yolks
  • 3/4 cup fresh orange juice
  • 2 tablespoons freshly grated orange zest
  • 2 teaspoons vanilla
  • 1/4 teaspoon orange flower water
  • 8 large egg whites
  • FOR THE GLAZE:
  • 3 cups confectioner’s sugar
  • 4 tablespoons orange juice (or more as needed)
  • 1 teaspoon cream of tartar
  • edible flowers
Instructions
  1. FOR THE CAKE:
  2. Sift together the flour, 3/4 cup of the sugar, the baking powder, and the salt.
  3. In the large bowl of an electric mixer beat the egg whites with a pinch of salt until they are foamy, then add the cream of tartar and beat the whites until they hold stiff peaks.
  4. Add the remaining 1/2 cup sugar, a little at a time, and beat the whites until they hold stiff glossy peaks.
  5. In a separate bowl, whisk together the oil, the egg yolks, the orange juice, the zest, the orange blossom water and the vanilla.
  6. Whisk the mixture into the flour mixture, mixing until the batter is smooth.
  7. Stir one third of the whites into the batter to lighten it and fold in the remaining whites gently but thoroughly.
  8. Cut a piece of parchment paper to fit the bottom of an ungreased 10-inch angel food pan, with a removable bottom.
  9. Spoon the batter into the pan and bake the cake in the middle of a preheated 325°F. oven for 1 hour, and five to ten minutes, or until a toothpick comes out clean.
  10. Invert the pan immediately onto a funnel and let it cool completely.
  11. Run a long thin knife around the outer and inner tube edges of the pan and turn the cake out of the pan onto a cake rack.
  12. Remove the parchment paper.
  13. FOR THE GLAZE:
  14. Mix the confectioner’s sugar with the orange juice until smooth, glossy and thick.
  15. Pour the glaze over the top of cake and spread over the sides as a first layer.
  16. Let the glaze dry, at least an hour or two, and spread a second layer of glaze over the sides to smooth out the first layer.
  17. Decorate with pressed, dried edible flowers.