Tuesday, February 25, 2020

Crispy Cheesy Pan Pizza

I’m partial to Neapolitan pizza, but when I saw this on King Arthur Flour’s website as its “recipe of the year” I was more than a little intrigued. The company has one of the best websites for recipes anywhere, and I have found that their recipes always produce optimum results. This may resemble a thick crust Sicilian pizza, or maybe you’re thinking Chicago deep-dish pizza. But it’s nothing like either of those. The dough, although thick, is not at all dense due to the long rising time overnight in the refrigerator. In fact, it’s quite light and easily digestible. It’s a snap to bake at home in a cast iron skillet, a technique that produces a crunchy bottom and side crust that crackles when you bite into it. It uses only a half cup of tomato sauce, which gets dolloped on after you’ve spread a layer of mozzarella cheese, ensuring that the dough doesn’t become soggy.

If you’ve made no-knead bread before, this procedure will seem familiar to you. You can check out the King Arthur page for more explicit photos on how to handle the dough (it’s easy).Leave the dough in the refrigerator anywhere from 12 hours minimum to 72 hours maximum, allowing the dough to develop flavor and great texture. It also gives you lots of flexibility in case your plans change at the last minute and you want to save the baking for the next day. When you are ready to get down to business, just press the risen dough into an oiled cast iron skillet. It does require proper timing and close attention on the day you bake it and the directions seem long, but if you read through them before starting, and follow them exactly, it’s really easy to make.

Spread the grated mozzarella cheese thoroughly all over the dough, all the way to the edges, to get that crispy, crunchy, cheese-y top. Then dollop the tomato sauce on top, (sorry, no photo for that step but check out the King Arthur website) and add the rest of the mozzarella cheese. I also sprinkled a little grated pecorino cheese over everything for a sharper tang. You could add other toppings if you like as well, but don’t get too carried away or you’ll weigh down the dough too much.

When you remove it from the oven, you won’t be able to resist digging into it right away. It pulls away from the pan easily, and you could even slide it out of the pan onto a plate or board for slicing.Or not. 
We couldn’t wait to dig in, so we sliced it right in the pan.
We could have eaten the whole pie by ourselves, but used a bit of restraint and saved half for another night. It could serve four for dinner, with a salad or soup on the side. Or it would make a great appetizer, sliced into smaller pieces and served with some drinks before dinner. It may even have you forgetting all about that Neapolitan pizza you thought was your favorite!
Click here to connect with me on Instagram and find out what Ciao Chow Linda is up to in the kitchen (and other places too.)

Crispy Cheesy Pan Pizza
Author: King Arthur Flour via Ciao Chow Linda
Ingredients
  • 2 cups (240g) King Arthur Unbleached All-Purpose Flour
  • 3/4 teaspoon salt
  • 1/2 teaspoon instant yeast or active dry yeast
  • 3/4 cup (170g) lukewarm water (I had to use almost 1/4 cup more water but it depends on the humidity/dryness of the day)
  • 1 tablespoon (13g) olive oil + 1 1/2 tablespoons (18g) olive oil for the pan
  • TOPPING:
  • 6 ounces (170g) mozzarella, grated (about 1 1/4 cups, loosely packed)*
  • 1/3 to 1/2 cup (74g to 113g) tomato sauce or pizza sauce, homemade or store-bought
  • freshly grated hard cheese and fresh herbs for sprinkling on top after baking, optional*
Instructions
  1. Weigh your flour; or measure it by gently spooning it into a cup, then sweeping off any excess.
  2. Place the flour, salt, yeast, water, and 1 tablespoon (13g) of the olive oil in the bowl of a stand mixer or other medium-large mixing bowl.
  3. Stir everything together to make a shaggy, sticky mass of dough with no dry patches of flour. This should take 30 to 45 seconds in a mixer using the beater paddle; or about 1 minute by hand, using a spoon or spatula. Scrape down the sides of the bowl to gather the dough into a rough ball; cover the bowl.
  4. After 5 minutes, uncover the bowl and reach a bowl scraper or your wet hand down between the side of the bowl and the dough, as though you were going to lift the dough out. Instead of lifting, stretch the bottom of the dough up and over its top.
  5. Repeat three more times, turning the bowl 90° each time.
  6. This process of four stretches, which takes the place of kneading, is called a fold.
  7. Re-cover the bowl, and after 5 minutes do another fold.
  8. Wait 5 minutes and repeat; then another 5 minutes, and do a fourth and final fold.
  9. Cover the bowl and let the dough rest, undisturbed, for 40 minutes.
  10. Then refrigerate it for a minimum of 12 hours, or up to 72 hours.
  11. It’ll rise slowly as it chills, developing flavor; this long rise will also add flexibility to your schedule.
  12. About 3 hours before you want to serve your pizza, prepare your pan.
  13. Pour 1 1/2 tablespoons (18g) olive oil into a well-seasoned cast iron skillet that’s 10” to 11” diameter across the top, and about 9” across the bottom.
  14. Heavy, dark cast iron will give you a superb crust; but if you don’t have it, use another oven-safe heavy-bottomed skillet of similar size, or a 10” round cake pan or 9” square pan.
  15. Tilt the pan to spread the oil across the bottom, and use your fingers or a paper towel to spread some oil up the edges, as well.
  16. Transfer the dough to the pan and turn it once to coat both sides with the oil.
  17. After coating the dough in oil, press the dough to the edges of the pan, dimpling it using the tips of your fingers in the process.
  18. The dough may start to resist and shrink back; that’s OK, just cover it and let it rest for about 15 minutes, then repeat the dimpling/pressing.
  19. At this point the dough should reach the edges of the pan; if it doesn’t, give it one more 15-minute rest before dimpling/pressing a third and final time.
  20. Cover the crust and let it rise for 2 hours at room temperature.
  21. The fully risen dough will look soft and pillowy and will jiggle when you gently shake the pan.
  22. About 30 minutes before baking, place one rack at the bottom of the oven and one toward the top (about 4″ to 5″ from the top heating element).
  23. Preheat the oven to 450°F.
  24. When you’re ready to bake the pizza, sprinkle about three-quarters of the mozzarella (a scant 1 cup) evenly over the crust.
  25. Cover the entire crust, no bare dough showing; this will yield caramelized edges.
  26. Dollop small spoonfuls of the sauce over the cheese; laying the cheese down first like this will prevent the sauce from seeping into the crust and making it soggy.
  27. Sprinkle on the remaining mozzarella.
  28. Bake the pizza on the bottom rack of the oven for 18 to 20 minutes, until the cheese is bubbling and the bottom and edges of the crust are a rich golden brown (use a spatula to check the bottom).
  29. If the bottom is brown but the top still seems pale, transfer the pizza to the top rack and bake for 2 to 4 minutes longer.
  30. On the other hand, if the top seems fine but the bottom’s not browned to your liking, leave the pizza on the bottom rack for another 2 to 4 minutes.
  31. Home ovens can vary a lot, so use the visual cues and your own preferences to gauge when you’ve achieved the perfect bake.
  32. Remove the pizza from the oven and place the pan on a heatproof surface.
  33. Carefully run a table knife or spatula between the edge of the pizza and side of the pan to prevent the cheese from sticking as it cools.
  34. Let the pizza cool very briefly; as soon as you feel comfortable doing so, carefully transfer it from the pan to a cooling rack or cutting surface. This will prevent the crust from becoming soggy.
  35. Serve the pizza anywhere from medium-hot to warm. Kitchen shears or a large pair of household scissors are both good tools for cutting this thick pizza into wedges.


Monday, February 17, 2020

Black Forest Cake with Birchbark Decoration

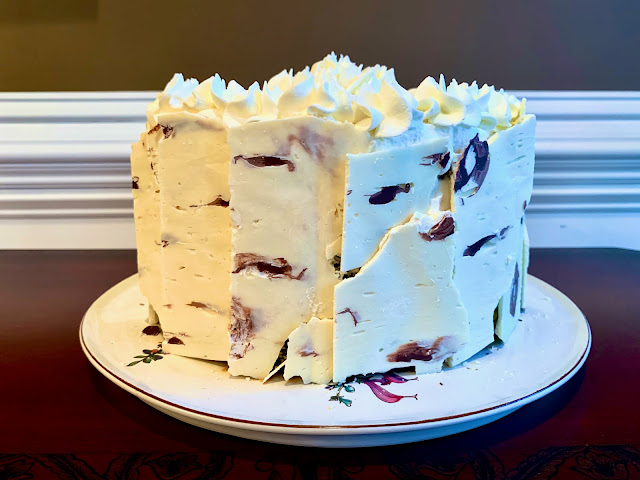
I confess. I went off my diet to enjoy two — no, make that three —  slices of this cake. And there’s still a quarter of the cake left. I’ve made it twice now — once for Christmas, when we had a big crowd that consumed all of it. And I made it again last week, when it was just the two of us. But don’t judge – I sliced off a quarter of this cake and took it to my 90+ year-old neighbors to help them celebrate Valentine’s Day. Studded with cherries and hugged by a white chocolate birch bark, this cake would also be perfect to celebrate the upcoming birthday of George Washington – the first president of the U.S.A. who legend says chopped down a cherry tree as a young boy.  You don’t have to embellish it with the chocolate birch bark if you want to make it easy on yourself. Just serve it with the whipped cream frosting and everyone will love it just the same. The cake recipe is from “Alice’s Tea Cup” cookbook, but it’s practically the same as the Hershey’s recipe I’ve been using for decades. Alice’s Tea Cup recipe calls for 1/4 cup sour cream, and I didn’t have it on hand, so substituted plain Greek yogurt instead. The cake is very forgiving and even without the sour cream or yogurt, it’s a delicious cake with a beautiful crumb.

Just a word of caution before baking however. The first time I made this, I put all three cake pans in the oven at once — not a good idea since they came out lopsided. The next time, I baked each cake layer one at a time and it was much more even. When you’re assembling the cake, you could eliminate the liqueur soaking each layer if you’re serving it to young children. But in my opinion, the liqueur adds so much flavor and it’s dispersed enough even for children to handle. I used about 1/2 cup of Cherry Marnier for the three layers, but next time, I’ll increase it to 3/4 cup. If you don’t have Cherry Marnier (I finally finished the bottle I’ve had for more than 40 years), substitute with kirsch or brandy.

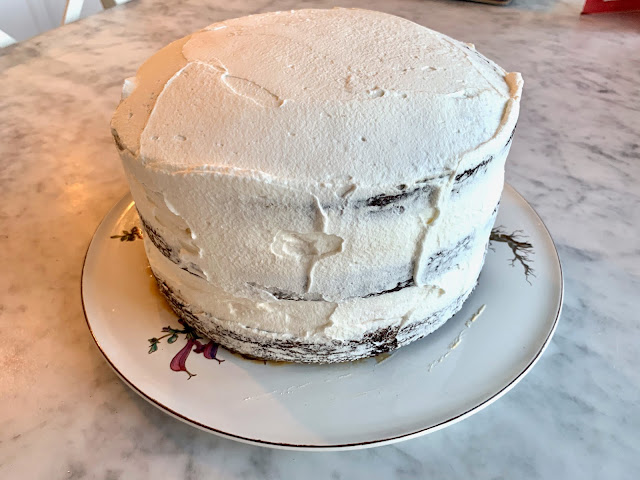
The first time I made this, I used amarena cherries from Italy (my favorite), but they are a bit expensive to use in such quantity. This time I bought some jarred pitted cherries that were just fine. After you’ve soaked the layer in liqueur, spread the whipped cream in abundance and dot it with the cherries. Repeat with the second layer, then top with the third layer. Smear whipped cream all over the sides and top. If you plan to decorate with the white chocolate birch bark, (and I do encourage you to do so. It makes quite a statement.) the perimeter doesn’t have to be perfect since it will be completely covered. Just make sure you have enough whipped cream to help the chocolate pieces adhere.

Making the birch bark is simple. First use a paint brush to “paint” melted dark chocolate marks across a piece of parchment paper. The area you cover in chocolate should be as tall as the finished cake with all the layers and frosting, and slightly wider than the circumference of the cake. After you’ve made the dark chocolate marks, let the chocolate harden. Then melt the white chocolate and let it cool before spreading over the dark chocolate with an offset spatula (I dripped some over the dark chocolate first before spreading with the spatula). This part can be tricky if the temperature isn’t just right. If you spread the white chocolate while it’s warm, or worse yet, while it’s hot, it will melt the dark chocolate and smear it. A little smearing is fine, but you don’t want to lose the characteristic look of the birch bark. If you wait until it’s too cold, the white chocolate will harden and you’ll have a hard time spreading it. I got the idea from “The Cake Girls” – and you might want to check out these directions before trying.

Let the white chocolate bark cool completely. Put it in the refrigerator if your room is too hot. Then slice or break off pieces to use for the decoration. Don’t worry if some of them break in two or three pieces. You can always patch some together on the cake.

I finished it off by piping some whipped cream rosettes on the top. But even that is not necessary if you don’t have the right equipment. Everyone will love it just the same.

Including my husband, who by now has shown remarkable (and uncharacteristic) self-restraint by eating only one slice a day of this cake. As for me, don’t ask. Because unlike George Washington, I may have to tell a lie.

Click here to connect with me on Instagram and find out what Ciao Chow Linda is up to in the kitchen (and other places too.)

Black Forest Cake with Birchbark Decoration
Author: Ciao Chow Linda
Ingredients
  • 2 cups sugar
  • 1-3/4 cups all-purpose flour
  • 3/4 cup unsweetened cocoa
  • 1-1/2 teaspoons baking powder
  • 1-1/2 teaspoons baking soda
  • 1 teaspooon kosher salt
  • 1/4 cup sour cream
  • 2 eggs
  • 1 cup whole milk
  • 1/2 cup canola oil
  • 2 teaspoons vanilla extract
  • 3/4 cup hot brewed coffee
  • FOR THE FILLING AND FROSTING:
  • 2 1/2 cups whipping cream
  • 1/2 cup powdered sugar
  • a jar of sour cherries in liquid (drained), or amarena cherries in syrup (use as many as you like. I didn’t measure but I think I used about 1 cup total)
  • 3/4 cup liqueur (Kirsch, or cherry marnier, or brandy)
  • FOR THE BIRCH BARK DECORATION:
  • 12 ounces white chocolate
  • a couple of ounces of dark or milk chocolate
Instructions
  1. Heat oven to 350°F. Grease and flour three 8-inch round baking pans.
  2. Stir together sugar, flour, cocoa, baking powder, baking soda and salt in large bowl.
  3. Add eggs (one at a time), sour cream, milk, oil and vanilla; beat on medium speed of mixer 2 minutes.
  4. Slowly drizzle in hot coffee, mixing until the batter is blended. Batter will be thin.
  5. Pour batter into prepared pans.
  6. Bake for 20 to 25 minutes or until a toothpick inserted in the center of cake comes out clean.
  7. Cool completely before removing from pan and frosting.
  8. FOR THE FILLING AND FROSTING:
  9. Whip the cream with the confectioner’s sugar, adding a little at a time, until peaks form.
  10. Be careful not to whip too much or you’ll end up with butter!
  11. Take one layer of the cakes and sprinkle generously with the syrup.
  12. Spread some of the whipped cream on top, and dot throughout with the cherries.
  13. Repeat with the second layer.
  14. Add the top layer and spread the remaining whipped cream on the top and sides.
  15. FOR THE BIRCH BARK DECORATION:
  16. Melt the dark chocolate, either at low heat in a double boiler or in the microwave.
  17. Using a paint brush, brush marks on a long piece of parchment paper, using a measurement that’s slightly taller than the three cakes would be with the frosting, and a bit wider than the circumference of the cakes.
  18. Let the dark chocolate cool, then melt the white chocolate, being careful not to overheat, or will “seize” on you. If this happens, try adding more white chocolate, off the heat, and stir vigorously.
  19. Alternately, add a small amount of boiling water, one teaspoon at a time, stirring into the white chocolate.
  20. Let the white chocolate cool, then spread over the dark chocolate.
  21. This can be tricky because if you spread it while it’s still warm, it will melt the dark chocolate and you’ll lose the characteristic marks of the birch tree. But if you let it cool too much, it will harden and be difficult to spread.
  22. Let the white chocolate cool completely (I put mine in the refrigerator), then cut large chunks of it, and press them against the sides of the cake.
  23. If some of the pieces break off, just patch them by pressing into the sides of the cake.


Monday, February 10, 2020

Barley, Pomegranate and Orange Salad

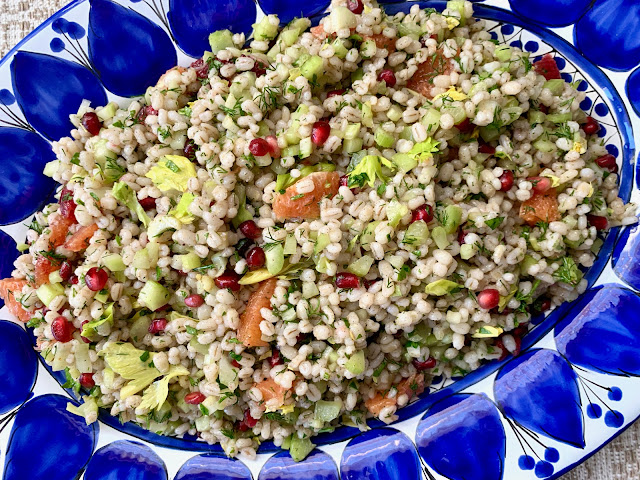
While searching for a recipe to serve at my recent book group dinner, where the book was set in Israel, I naturally thought of  Yotam Ottolenghi, the pre-eminent Israeli chef whose cookbooks (and restaurants in London) are a treasure trove of Middle Eastern cooking.  I was surprised to find a salad using bulgur, since I associated the grain mostly with soups. Since pomegranates are a favorite of mine, the recipe was calling my name. Although not included in Ottolenghi’s recipe, I felt the urge to add the oranges — both blood oranges and cara cara oranges — since they were in season and added more color and flavor. The celery leaves are crucial in this recipe, and unfortunately most celery in supermarkets has scant leaves. If you’re lucky enough to find a locally grown bunch of celery, you’ll more likely to find leaves on the ends of the stalks. But even with the supermarket celery, I managed to pluck enough leaves to add to the recipe. This salad is delicious even several days after making it, so keep it in mind for a do-ahead recipe to take to a party.

Click here to connect with me on Instagram and find out what Ciao Chow Linda is up to in the kitchen (and other places too.)

Barley Salad
Author: Ciao Chow Linda
Recipe adapted from Yotam Ottolenghi’s book “Plenty”
Ingredients
  • 1 cup pearl barley
  • 6 celery stalks (leaves picked and reserved), cut into dice
  • 1/4 cup olive oil
  • 3 tablespoons sherry vinegar
  • 2 small garlic cloves, crushed
  • 2/3 teaspoon ground allspice
  • salt, black pepper
  • 3 tablespoons chopped dill
  • 3 tablespoons chopped parsley
  • 1/2 cup pomegranate seeds
  • sections from 2 oranges (I used one cara cara and one blood orange)
Instructions
  1. Cook the barley according to package directions.
  2. Usually, it is simply placed in a pot and covered with water, then boiled for about 30 minutes.
  3. Drain the barley and transfer to a mixing bowl.
  4. Add the celery, olive oil, vinegar, garlic, allspice and salt and pepper.
  5. Stir, then leave to cool completely.
  6. When it’s cool, add the herbs, celery leaves, pomegranate seeds and orange sections.
  7. Squeeze the juice from the remaining pulpy part of the orange that’s left into the bowl and mix.
  8. Serve.


Monday, February 3, 2020

Halibut with oranges and salsa verde


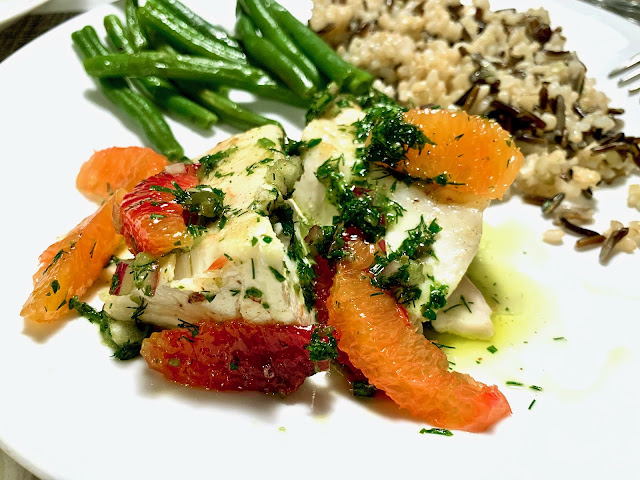
In an effort to eat more low calorie foods and lose some weight before dress shopping for my daughter’s wedding, I have been trying to cut back on the pizza, pasta and pastries and focus on fish, fruit and flavors. (I am constantly sabotaging myself and Superbowl Sunday party foods didn’t help.) Since it’s citrus season, and I can’t seem to get enough of those luscious cara cara oranges and blood oranges, I combined them with a fish that I love to order when eating out — halibut. It’s always so expensive at the fish market, making it a relative bargain on a restaurant menu. But I couldn’t resist buying some when I saw it on sale last week, and a 3/4 pound piece was enough for the two of us. It provided the perfect foil for the oranges and the salsa verde. It couldn’t be much simpler to cook either. Just dry the fish thoroughly, sprinkle with salt and white pepper and place it skin side down in a hot skillet coated with oil. I didn’t use olive oil here since the heat is cranked way up, but rather chose canola oil. You could use peanut or safflower oil, which also have a high smoking point. The skin will start to crisp up, and eventually loosen from the pan. After about five minutes, lower the temperature of the burner.You could flip the fish over and finish cooking on the other side, or even easier, just leave it skin side down and cover with a lid. It should finish cooking in just a couple of minutes.

While the fish is cooking (or before you even start cooking the fish), make the salsa verde, by finely mincing the parsley, dill, onion, capers and jalapeño. The jalapeño is optional, but I had some candied jalapeño in the pantry and I thought they would add a nice “zip” to the salsa.
Scatter the orange sections and salsa all around the fish. Serve with some rice and vegetables for a colorful, healthy and easy to prepare dinner that’s fit for company or just you and your partner.

Click here to connect with me on Instagram and find out what Ciao Chow Linda is up to in the kitchen (and other places too.)

Halibut with oranges and salsa verde
Author: Ciao Chow Linda
Ingredients
  • 3/4 lb. – 1 lb. halibut
  • 2 tablespoons canola, safflower, peanut or other vegetable oil with a high smoking point
  • 2 oranges sectioned into supremes (I used one cara cara and one blood orange)
  • FOR THE SALSA VERDE:
  • 1/2 cup finely minced parsley
  • 1/2 cup finely minced dill
  • a couple of tablespoons finely minced red onion
  • 1 tablespoon capers
  • a couple of slices of candied or fresh jalapeno (optional)
  • 1/4 cup olive oil
  • 2 tablespoons red wine vinegar
  • salt, pepper
  • juice that remains in the oranges after sectioning
Instructions
  1. Let the halibut sit on the counter for about a half hour to let it reach a temperature closer to the room temperature.
  2. It will cook more evenly if it’s not cold from the refrigerator.
  3. Dry the piece (or pieces) of fish, then sprinkle with salt and white pepper.
  4. Heat the oil in a skillet, then add the fish, skin side down.
  5. Cook at high heat until the skin starts to loosen from the pan.
  6. (Be patient – It will take five minutes or so and it will splatter a lot of oil on your stove).
  7. At this point, lower the heat slightly, and put a lid on the pan to finish cooking.
  8. It should take only a couple of minutes to finish cooking.
  9. While the fish is cooking, section the oranges and make the salsa verde.
  10. For the salsa, combine all the ingredients and stir with a fork.
  11. Remove the halibut from the pan, drizzle the salsa on the fish and around the sides, and scatter the orange sections all around.