Showing posts with label pancetta. Show all posts

Thursday, July 17, 2025

Clams On The Grill

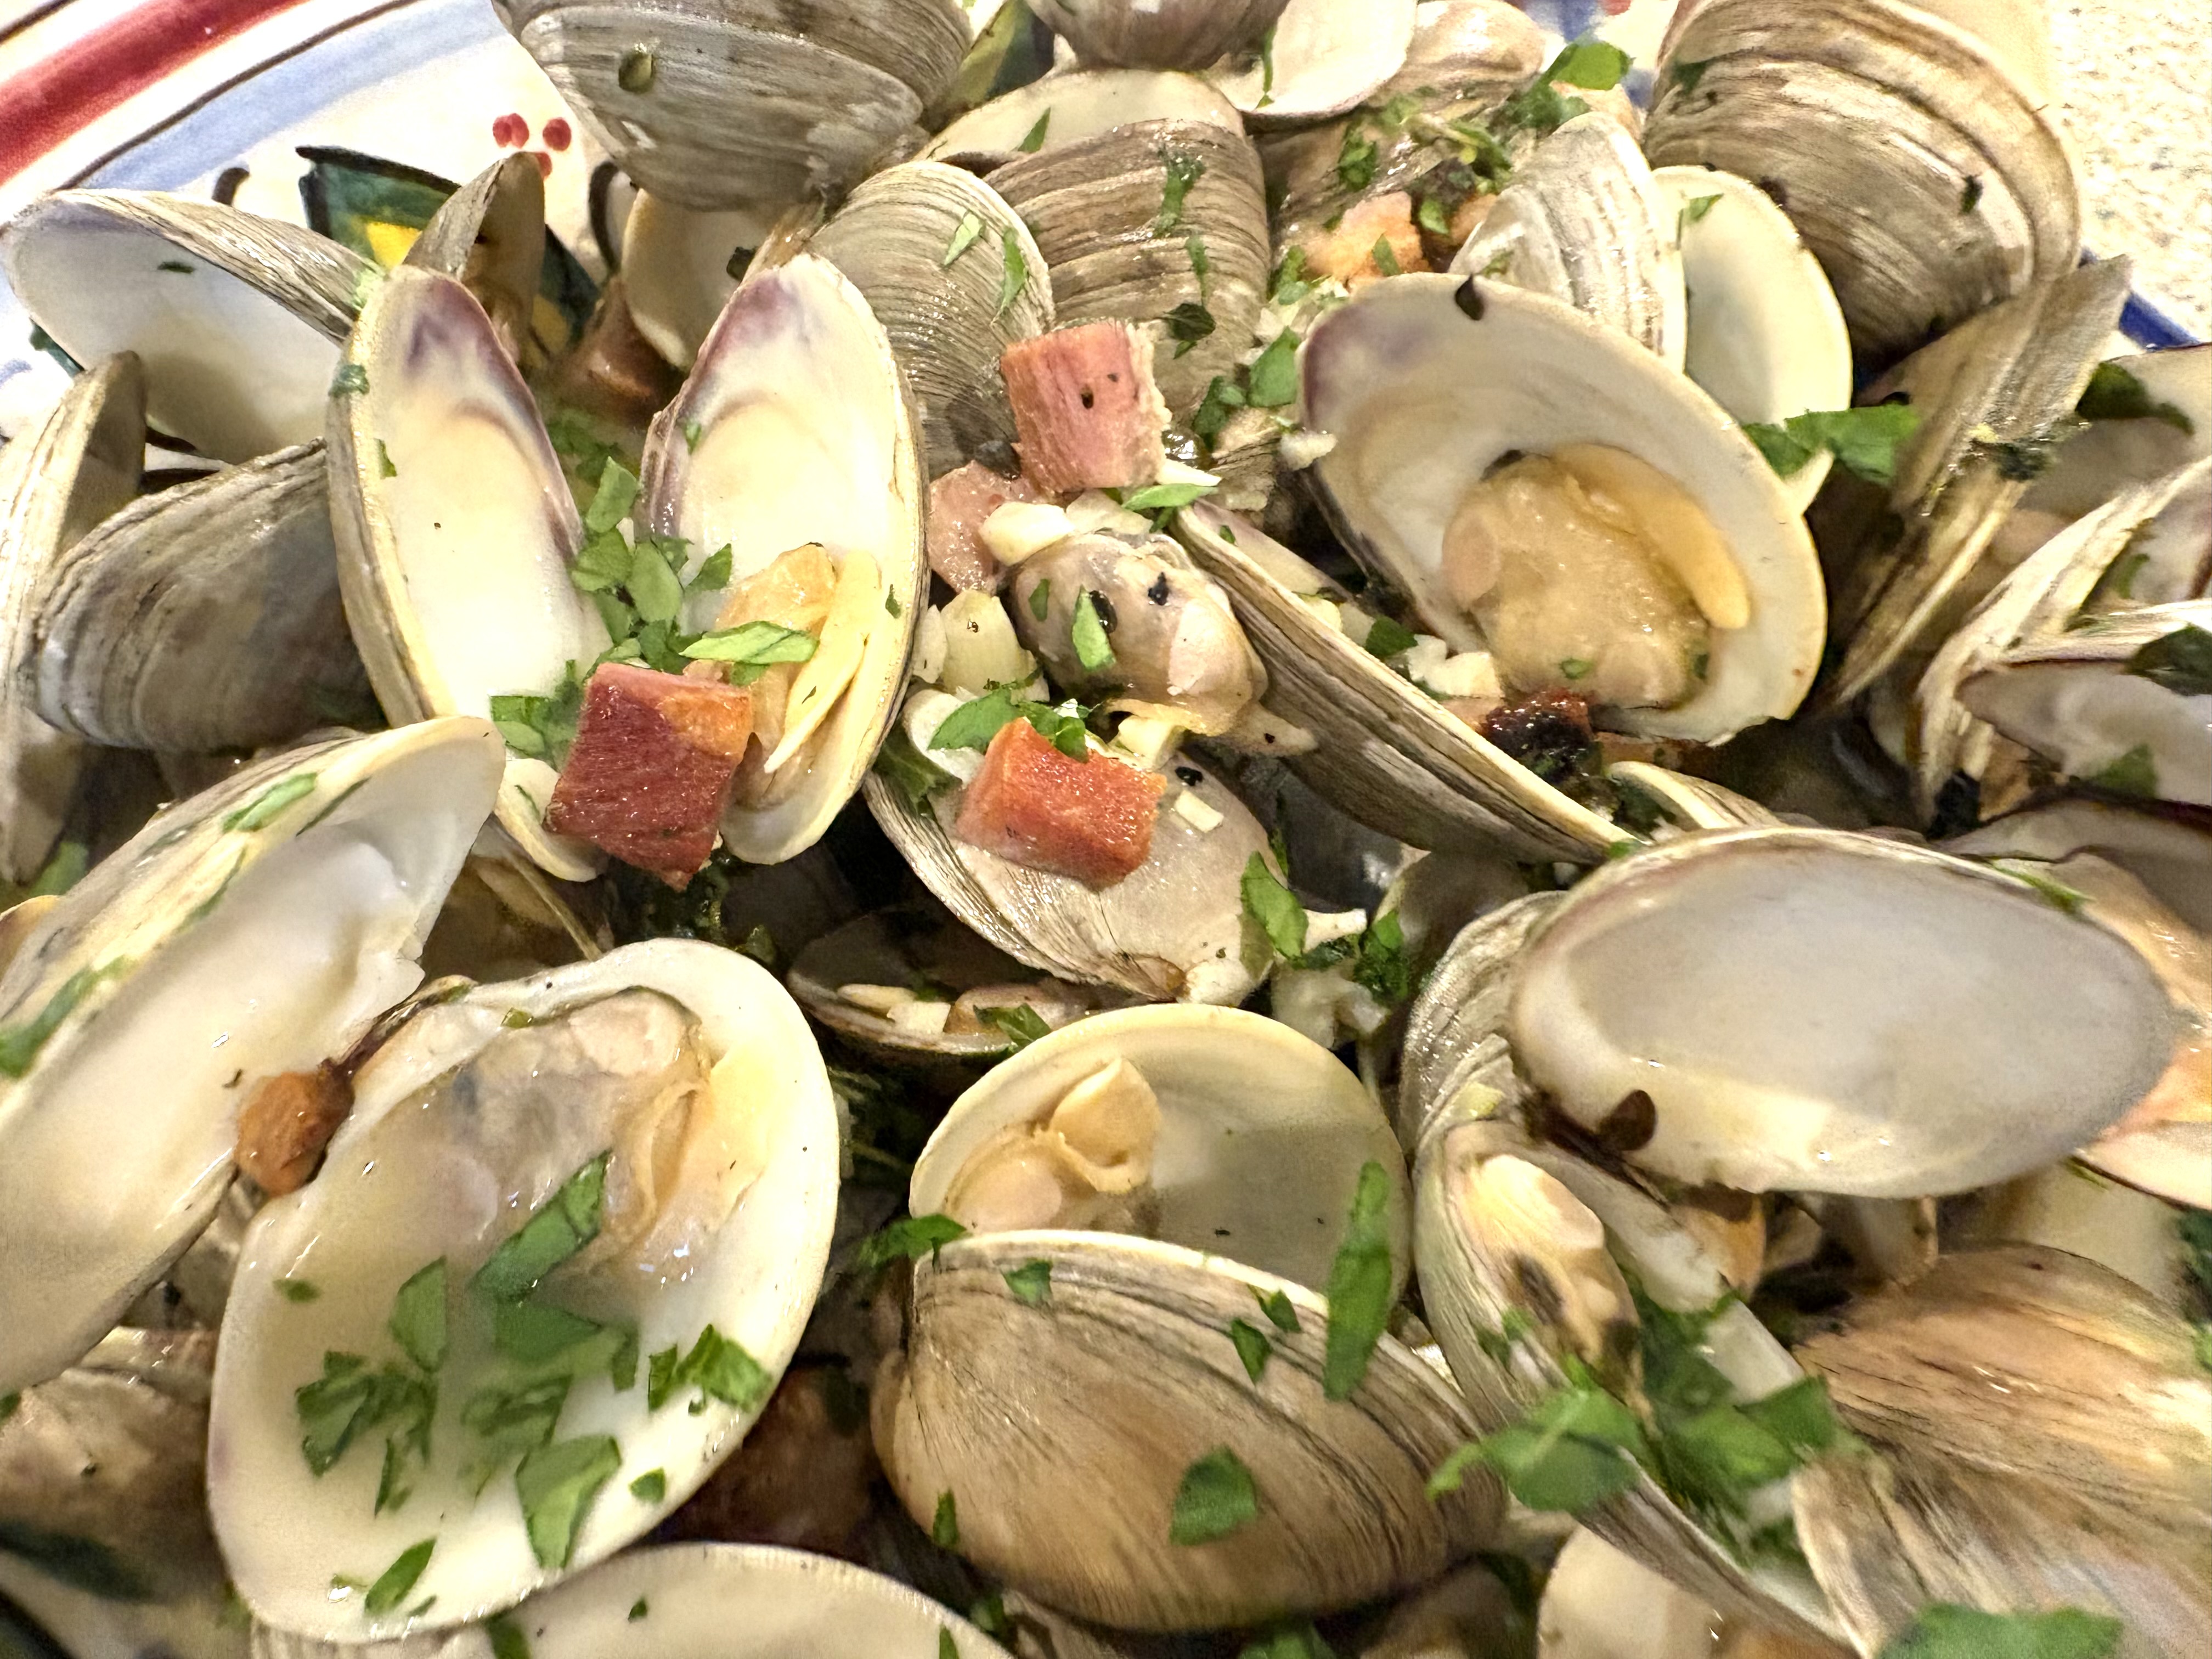
It's summertime and that means no-fuss, no-muss cooking. These clams, cooked in a disposable pan on the grill, fit the bill perfectly. We ate them as our main course, sharing a little more than forty clams, but enough to serve as an appetizer for a larger group. I was inspired to make these after reading about how much protein we "seniors" should be eating each day. A 70-year-old woman generally needs between 1.0 and 1.2 grams of protein per day for each kilogram of body weight. That's higher than the recommended intake for younger adults and is crucial for maintaining muscle mass, bone strength, and overall health. For example, a 150-pound (68 kg) woman would need approximately 68-82 grams of protein daily. When I checked how much food I needed to eat to consume that amount of protein, I realized I needed to 
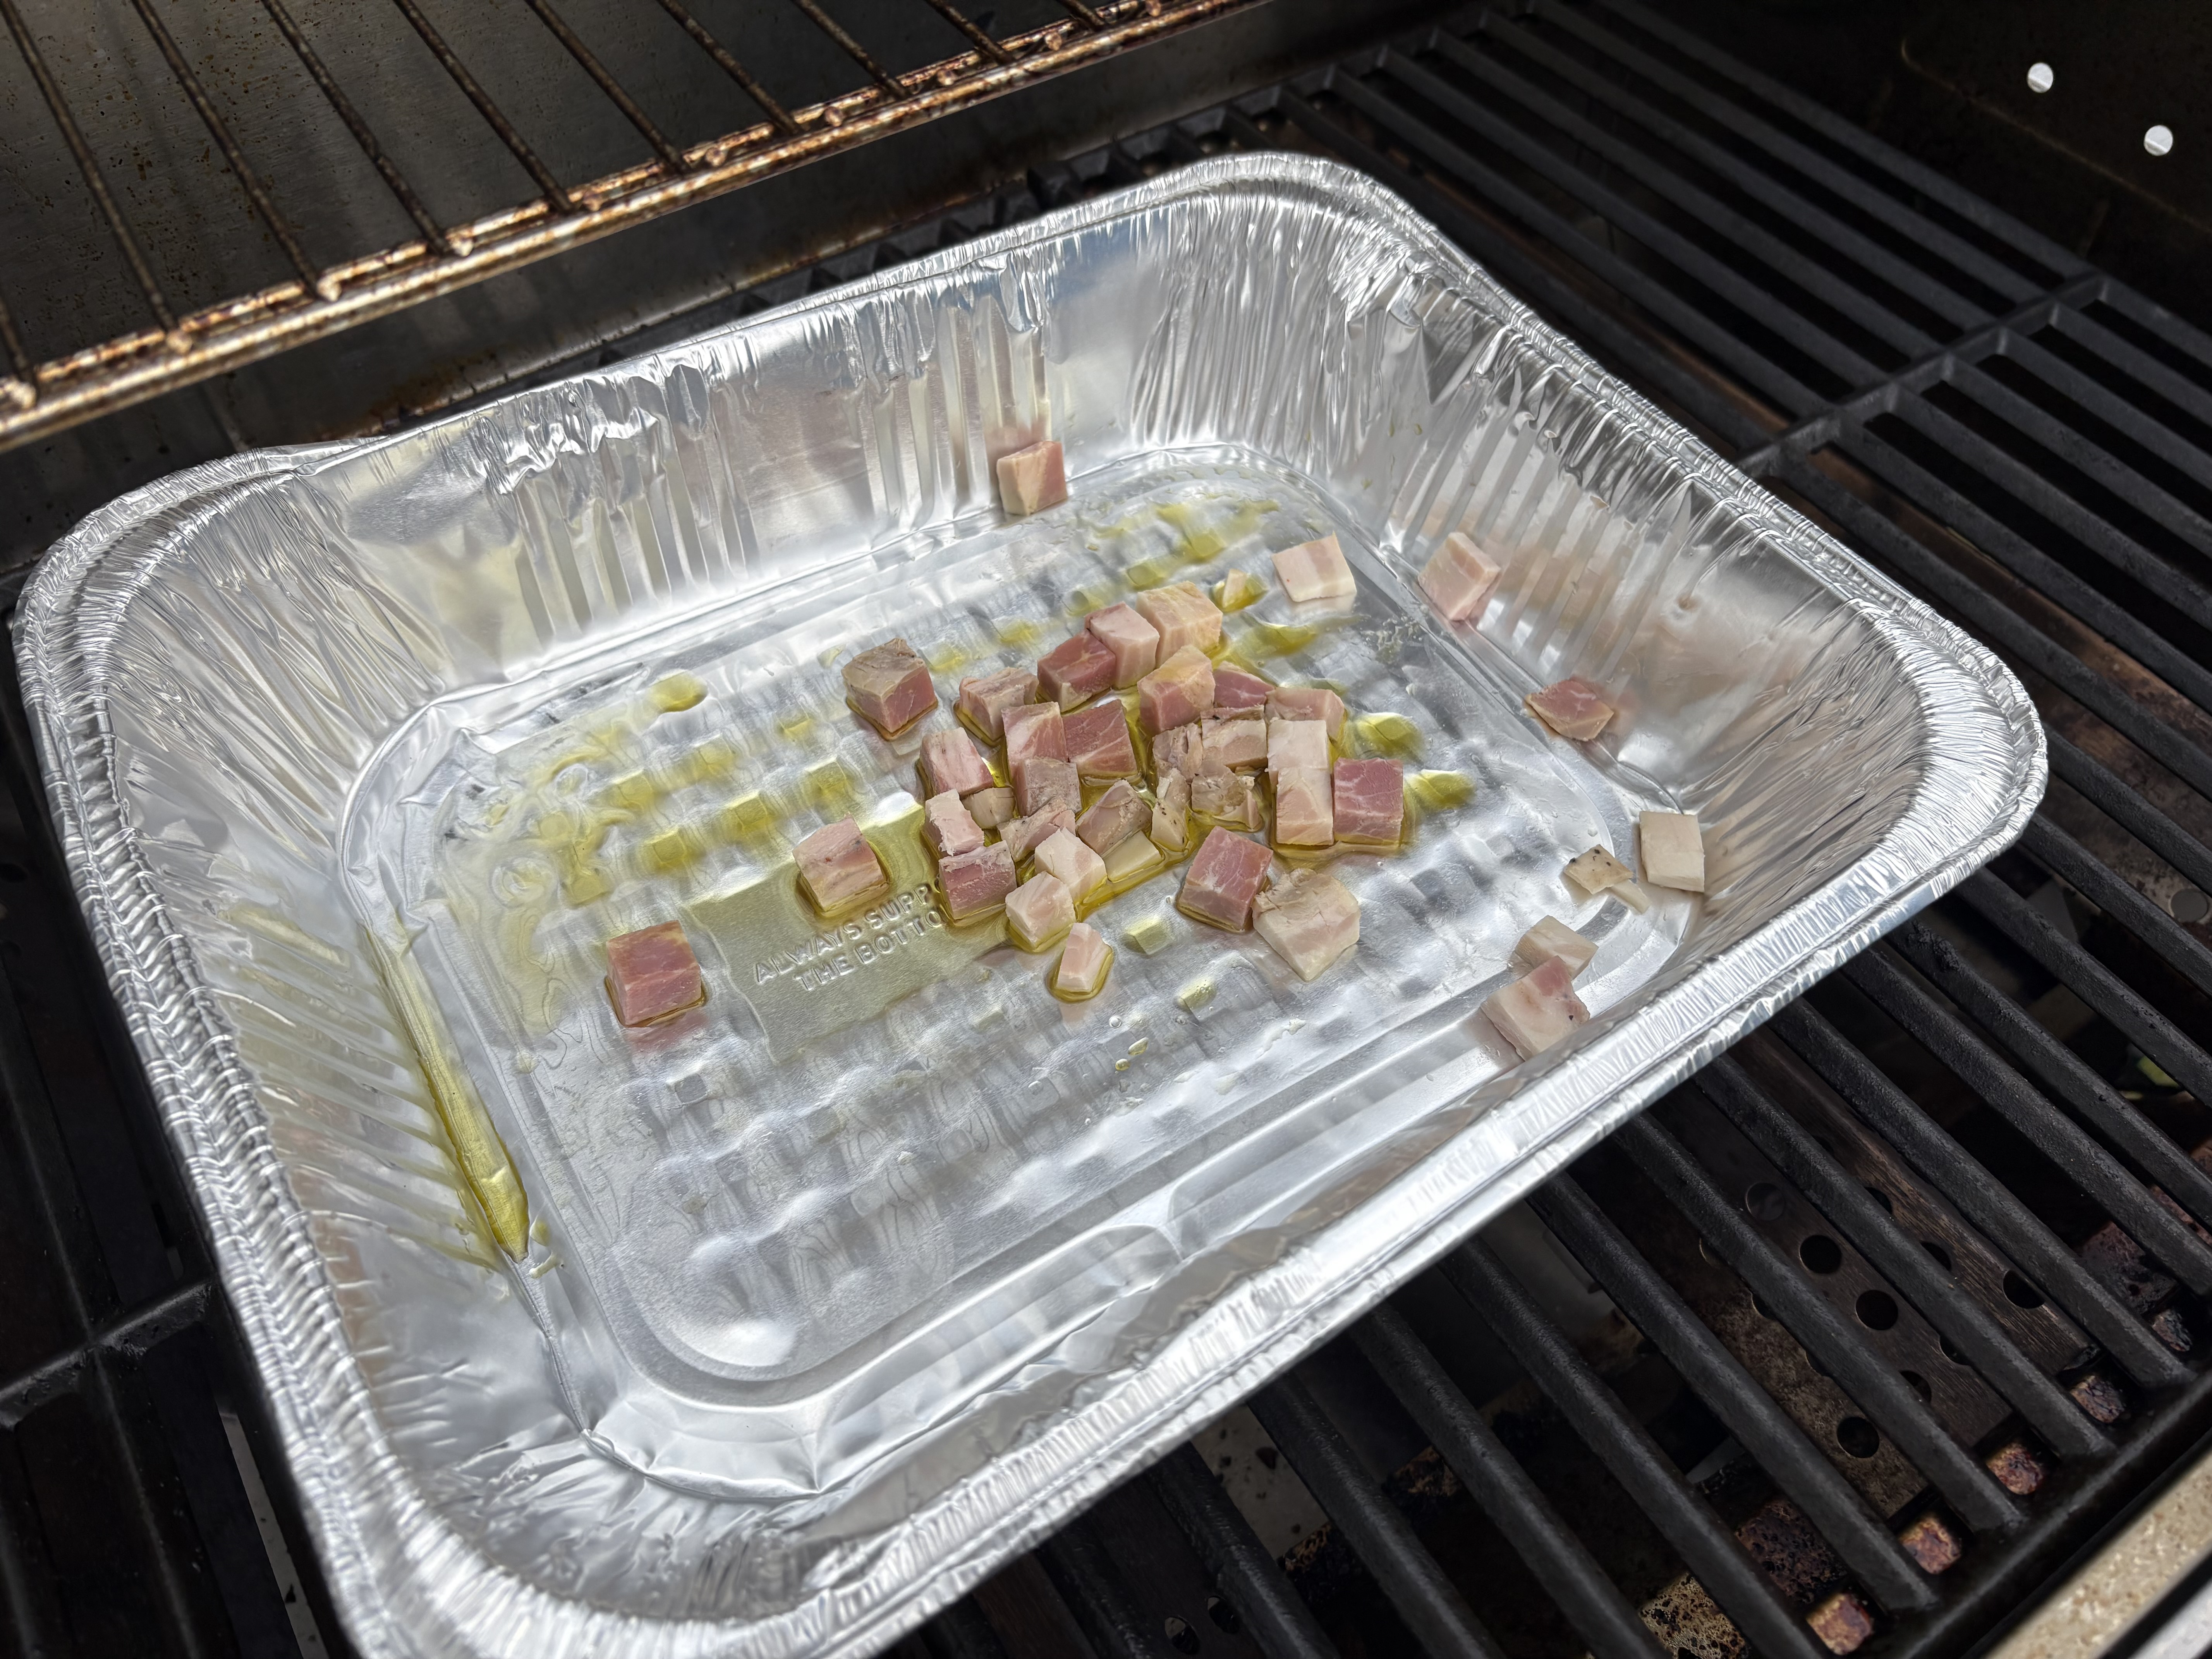
up my game. We eat mostly fish, chicken or a grain main course, like pasta, and eat red meat only once or twice a month at most. Oatmeal is our breakfast of choice, but we'll be rotating that with yogurt or eggs from now on. When I looked up the amount of protein in clams, I was astonished to learn that 12 littleneck clams contain 22-28 grams of protein, meaning that my meal last night contained half if not more of my protein requirements for the day. Yea! Clams are also rich in vitamins and minerals and low in fat and calories. Win-win! The small amount of pancetta added even more protein and added more flavor. Are you on board?  Start by drizzling a little olive oil in a disposable pan, and place the pancetta inside. Place the grill on high heat and cook the pancetta until it's crisp and the fat has been rendered.
Add the clams and the rest of the ingredients -- a little knob of butter, dry white wine, garlic, salt, and fresh herbs.
Close the lid and let it bubble away for five minutes, then open the lid and stir to move the clams around. I also added more fresh herbs each time I opened the lid of the grill.
Cook for ten to fifteen minutes, or until the clams have all opened and had a chance to cook through. Toss more fresh parsley on top and serve with grilled bread that's been moistened with olive oil and sprinkled with coarse sea salt.


Click here to connect with me on Instagram and find out what’s cooking in Ciao Chow Linda’s kitchen each day (and more)

Clams On The Grill

1 bag of littleneck clams (there were about 40 in the bag)

1 slice of pancetta 1/2" thick, cut into small pieces

2 tablespoons olive oil

2 tablespoons butter

six cloves of minced garlic

1/4 cup dry white wine

salt

minced parsley, plus other herbs to your liking (I used sprigs of thyme and marjoram)

Place the olive oil and pancetta in the disposable pan and cook over high heat until the pancetta loses its fat and starts to crisp. Add the clams, the garlic, salt, wine, butter and herbs, leaving some minced parsley to sprinkle over the top at the end.

Cover the lid of the grill, opening the lid occasionally to stir once or twice. When the clams are all open and have cooked for a few minutes, they are done. It may take 10 to fifteen or twenty minutes.

Serve with grilled bread, smeared with olive oil and salt.


Thursday, October 3, 2024

Romano Beans, Potatoes and Pancetta


If you've never tried Romano beans, you have been missing out on one of best vegetables ever. They're sometimes hard to find, and are available for only a short time in late summer/early fall, so if you see these in your local supermarkets or farmer's market, grab a bunch.
They're common in Italian households, but not so much in the U.S., unless you come from the South, as does my friend Emily, who said they are called pole beans there. Her husband Tom curates a beautiful garden in Hopewell, NJ, growing all kinds of fabulous produce, including agretti, practically unheard of here in the U.S. but another of my favorite seasonal vegetables in Italy. He even sells to a few high end restaurants, and I am occasionally the beneficiary of some of their goodness, including this latest batch of Romano beans.
These beans were simply prepared with small white potatoes, a little pancetta, some garlic, olive oil, salt and pepper. Be sure to use quality ingredients since when a recipe is so simple as this, each ingredient really needs to shine.


Start out by boiling the potatoes and about ten minutes before they're done, add the beans. Cook until the beans and potatoes are soft through and through. This is not the time for crunchy beans. They need to be soft enough to smush a bit with a potato masher. Then drain everything in a colander.


Meanwhile, saute some pancetta and shallots (Tom also gave me some Belgian shallots he grew) until the pancetta has rendered its fat and the shallots are wilted. Add the garlic and let it soften too.
Add the potatoes and beans, salt and pepper, and "smush" everything together with a potato masher or a sturdy fork. Add a little more olive oil if you like (and I like).

Serve with a nice glass of wine. This was dinner for me and my husband, and was very filling, but you might like to add a salad if it's not enough for you.


Romano Beans, Potatoes and Pancetta

(For two people)
Ingredients:
about 8-10 tiny white potatoes
about 1/3 pound Romano beans
1 thick slice of pancetta (about 1/2" slice)
4 tablespoons of extra virgin olive oil
1 shallot, finely diced
1 large or 2 small cloves of garlic, minced
salt, pepper

Instructions:
Boil the potatoes in water until almost cooked through. Add the beans to the water (after de-stringing them if they are stringy) and boil until they are cooked through - about 8-10 minutes. Drain everything.
Place the pancetta in a pan with 1 tablespoon of the olive oil. Cook until the fat starts to render, then add the shallot and cook until wilted. Add the garlic and cook until wilted, then put the potatoes and beans into the pan, season with salt and pepper. Smush the potatoes and beans somewhat using a potato masher or sturdy fork. Add more olive oil and mix everything well. 


Wednesday, August 21, 2019

Spinach linguine with clams, corn and pancetta

This dish has got to be my favorite thing that I made all summer. I know it’s a long blog post, and it involves making your own pasta, but the end result is worth it. If you want to eat something divine and be crowned with a halo from your family and friends, you have to make it. But — and this is a big but — only if you live in a place where corn and clams are in season right now. Don’t try this with canned corn or canned clams or I will get the “freshness police” after you. The pancetta is crucial too, but I know some of you may not have access to it. A decent substitute is slab bacon, but it will have a smoky taste, whereas pancetta does not. I’ll give you a pass and say you can use boxed pasta but ONLY if you don’t have a pasta machine. Otherwise, you must, must, must make your own pasta. I’ve made it different ways, from rolling it out by hand, to using the automated KitchenAid attachment, to using my nearly 50 years-old crank machine that you’ll see in the photos below. I’ve made plain pasta many times (tutorial here) and beet-flavored pasta too, but this was my first time making homemade spinach pasta and it was a game changer. What a toothy and delicious texture and flavor, not to mention the vibrant color. I made this dish earlier in the month with store bought pappardelle and everyone loved it, but that’s because they hadn’t yet eaten it with the homemade spinach pasta. Excuse me for tooting my own horn, but it’s no exaggeration to say the homemade pasta version was sublime, compared to just delicious with the store bought pasta. So I may be making spinach pasta on a regular basis. Or at least until my pants zipper gets harder to close. I know my husband won’t complain.

I used a 10-ounce box of frozen spinach. Don’t cook it. Just let it thaw on the counter, and squeeze the bejesus out of it. Using your hands, make sure you squeeze every bit of water from the spinach you can. Then press it between paper towels to get any other moisture out. Place the spinach in the food processor with the eggs and give it a whir. Then add the flour and a pinch of salt until it forms a ball. (Your food processor is not going to be happy and will probably start “dancing” on the counter.) Stop it at this point and put it on the counter.

It will still be a bit sticky, so knead in more flour. Use 00 flour from Italy if you can find it (it’s easily available online.)

After a few minutes, it will develop a smoother texture. Cover it with a bowl, or in plastic wrap and let it sit for about a half hour, to let the glutens rest.

Then cut off a piece, squish it with the palm of your hands, flour both sides a little, and pass it through the pasta machine, starting with the largest opening and going down a few notches (but not to the thinnest. I stopped at two numbers before the last on the dial).

Then take the long piece of pasta, flour it a bit on both sides again, and pass it through the linguine cutter (or the smaller spaghetti size if you prefer.)

You could make “nests” with pasta and place them flat on linen or paper towels, or hang the pasta from clothes hangers, as my kitchen helper did for me. (Smile, you’re on Ciao Chow Linda!)


OK, now that the pasta making is out of the way, start on the sauce. Scrape the corn from the cobs, mince the garlic, pancetta and herbs and set aside while you prepare the clams. I used littleneck clams, the smallest available where I live. If this were Italy, I’d be using the even smaller vongole. If only!

After rinsing and scrubbing the clams, place them in a pan, turn the heat to high and cover.


If you don’t have a cover large enough, use another pan that’s the same size to cover the bottom pan.

Steam the clams in their own juices and remove immediately when they start to open. It will take only a minute or two once the pan is hot. The clams won’t be fully cooked and that’s fine. You’ll finish cooking them later. The reason to cook them partially is to open them up and pluck some of the clams out of the shell to mix with the pasta, and you also want to strain the liquid from the clams to use in the sauce. There was still a lot of sandy sediment, even after scrubbing the clams before cooking. Use a coffee filter, or a paper napkin on top of a sieve to strain out the sediment. I cooked the clams in two batches to give them enough room to open. Don’t worry that they’ll get cold. You’re going to heat them and cook them further with the pasta later.

After removing the clams, and straining the liquid, I used the same saucepan to cook the pancetta (you can see the splatter from the clams on the sides).

When the pancetta is nearly crispy, add the garlic and the clams (both the ones you plucked out of the shell and the ones in the shell.)  Cook for a minute or two to soften the garlic. Add the olive oil, the white wine, the reserved clam juice (it should be about 1/2 cup) and season with salt and pepper. I also added a tablespoon of butter (because butter always makes everything taste better.)

Meanwhile cook the pasta. If it’s freshly homemade, it won’t take longer than two or three minutes. Save about a cup of that pasta water before you drain the pasta.

After draining the pasta and getting rid of the water (except for that cup you saved), put the pasta back in the pot and dump all the clams, pancetta and raw corn into the pot. Mix everything really well, adding some of the pasta water, and a bit more olive oil to make sure you have a bit of  “sauce.”

It shouldn’t be drowning in the sauce, but just enough to moisten the pasta and keep it from sticking to itself. Add in the minced parsley and basil just before turning into a platter or bowl.

Serve immediately and receive your kudos. This recipe makes enough for four to six people, depending on appetites. My husband and I each had two servings, and the family of three living next door to us were happy to consume the rest.

Buon Appetito!

Click here to connect with me on Instagram and find out what’s cooking in Ciao Chow Linda’s kitchen each day (and more)

Spinach linguine with clams, corn and pancetta
Author: Ciao Chow Linda
Serves: 4-6 people
Ingredients
  • FOR THE PASTA:
  • 1 10-ounce box frozen spinach
  • 2 cups 00 flour
  • 2 eggs
  • pinch of salt
  • FOR THE SAUCE:
  • 3-4 dozen clams
  • 1/4 pound pancetta, cut into small bits
  • 4 garlic cloves
  • 1/4 cup white wine
  • 1/4 cup olive oil
  • 1 tablespoon butter
  • 1/2 cup reserved clam juice
  • 2 ears of fresh corn, stripped off the cob
  • pasta water
  • black pepper
  • a generous handful of minced parsley
  • a generous handful of minced basil
Instructions
  1. FOR THE PASTA:
  2. Drain the spinach thoroughly, squeezing out all the water you can with your hands.
  3. Then press it with paper towels to get out any remaining water.
  4. Place the spinach and the two eggs into the food processor to break down the spinach.
  5. Start adding the flour.
  6. You may need as little as a cup and a quarter of flour.
  7. It’s easy to add more flour later, but much harder to work the dough if you place too much flour into the food processor.
  8. Add just enough flour and process until the dough comes together into a ball.
  9. It will be sticky.
  10. Place the dough onto a wooden work surface, add more flour until the stickiness disappears and the dough seems more “homogenized” and softer.
  11. Cover the dough with plastic wrap or a bowl and let it sit for at least 1/2 hour.
  12. FOR THE SAUCE:
  13. Place the clams in one layer a pan over high heat and cover.
  14. Cook for a couple of minutes or until the clams have opened.
  15. Once open, set aside on a plate and repeat with remaining clams, draining the liquid from the clams.
  16. Strain the liquid from the clams to remove any sediment.
  17. Remove half the clams from the shells but leave the rest in the shell.
  18. Set the clams aside and the liquid aside.
  19. In the same pan, saute the pancetta until nearly crisp.
  20. Add the garlic and cook until softened.
  21. Place the clams (the ones in the shell and the ones out of the shell) in the pan and add the white wine, butter, olive oil, clam juice and black pepper.
  22. Meanwhile, cook the pasta and drain, but reserve about a cup of the pasta water.
  23. Put the pasta back into the large pot and dump the clams and pancetta over the pasta, adding the raw corn as well.
  24. Add the parsley and basil and mix all together.
  25. If it seems too dry, add some of the pasta water and swirl around a bit more.
  26. If the liquid seems too thin, add a bit more butter or olive oil.
  27. Serve immediately,.


Monday, August 7, 2017

Summer Veggie Pizza


There are so many reasons I love summer, including the delicious sweet corn that grows prolifically here in New Jersey. We've been eating it at least once a week, just boiled in water for three or four minutes. 


With one of the leftover ears, I was inspired to make a summer pizza using more terrific Jersey produce - (we are the "Garden State" after all!) after seeing something similar on my friend Stacey's blog. 


The first time I tried it, I also added some zucchini and a bit of anchovy - just enough to give it a zing. 


I can just hear those of you who are anchovy averse turning off at this point. But wait - the second time I made it, I added small cherry tomatoes and pancetta in addition to the corn and zucchini. In both cases, I used fresh oregano and basil (and mozzarella cheese of course).

For all you vegetarians, you can skip the anchovies or the pancetta and it will still be delicious, provided you have sweet corn in season.


Although I used a perforated pizza pan to bake the pizzas at a high temperature, the bottom crust just wasn't getting browned enough. So after about 12 minutes at 475 degrees, I slipped the pizza off the pan and slid it directly onto the lowest of the oven's wire racks for a few more minutes. Keep a close eye on it so it doesn't burn on the bottom.


It worked beautifully and created a crispy, crunchy bottom crust, without burning the toppings.


So take your pick and choose either surf (anchovies):


or turf (pancetta). In either case, you'll want to try this corn pizza while fresh corn is at its peak.


Want more Ciao Chow Linda? Check out my Instagram page here to see more of what I'm cooking up each day. 


You can also connect with Ciao Chow Linda here on Facebook, here for Pinterest or  here for Twitter.


Summer Veggie Pizza


pizza dough (your own recipe or store-bought)


2 cups grated mozzarella cheese (or several balls of fresh mozzarella, sliced)


1 ear of corn, kernels scraped (either raw or leftover boiled)


1 small zucchini (or half of a large zucchini), sliced thinly and salted


either - 2 anchovies in oil or 6 thin slices of pancetta, fried until crispy 


8-10 red or yellow cherry tomatoes, cut in half


fresh basil


fresh oregano


black pepper 


olive oil 


Whether using your own homemade dough, or store-purchased dough, put it in a bowl smeared with oil and let it come to room temperature and rest for about an hour. Punch it down and spread it out over a large perforated pizza pan. 


Scatter the mozzarella over the dough, then place the zucchini and corn kernels and/or cherry tomatoes on top .


If using anchovies, lay them in a few places across the pizza. Do the same if using the pancetta.


Sprinkle with the fresh herbs and black pepper and a drizzle of olive oil.


Bake at 475 degrees for 10-12 minutes. If the dough is not browning on the bottom, slide the pizza from the pan directly onto the lowest rack of the oven. Let it bake for another 3-5 minutes, checking to make sure it doesn't burn.


Bookmark and Share


Wednesday, July 20, 2011

Bucatini All'Amatriciana


After that last post on how pecorino cheese is made, it didn't seem fair to leave you without a recipe, and I couldn't think of any recipe more associated with pecorino cheese than this pasta dish.  The recipe is frought with controversy - Romans claim it as their own (it's on the menu of nearly all Roman eateries), but it originated in Amatrice, a town that was once in Abruzzo, but that was annexed in 1927 to the region of Lazio, where Rome is located.


Romans prefer to add onions to the sauce, something that's heresy in Amatrice. Some recipes call for pancetta, but purists will use only guanciale (pork jowls).  Because the ingredients are so few, each one makes a crucial contribution to the flavor. Pancetta has less fat than guanciale and comes from the midsection of the pig (pancia means belly), while guanciale comes from the cheeks (guancia means cheek). The flavor from the fat that's rendered becomes an integral part of the dish, and while pancetta fat is good, guanciale fat is better. That said, if you live in an area where guanciale is impossible to find, I'll give you a perdonanza for using pancetta.


By the way, you'll also see pasta "alla gricia" on nearly every Roman menu too. It's the same recipe as pasta "all'amatriciana" but without the tomatoes.


The traditional pasta used is bucatini - a thick pasta so named because of the hole (buco) down the center of each strand. But it's also not unusual to see the dish served with rigatoni, paccheri or penne either.


One thing you should not substitute however, is the cheese you grate on top. It HAS to be pecorino cheese, not parmigiano, not grana padano. Years ago, I ordered this dish in one of the hill towns outside of Rome, but asked the waiter to bring me parmigiano instead of the pecorino I later learned was the classic topping. Big mistake. "Parmigiano?" the waiter said incredulously to my request, as if I'd just asked him to dance naked in the Roman Forum.  "Sei sicura che vuoi parmigiano?" he asked. "Yes, I'm sure I want parmigiano," I replied. And the service went downhill from there. Something about "When in Rome...." came to mind at that point and from then on, I have always ordered bucatini all'amatriciana with pecorino.


 So please, take liberties and use onions if you like, switch up the fat and buy pancetta if you must, go non-traditional and cook up conchiglie pasta if need be, but don't sprinkle anything but real pecorino on top!


 Bucatini All'Amatriciana


printable recipe here 


Serves four to six, depending on appetites.


1/4 pound of guanciale, cut into lardons

1 28-ounce can tomatoes, preferably San Marzano

1/4 tsp. (or more if you like) red pepper flakes

abundant pecorino cheese, grated


1 pound bucatini pasta


Place the lardons of guanciale in a saucepan on medium heat and slowly let the fat render. The lardons should not crisp up, but should remain a little chewy. Remove the lardons with a slotted spoon, and add the tomatoes, breaking up with your hands or with a spoon. Put the lardons back in, add the red pepper flakes and cook together with the tomatoes, on a low simmer, for about 1/2 hour.


Meantime, when the sauce has cooked about 15 minutes, get the water boiling and throw in the pasta. Bucatini takes a while to cook, depending on the brand. Cook until a little firmer than al dente, then drain the pasta with a slotted spoon or fork and place into the pan with the sauce. Don't worry if a little pasta water makes its way into the sauce. Finish cooking the pasta in the sauce for the last couple of minutes. Serve immediately while it's hot, with ample pecorino cheese grated on top.


Bookmark and Share


Bucatini